DigiDoc-It™ Imaging System Set-Up and Operating Instructions UVP, LLC 2066 W. 11th Street Upland, CA 91786 Phone: (800) 452-6788 / (909) 946-3197 Fax: (909) 946-3597 Ultra-Violet Products Ltd. Unit 1, Trinity Hall Farm Estate Nuffield Road, Cambridge CB4 1TG UK Phone: +44(0)1223-420022 Fax: +44(0)1223-420561 Web Site: www.uvp.com 81-0218-01 Rev.
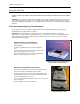
DigiDoc-It Imaging System 2 Introduction The DigiDoc-It Imaging System is a basic gel imaging system designed to fit over any of UVP’s optional High Performance UV Transilluminators or optional Benchtop UV Transilluminator and drawer combination. The system combines: Hood enclosure DigiCam 110 digital color camera, Ethidium Bromide (EtBr) Filter Doc-It®LS Acquisition Software (refer to software manual for installation) UV transilluminator or drawer assembly (optional).
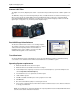
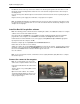
DigiDoc-It Imaging System 2 Camera & UV Filter The digital color camera (DigiCam photo below – actual camera may be different) includes a built-in optical zoom lens. The EtBr filter, orange-colored UV blocking band pass filter, is installed inside the hood at the UVP factory. The filter is used to absorb UV and IR radiation from the transilluminator and to enhance the orange/pink bands generated by Ethidium Bromide stained gels.
DigiDoc-It Imaging System 3 System Set-Up DO NOT ATTEMPT TO CONNECT ANY WIRING WHILE THE EQUIPMENT IS CONNECTED TO ANY POWER SUPPLY. CAUTION: Do not install the system in places with high moisture, dust or high temperature. Do not use any oil or petroleum based cleaner for the cabinet. Use only mild soap or detergent solution for cleaning. Ensure that the system is turned OFF during cleaning. Keep the equipment away from motors or other large magnetic equipment apparatus.
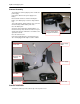
DigiDoc-It Imaging System 4 Camera Assembly To assemble the camera, plug the power cord into the power supply. Connect the cable from the power supply to the battery. Ensure that the camera is off before inserting the battery. (The battery may need to be charged before use) To insert the battery, slide the battery cover open and insert the battery until the battery lock clicks. Close the battery door. A memory card is required for capturing images.
DigiDoc-It Imaging System 5 Position the camera on the top of the hood so that the lens fits through the gasket seal. Insert the hex screw through the camera mounting bracket and turn the hex screw clockwise to tighten it into the camera’s tripod mounting threads. Pass the camera power cable through the round notched hole from the back the camera cap and plug into the camera. Plug the camera’s power supply into a wall outlet or surge-protector receptacle.
DigiDoc-It Imaging System 6 System Operation Camera Operation It is recommended that the camera be turned off when not in use. To use the camera, open the camera cap on top of the hood. Set both camera mode dial buttons to Auto to turn on the camera. Close and secure the camera cap on the hood. If the camera is off when starting Doc-It software, a message stating that the application cannot find a camera will appear. To remedy this, turn the camera on and click Retry.
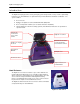
DigiDoc-It Imaging System 7 Thermal Paper, 4 rolls (800 images) Thermal paper, 16 rolls (3200 images) Thermal Paper, 40 rolls (8000 images) UV to White Light Converter Plate (21x26cm) UV to White Light Converter Plate (20x40cm) Visi-Blue Converter Plate (21x26cm) Visi-Blue Converter Plate (20x40cm) Filter, 50mm, sq., SYBR Green and EGFP Filter, 50mm, sq.