GelDoc-Ite Imager Installation and User Instructions UVP, LLC 2066 W. 11th Street Upland, CA 91786 Phone: (800) 452-6788 Fax: (909) 946-3597 Ultra-Violet Products Ltd. Unit 1, Trinity Hall Farm Estate Nuffield Road, Cambridge CB4 1TG UK Phone: +44(0)1223-420022 Fax: +44(0)1223-420561 Web Site: www.uvp.
e GelDoc-It Imager 2 Introduction e The GelDoc-It® Imager enables easy, efficient and economical documentation and analysis of fluorescent ® and non-fluorescent gels, membranes, film, plates and assays. Use UVP’s VisionWorks LS Acquisition and Analysis software to capture images, to save images for later quantitative analysis, or for image enhancement for publication purposes.
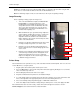
e GelDoc-It Imager 3 System Components Refer to the packing slip and pictured components for specific parts and components included with the system.
e GelDoc-It Imager 4 Camera and Lens e The GelDoc-It Imager is equipped with a FluorCam 220 camera, a scientific-grade monochrome CCD camera with a resolution of 1.3 megapixels (1280x1024). The FluorCam 220 utilizes a USB 2.0 PC connection and is equipped with an 8-48mm optical zoom lens. All camera settings are factory pre-set for optimum performance when viewing gels, films or membranes under low light level conditions.
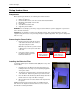
e GelDoc-It Imager 5 Optional Equipment UVP offers a variety of optional equipment to support the needs of varying laboratory environments. Refer to “Replacement Parts and Accessories” at the end of this manual for optional equipment part numbers. Thermal Printer The thermal printer provides archive quality, 256 grayscale prints and five optional cost-effective print sizes.
e GelDoc-It Imager 6 Setup Instructions Components e When unpacking the GelDoc-It , the following items will be included: 1. 2. 3. 4. 5. 6. e GelDoc-It darkroom Camera kit with camera, zoom lens, bracket and related hardware Ethidium bromide (EtBr) emission filter Power cable VisionWorksLS software disk Supporting documentation WARNING: Do not attempt to perform any setup procedures while the system is plugged in or powered on unless otherwise instructed.
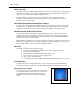
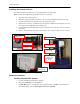
e GelDoc-It Imager 7 Installing the Camera and Lens The camera and zoom lens will arrive as an assembled unit from the UVP factory. Note: The zoom lens shipped may appear different than the one pictured. 1. Remove the lens cap from the lens. 2. Attach the step up ring and diopter to the lens. The step up ring and diopter will only fit one way. 3. Using the four thumb screws provided, secure the bracket to the base. 4. Slide the camera and lens assembly into the camera bracket.
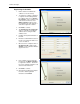
e GelDoc-It Imager Registering the Software 1. Double click the VisionWorksLS software icon on the desktop. 2. To activate the software, registration is required. To immediately activate the software online, choose On-theFly activation. If the computer is not connected to the Internet, select Offline activation and proceed to the following page of this manual, or call UVP to register the software. 3. Click Next to continue. 4.
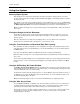
e GelDoc-It Imager 9 Using the System Powering Up the System e Once plugged in to a surge-protected wall outlet, the GelDoc-It Imager is always powered on. Power to specific system components, including epi and transillumination lighting, is controlled by switches located on the front of the unit. The switches on the front of the unit indicate when the system’s illumination sources are on.
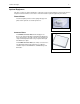
e GelDoc-It Imager 10 Caution: To avoid direct exposure to ultraviolet light, always use protective skin wear when using the Side Access Doors to reach inside the darkroom when the UV transilluminator is on. Note: For ideal image capture results, close the Side Access doors prior to capturing an image. Image Focusing Prior to capturing an image, prepare the image focus: 1. Turn on the transilluminator and place the Fluorescent Focus Target (see “System Components”) on the transilluminator surface.
e GelDoc-It Imager 11 Service Procedures Return Procedure A Returned Goods Authorization (RGA) number must be obtained from UVP Customer Service prior to returning any product. Replacement Parts and Accessories e To order accessories or replacement parts for the GelDoc-It Imager, contact UVP’s offices. Part Description Part Number Fuses: Fuse, 3.2A (for Darkroom) Fuse, 2A (for 115V Transilluminators) Fuse, 2A (for 230V Transilluminators) 56-0002-05 (Qty. 2 Required) 56-0002-01 (Qty.
e GelDoc-It Imager 12 Transilluminator Will Not Turn On 1. Make sure to turn ON the transilluminator power switch and that the switch is glowing green. The switch is located on the front of the transilluminator, directly below the darkroom door. If the switch does not glow green, refer to “No Power to the Darkroom or Transilluminator” above. 2. Ensure that the darkroom cabinet’s door is completely closed.