ENGLISH 2 WIRE INTERCOM SYSTEM USER MANUAL Please read this manual carefully before using the product, and keep it well.
1.
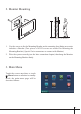
145~160 cm 2. Monitor Mounting 1. Use the screws to fix the Mounting Bracket on the mounting box.(fitting accesories includes a Bracket (Two pieces of 4X25 screws are needed for fastening the Mounting Bracket), Special 2 wire connectors to connect with Monitor) 2. Wire the system correctly(see the later connection chapter) then hang the Monitor on the Mounting Bracket firmly. 3.
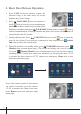
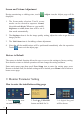
. Basic Door Release Operation 1. Press CALL button on outdoor station, the Monitor rings, at the same time, the screen displays the visitors' image. DS-1 00:30 2. Press TALK/MON Button on monitor or touch icon on screen, you can communicate hands free with the visitor for 90 seconds.After finishing communication,press TALK/MON button again or touch icon to end the communication. If nobody answers the phone, the screen will be turned off automatically after 30 seconds. 3.
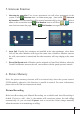
. Intercom Function 1. Intercom by namelist: User in one apartment can call other apartments in the Intercom item on main menu page , then touch Intercom system. Touch by Namelist icon (the namelist will be created automatically by the system). Select a Dial Number icon to call.Press name on the screen then touch / icon to Dial Number icon again to redial) enter last/next name list page. (Touch [ 00 ] [ 01 ] Jim. Zhang Calo. Liu [ 02 ] Jacko. Zhang [ 03 ] [ 04 ] [ 05 ] Philips. Chen Hebe. Zhang Tony.
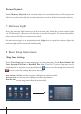
Picture Playback Touch Memory Playback icon on main menu, the recorded pictures will be played on full screen, please note that the recorded pictures can not be deleted on monitor directly. 7. Staircase Light Note: the staircase light function will be activated only when the system connect light via SC6M module, otherwise, this function is unvalid in normal. For more information, please refer to SC6M user instruction in detail.
Ring Volume and Night Ring Volume Setting You can set a ring volume for day time and night time individually, 6:00 AM~18:00 PM is the day time and 18:00 PM~6:00 AM is the night time by default,if you don't want to be disturbed at night,you can set the night ring volume to 0. Touch User Setup item on main menu page to enter setup page,then touch Ring Volume or Night Ring Volume item. then touch / icon to increase / decrease the value; After finish, touch icon to save and exit.
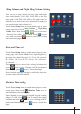
Screen and Volume Adjustment During monitoring or talking state, touch displayed. Adjust icon,the Adjust page will be 1. The Scene mode selection: Total 4 screen modes can be selected in sequence: Normal, User, Soft and Bright. Whenever you modify Brightness or colour, Scene item will be set to User mode automatically. 2. The Brightness item is for the image quality setting, adjust the value to get the best image you like. 3. The Talk Volume item is for talking volume adjustment. 4.
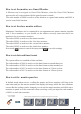
How to set the monitor as a Guard Monitor A Monitor can be assigned as Guard Unit Monitor; when the Guard Unit Monitor answers the call, conversation with the guard person is started.. The code number of 8004 is used to set the monitor as a guard unit monitor and 8005 is used to cancel this function. How to set the slave monitor address Maximum 4 monitors can be connected in one apartment,one master monitor together with 3 slave monitors, so you should set the address correctly.
How to set the unlock parameter Unlock mode: There are two unlock modes: 1.power-on- to-unlock type:unlock mode=0(by default) 2.power-off-to-unlock:unlock mode=1. The code number of 8010 is used to set the unlock mode to 0 The code number of 8011 is used to set the unlock mode to 1 Unlock time: The unlock time can be changed by yourself at any time.it can be set from 1 to 9 seconds. The code number from 8021 to 8029 are used to set the unlock time to 1~ 9 seconds.
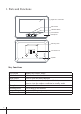
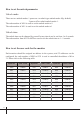
10. Specification ●● Power supply for indoor monitor: DC 24V ●● Power consumption: Standby 38.4mA; Working 320mA ●● Monitor screen: 7 Inch digital color LCD ●● Display Resolutions: 800*3(R, G, B) x 480 pixels ●● Video signal: 1Vp-p, 75Ω, CCIR standard ●● Wiring: 2 wires, non-polarity ●● Dimension: 139(H)×212(W)×15(D)mm 11. Precautions 1) All components should be protected from violence vibration. And not allow to be impacted, knocked and dropped.
DT-ENG-37TD7-V1 The design and specifications can be changed without notice to the user. Right to interpret and copyright of this manual are preserved.