
Owner manual


3
UNPACKING & ASSEMBLY
The Auricle Preamplifier is shipped with the vacuum tubes installed.
Should the need ever arise to replace the tubes, follow all of the safety directions
contained in the beginning of this manual.
INSTALLATION
1)Provide adequate ventilation.
2)Do not operate on carpet or any other surface that might block air flow.
3)The chassis will become warm in normal use.
4)Do not allow the chassis to touch any metal parts, such as the frame of an equipment
rack. This might create a parallel ground path that could degrade the sound of your
system.
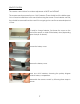
5)All connections are via single ended RCA jacks. Connect line level inputs (CD, Tuner,
Tape, etc.) to the appropriate RCA input jacks on the rear panel (L1, L2, L3, or Tape
Play). Note: with the exception of Phono all inputs are "line level". The Tape Out jacks
may be used to feed a signal to a tape or disc recorder.
6)Connect phono cables from a MM phono cartridge to the inputs labeled "Phono".
Connect the ground wire(s) from the turntable(s) or phono cable(s) to the "Ground"
terminal provided on the rear panel.
7)Connect the AC cable from the wall outlet to the preamplifier. Be sure to insert the
connector properly and fully.
8)Operate only from the power supply voltage labeled on the rear panel (100, 120,
220, or 240 volts AC). For best performance, try to route the power cord away from
signal cables.
9)Pay close attention to power quality, and be aware that different power cords can
alter the sound. The backlit meter shows variation in power line voltage as reflected
to the audio circuitry.