
Owner manual


8
V1
V2
V3
V4
V5
V6
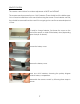
REPLACEMENT OF LOW LEVEL TUBES
We strongly recommend that you use only tubes specifically selected and tested by VAC
for this application.
Before replacing tubes, all power must be turned off and all cables disconnected. Allow
15 minutes for the tubes to cool down before removing the top cover.
Install new tubes of the appropriate types firmly in their sockets, noting the location of holes
in the socket and pins of the tubes, taking care to make sure that pin pattern corresponds
to holes in tube socket. Replace the cover and secure it will all of the screws before
connecting and/or operating the preamplifier.
In the event that trouble is encountered, check all signal, speaker and power connections.
If the problem persists, follow all safety precautions stated earlier in this section, and check
that all tubes are correctly seated in their sockets. If possible, try another tube. If the
problem persists, please consult your VAC dealer or contact the factory directly.
Tubes are like the tires on a car; they will eventually need replacement. Murphy's Law states
that a tube will probably fail right at the start of a long holiday weekend. Therefore, many
audiophiles keep a spare tube of each type on hand, just in case!
VAC can test tubes for concerned customers.
V1 = 12AX7 low noise*
V2 = 12AX7 low noise*
V3 = 12AX7
V4 = 12AU7
V5 = 12AX7
V6 = 12AX7
* low noise not
necessarily required,
but helpful with
low output phono
cartridges