Wet/Dry Vacuums Operator’s Manual Wall Mountable Wet/Dry Vacuum Model No.VWM510 FOR YOUR SAFETY Read and understand this manual before use Keep this manual for future reference www.vacmaster.com Cleva North America 44 Parkway Commons, Greer, SC 29650 VW01BZ.20.60.
TABLE OF CONTENTS SECTION Page Warranty…………………………………………………………………………………………… Safety Instructions and Warnings………………………………………………………………. Double Insulation Instructions....……………………………………………………………… Extension Cord……………………………………………………………………………………. Unpacking and Checking Carton Contents………….……………………..………………….. General Assembly Instructions…………………………………………………………………..
SAFETY INSTRUCTIONS & WARNINGS IMPORTANT SAFETY INSTRUCTIONS Read and understand all instructions before using this vacuum Read and understand this owner’s manual and all labels on the Wet/Dry Vacuum cleaner before operating. Safety is a combination of common sense, staying alert and knowing how your vacuum works. Use this Wet/Dry Vac only as described in this manual. To reduce the risk of personal injury or damage to your Wet/Dry Vac, use only Vacmaster™ recommended accessories. For Household Use Only.
DOUBLE INSULATION INSTRUCTIONS This Wet/Dry Vac is double-insulated, eliminating the need for a separate grounding system. Use only identical replacements parts. Read the instructions for Servicing Double-Insulated Wet/Dry Vacs before servicing. Use this Wet/Dry Vac as described in this manual. Observe the following warnings that appear on the motor housing of your Wet/Dry Vac. DOUBLE INSULATED - GROUNDING NOT REQUIRED - WHEN SERVICING USE ONLY IDENTICAL REPLACEMENT PARTS.
UNPACKING AND CHECKING CARTON CONTENTS Remove entire contents of carton. Check each item against the carton contents list. Carton contents lists Key A B C D E F G H I J K L M N O P Q R Description………………... QTY Vac Assembly…………....... Hose Holding Rod ……….. Mounting Rack ……………. 11-Foot Hose………………. 10-Foot Flex Hose………… Utility Nozzle……………….. Crevice Tool ………………. Round Dusting Brush …….. Extension Wands ……........ Car Nozzle ………………… Cartridge Filter…………….. Filter Retainer……………… Air/Noise Diffuser ………...
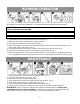
GENERAL ASSEMBLY INSTRUCTIONS WARNING: DO NOT PLUG IN POWER CORD TO POWER OUTLET, MAKE SURE PLUG IS DISCONNECTED BEFORE ASSEMBLING THE WET/DRY VAC UNPACKING YOUR WET/DRY VACUUM & GENERAL ASSEMBLY 1. Verify that the power cord is disconnected from the outlet. (fig. 1) 2. Undo the latches. (fig. 2) 3. Lift the power head off of the container. (fig. 3) 4. Remove the contents from inside the container, make sure you have all contents as listed on page 5. (fig. 4) 5.
6. Insert the hose holding rod into the two holes located on the top of the mounting rack. Make sure the bend of the rod is directed away from the wall. (fig. 6) 7. Select a location on a wall stud that is not more than 20 feet away from an electrical outlet. 8. Align the three screw holes so that they are over a stud. Make sure the rack is level and mark the whole locations. Make a 1/8-inch diameter pilot hole in each marked location.
DRY-VACUUM OPERATION DRY VACUUMING WARNING: BE SURE TO READ, UNDERSTAND, AND APPLY INFORMATION, ENTITLED ‘SAFETY INSTRUCTIONS & WARNINGS’. DO NOT VACUUM IN AREAS WITH FLAMMABLE GASES, VAPORS, OR EXPLOSIVE DUSTS IN THE AIR. FLAMMABLE GASES OR VAPORS INCLUDE BUT ARE NOT LIMITED TO; LIGHTER FLUID, SOLVENT TYPE CLEANERS, OIL-BASE PAINTS, GASOLINE, ALCOHOL OR AEROSOL SPRAYS. EXPLOSIVE DUSTS INCLUDE BUT ARE NOT LIMITED TO; COAL, MAGNESIUM, GRAIN OR GUN POWDER.
LIQUID VACUUM OPERATION LIQUID VACUUMING WARNING: BE SURE TO READ, UNDERSTAND, AND APPLY INFORMATION, ENTITLED ‘SAFETY INSTRUCTIONS & WARNINGS’. DO NOT VACUUM IN AREAS WITH FLAMMABLE GASES, VAPORS, OR EXPLOSIVE DUSTS IN THE AIR. FLAMMABLE GASES OR VAPORS INCLUDE BUT ARE NOT LIMITED TO; LIGHTER FLUID, SOLVENT TYPE CLEANERS, OIL-BASE PAINTS, GASOLINE, ALCOHOL OR AEROSOL SPRAYS. EXPLOSIVE DUSTS INCLUDE BUT ARE NOT LIMITED TO; COAL, MAGNESIUM, GRAIN OR GUN POWDER.
BLOWING OPERATION This Wet/Dry Vac has blowing capabilities. To use the blower feature follow the instructions listed. WARNING: ALWAYS WEAR SAFETY GOGGLES COMPLYING WITH ANSI Z87.1 (OR IN CANADA, CSAZ94.3) BEFORE USING BLOWER. WARNING: KEEP BYSTANDERS CLEAR FROM BLOWING DEBRIS. WARNING: WEAR A DUST MASK IF BLOWING CREATES DUST THAT MIGHT BE INHALED. 1. 2. 3. 4. Verify that the power cord is disconnected from the outlet. (fig. 1) Make sure the container is empty before using as a blower.
NOTICE! The filters included are made of high quality materials designed to stop small dust particles. The cartridge filter should be used for dry pick-up and small amounts of liquids. A dry cartridge filter is necessary to pick up dust. If the cartridge filter is wet, it will clog quickly and be difficult to clean. Handle the filter carefully when removing it for cleaning and replacing it. Check the filters for tears or small holes, a small hole can let dust pass through and out of the cleaner.
RESETTING THE REMOTE CONTROL Resetting The Remote Control 1. Set the power switch to remote control position “ ”. (fig. 1) 2. Press the RESET button on the side of the power head with a pen tip until the indicator lights up. (fig. 2) 3. Within the 15 seconds, press and hold the “ON” or “OFF” button on the remote control. If you didn’t press and hold the “ON” or “OFF” button within the 15 seconds, it will cancel this resetting. (fig. 3) 4.
TROUBLESHOOTING WARNING: TO REDUCE THE RISK OF ELECTRIC SHOCK-UNPLUG BEFORE TROUBLESHOOTING Symptom Possible Causes Corrective Action Vacuum will not operate 1) No power supply. 1) Check power supply – cord, breakers, fuses. 2) Unplug and check the power cord. If damaged, have it repaired by a professional. 3) Empty container. 4) Press the ON ‘I’ button on the power head. 1) Attach or replace cartridge filter. 2) Faulty power cord. 3) Container full.
EXPLODED VIEW AND PARTS LIST 14