Wet/Dry Vacuum Operator’s Manual 5 Gallon Model No. VWM510 FOR YOUR SAFETY Read and understand this manual before use. Keep this manual for future reference. Distributed By Cleva North America, Inc. 601 Regent Park Court Greenville, SC 29607 Replacement Filters & Accessories available at: Vacmaster.
TABLE OF CONTENTS SECTION PAGE Warranty........................................................................................................................................ Safety Instructions & Warnings..................................................................................................... Double Insulation Instructions....................................................................................................... Extension Cords.....................................................
CAUTION: This equipment has been tested and found to comply with the limits for a Class B digital device, pursuant to part 15 of the FCC Rules. These limits are designed to provide reasonable protection against harmful interference in a residential installation. This equipment generates uses and can radiate radio frequency energy and, if not installed and used in accordance with the instructions, may cause harmful interference to radio communications.
• Do not use this Wet/Dry Vac with a torn filter or without the filter installed except when vacuuming liquids as described in the operation section of this manual. • Do not allow to be used as a toy. Close attention is necessary when used by or near children. • To reduce the risk of injury from accidental starting, unplug power cord before changing or cleaning filter. • Do not leave Wet/Dry Vac unattended when plugged in. Unplug from outlet when not in use and before servicing.
WARNING: SERVICING OF DOUBLE-INSULATED WET/DRY VACUUM WITH A DOUBLE-INSULATED WET/DRY VACUUM, TWO SYSTEMS OF INSULATION ARE PROVIDED INSTEAD OF GROUNDING. NO GROUNDING MEANS IS PROVIDED ON A DOUBLE-INSULATED APPLIANCE, NOR SHOULD A MEANS FOR GROUNDING BE ADDED. SERVICING A DOUBLE INSULATED WET/DRY VACUUM REQUIRES EXTREME CARE AND KNOWLEDGE OF THE SYSTEM, AND SHOULD BE DONE ONLY BY QUALIFIED SERVICE PERSONNEL.
UNPACKING & CHECKING CARTON CONTENTS Remove all contents from the box. Remove the power head and take out any contents inside the collection tank. Check each item against the carton contents list. B A Carton Contents List: Key A B C D E F G H I J K L M N O P Q R C E D I F K J G H M N Q R L P O Description....................................... Qty. Vac Assembly................................... 1 Hose Storage Rod............................ 1 Mounting Rack................................
GENERAL ASSEMBLY INSTRUCTIONS WARNING: TO REDUCE THE RISK OF ELECTRIC SHOCK, DO NOT EXPOSE TO RAIN. MAKE SURE PLUG IS DISCONNECTED BEFORE ASSEMBLING THE WET/DRY VAC. UNPACKING YOUR WET/DRY VACUUM & GENERAL ASSEMBLY 1. Verify that the power cord is disconnected from the outlet. (fig. 1) 2. Undo the latches. (fig. 2) 3. Lift the power head off the collection tank. (fig. 3) 4. Remove the contents from inside the collection tank; make sure you have all contents as listed on page 6. (fig. 4) 5.
MOUNTING THE VACUUM ONTO THE RACK 1. Measure the distance from the top screw hole of the mounting rack to the closest electrical outlet and add 12 inches. This is the amount of cord needed; wind the excess power cord around the cord wrap area located on the rear of the vacuum. (fig. 8) 2. Make sure the cord is not wrapped around the vac hanging hook (A). (fig. 9) 3.
DRY VACUUM OPERATION WARNING: BE SURE TO READ, UNDERSTAND, AND APPLY, INFORMATION ENTITLED ‘SAFETY INSTRUCTIONS & WARNINGS’. DO NOT VACUUM IN AREAS WITH FLAMMABLE GASES, VAPORS, OR EXPLOSIVE DUSTS IN THE AIR. FLAMMABLE GASES OR VAPORS INCLUDE BUT ARE NOT LIMITED TO: LIGHTER FLUID, SOLVENT TYPE CLEANERS, OIL-BASED PAINTS, GASOLINE, ALCOHOL, OR AEROSOL SPRAYS. EXPLOSIVE DUSTS INCLUDE BUT ARE NOT LIMITED TO: COAL, MAGNESIUM, GRAIN, OR GUN POWDER.
LIQUID VACUUM OPERATION LIQUID VACUUMING WARNING: BE SURE TO READ, UNDERSTAND, AND APPLY, INFORMATION ENTITLED ‘SAFETY INSTRUCTIONS & WARNINGS’. DO NOT VACUUM IN AREAS WITH FLAMMABLE GASES, VAPORS, OR EXPLOSIVE DUSTS IN THE AIR. FLAMMABLE GASES OR VAPORS INCLUDE BUT ARE NOT LIMITED TO: LIGHTER FLUID, SOLVENT TYPE CLEANERS, OIL-BASED PAINTS, GASOLINE, ALCOHOL, OR AEROSOL SPRAYS. EXPLOSIVE DUSTS INCLUDE BUT ARE NOT LIMITED TO: COAL, MAGNESIUM, GRAIN, OR GUN POWDER.
BLOWER OPERATION This Wet/Dry Vac has blowing capabilities. To use the blower feature follow the instructions listed. WARNING: ALWAYS WEAR SAFETY GOGGLES COMPLYING WITH ANSI Z87.1 (OR IN CANADA, CSAZ94.3) BEFORE USING BLOWER. CAUTION: WARNING: BE INHALED. KEEP BYSTANDERS CLEAR FROM BLOWING DEBRIS. WEAR A DUST MASK IF BLOWING CREATES DUST THAT MIGHT 1. Verify that the power cord is disconnected from the outlet. (fig. 1) 2. Make sure the collection tank is empty before using as a blower. 3.
MAINTENANCE 1. Verify that the power cord is disconnected from the outlet. (fig. 1) 2. Disconnect the hose from the vacuum. (fig. 2) 3. Remove the vacuum from the mounting rack. 4. Undo the latches and remove the power head from the collection tank. (fig. 3) 5. Clear all dirt or debris from the collection tank and hose. (fig. 4) 6. Clean the foam filter by washing it with water and mild soap. (fig. 5) 7. Check the hose, attachments, and power cord to verify that they have not been damaged. 8.
INSTALLING & CLEANING CARTRIDGE FILTER Installing Cartridge Filter 1. Verify that the power cord is disconnected from the outlet. (fig. 1) 2. Remove power head and place in upside down position. 3. Install the cartridge filter over the filter cage with the flat end of the filter towards the power head. Carefully push filter in until it stops against the power head. (fig. 2 & 3) 4.
RESETTING THE REMOTE CONTROL Resetting The Remote Control 1. Set the power switch to remote control position “ ”. (fig. 1) 2. Press the RESET button on the side of the power head with a pen tip until the indicator lights up. (fig. 2) 3. Within 15 seconds, press and hold the “ON” or “OFF” button on the remote control. If you didn’t press and hold the “ON” or “OFF” button within 15 seconds, it will cancel this resetting. (fig. 3) 4. When the light blinks 3 times, this means the remote control is programmed.
TROUBLESHOOTING WARNING: TO REDUCE THE RISK OF ELECTRIC SHOCK, UNPLUG BEFORE TROUBLESHOOTING. Symptom Vacuum will not operate. Possible Causes 1) No power supply. 2) 3) 4) Dust comes from motor cover. 1) 1) Reduced efficiency and motor/ speed vibration. Remote will not operate 1) Corrective Action 1) Check power supply – cord, breakers, fuses. Faulty power cord. 2) Unplug and check the power cord. If damaged, have it repaired by a professional. Collection tank full. 3) Empty collection tank.
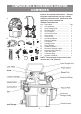
EXPLODED VIEW 16
PARTS LIST Part 1 2 2.