ALL IN ONE VEHICLE VIDEO RECORDER USER MANUAL TYPE A 2.9 mm Lens TYPE B / TYPEC 4 mm Lens 2011 OCT V1.1 TYPE C Features and operations may vary in different models.
Index A. Features .............................................................................................. 1 B. Specifications ..................................................................................... 2 C. Product Appearance.......................................................................... 3 D. Product Dimensions .......................................................................... 4 E. Installation Instructions ........................................................
A. Features 1. Suitable for all personal vehicles, taxi, buses, trucks and etc. 2. Easy to install and compact size to prevent blocking the driver's view. 3. Video record on outside driving conditions and audio record inside the vehicle simultaneously. 4. TYPE A: 2.9mm lens, apx. 120 degrees viewing angle; TYPE B/C: 4mm lens, apx. 90 degrees viewing angle. Optional: M12 lens 5. Image data is securely stored on Micro-SDHC Card, and sudden disconnection from unexpected shock is completely prevented. 6. 7.
B. Specifications Items System Chipset Sensor View Angel Voltage Operating Temp Storage Device Recording Frame Content Recording Format Microphone Time Setting Input / Output Device G-Sensor Accessories Important Notice Specification NTSC/PAL H.264 compression chipset VGA CMOS Sensor 2.9mm lens apx. 120 degrees viewing angle. (TYPE A) 4mm lens apx. 90 degrees viewing angle.
C. Product Appearance Front View TYPE A:2.9 mm lens TYPE B/TYPE C:4 mm lens Lens Lens Optional lens for selecting 2.9mm-12mm 4mm-12mm Aperture models Small aperture Large aperture Viewing angle 90-120 degree 90-105 degree Back View TYPE A / TYPE B / TYPE C Normal recording Power light MICRO SD card Side View TYPE A DC5V Emergency button AV output Features and operations may vary in different models.
TYPE B / TYPE C AV output DC5V D. Product Dimensions Emergency button unit:mm TYPE A TYPE B / TYPE C Features and operations may vary in different models.
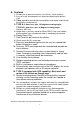
E. Installation Instructions Make the bracket facing upward. Assemble the suction discs and insert Micro SD card. Set up the machine in a proper position. Tilt to adjust the viewing angle. Connect the power cable. Plug in the cigarette adapter, Connect the power cable. The green indicator will light up. Flashing red light: recording in progress. Features and operations may vary in different models.
F. Start / Stop Recording After powering up the unit and a display device connected properly, the display will show the welcome screen as below follow up Firmware Version: XXXX. Then enter the live mode. OSD screen when Power-on ★The OSD and led lights may vary in different models. 1. Power on / Recording Wait about one minute after power-on, After machine booted-up, the red light will be flashing; the icon will appear top right of the screen, that means start recording.
3. GPS When the icon appears in the top right of LIVE screen, it means that there is no GPS or no GPS signal; when the icon appears in the top right that indicates that the GPS is working. 4.
G. Playback Two operating methods: Onsite playback with remote controller and playback via client software on PC. 1. Onsite Playback Operating with Remote Control. a. Description of Remote Controller as below. Key Icon Function Description arrow key Upward file selection, enter password. arrow key Downward file selection, enter password. arrow key Left file selection, enter password. arrow key Right file selection, enter password. Confirm file to display & password.
i. Choose to enter log-in page, choose to key-in password, select to next step. After log-in password, to enter playback page. choose ii. While exiting playback page, select to go back to LIVE view. ★ If there is no password setup for software of PC client, select to enter menu of playback page directly. ★ The first password string is shown as * for protection of host info. After key-in the first password and move forward to next one. c. Operating description of playback page i.
2. Playback On PC Client Q:How to playback file of SD card after recording? Ans:Please follow the following instructions to playback records. Press and pop out the SD card. Remove the card from the machine. Insert the SDHC card into the card reader (please make sure the direction is correct). Connect the card reader to the USB slot on PC. (5) Read folder of memory card; or backup data to path of PC client “C:\BlackBox folder”. (6) Select file to display: execute CarBox2.
Player i. Viewer Interface GPS direction & Coordinate G-Sensor Speed Display speed & setting Volume Setting Back to Menu Menu Setting ★TYPE C model only: GPS direction & Coordinate, Speed and Google Map should match up specific models within GPS function. ii. Description for icons of viewer Detail Figure Info Functions GPS Direction. GPS Longitude & Latitude. X: Horizontal G Value for left and right sides of driving vehicle. Y: Horizontal G Value for front and back sides of driving vehicle.
Volume adjustment. Previous File Play previous file. Previous Frame Previous frame (freeze-frame). Playback Key Playback records. Pause Pause play files. Stop Stop play files. Play Play files/records. Next Frame Next frame (freeze frame). Next File Select next file to play. Open File Backup files. Option Setting Setting detail functions. Google Map Open E-Map for reviewing driving route (MUST connect to the internet). Open Folder Select folder & file.
H. Recording Set Up 1. Insert micro SD card to card reader of PC client before setting. 2. Option setting of software shown below. Detail Figure Info Functions 1. Password: encrypt micro SD card for prevention of getting any info. The string of password is limited as 15 characters. ★Please confirm case and record password setting to avoid forgetting. 2. Unit of Speed: show playback speed. ★ 1 KM = 0.624 Mile, 1 Mile = 1.6093 KM, Knot = 1.
3. Time Zone: adjust local time by GMT. 4. Time Setting: PC client time to set up and revise current time. 5. Playback Password: playback by protection of password. Tick number from 0 to 9 while setting. After tick 6. G-Sensor sensitivity: set up by road situation, including off, lower, low, normal, high, and higher. 7. Sensor Sensitivity: base on night driving condition, including low, normal, and high. 8. Audio Recording: choose volume ON / OFF inside vehicle. 9.
I. Snapshop Q: How to use the snapshot function to get the picture from playback file on micro SD card? Ans: While playback the recorded file of SD card, click the icon then snapshot the image and save into your PC. Default message box is shown by snapshot folder of CarBox2.exe. J. SD Card Formatting Two ways to format the SD card, format and restore. Q: When should you「format」or「restore」the SD CARD? Ans: 1.
Please follow the steps below: 1. Insert the SD card into card reader, then insert card reader to USB slot in PC side (refer to the charts) Notice 1 Before formatting SD memory card, please ensure to unlock it first. 2 If the card is unlocked but still cannot be formatted, this might be caused by Window Vista / 7 security restrictions. Please run the program as Administrator to prevent from this problem. 2. Execute the player “CarBox2.exe” the charts below). 3.
(2) Select the location of SD card. (3) 「format」or「restore」the SD card. (3.1)「format」SD card (3.1.1) Click「Format」button, click「yes」to start formatting on the pop-up dialog window. (3.1.2) Pop-up the format finished dialog window. (3.1.3) Click「OK」and re-insert the SD card to do relative setting. ★The original settings are completely eliminated after formatting the SD card. The SD card must reset the relevant settings. Otherwise it operates abnormally. (3.2) 「restore」SD card (3.2.
(3.2.3) Check the quick format and click "Start" to format. After formatting is complete please click "OK", then "Close" dialog window. (3.2.4) Click "OK" to finish restore SD card. ★After completion, you can use the memory card for other purposes. Features and operations may vary in different models.
K. Firmware Upgrade Operating Steps Please follow the steps to upgrade: 1. Put the memory card into computer, using old version player to backup the important file to computer, then shut down the old version player and start firmware upgrade procedures. 2. Insert the memory card into the card reader, Connect the card reader with the PC. Click the new version player, to open player main menu 3. Using format tool in new version player, select location of the memory card.
Clear all data in memory to Avoid incompatibility caused by not properly stored records after formatting.The memory card will automatically exit Windows sector after formatting completed. 4. Remove the memory card from the card reader and re-insert it. (After formatting, the remaining capacity will show 80MB) 5. Extracted carbox.rar to memory card. or unzip to the PC, and then copy the carbox folder to memory card.
Machine will use the setting value with new player version for recording after firmware updating completed. When setting is completed, the player will close automatically. 7. Remove memory card from USB device from PC. 8. Power-off first, then put the memory into Vehicle video recorder slot, connect TV-out cable, if it doesn’t have TV-Out function, please verify by recording light indicator on machine. 9. Please do not power-off during updated.
After firmware update, please reboot the Machine manually to complete the update. P.S after finished updated, When turn on the vehicle video recorder, it will appear firmware version number , then enter the live recording screen (remark: version number will be changed of each firmware updated.) From vehicle: (ii). Put the power cable into USB slot on PC, and the machine will start the firmware update automatically. During the firmware update, It will remain in booting screen.