
User Manual


Documents are only to be used and distributed completely and unchanged. It is strictly the users’ responsibility to check carefully
the validity of this document with respect to his product. Manual-no.: 999164 / 19/05/2009
page 60 of 75
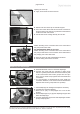
➨ Check for washers between the diaphragm support disc
and the connecting rod. Do not mix the washers from the
different pump heads. Make sure that the original number
is reassembled at the individual pump head.
☞ If the old diaphragm is difcult to separate from the support
disc, immerse assembly in naphtha or petroleum ether. Do
not inhale!
☞ Too small number of washers: The pump will not attain
ultimate vacuum. Too many washers: Clamping disc will
hit head cover; noise or even blockade of the pump.
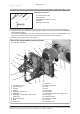
➨ Position new diaphragm between diaphragm clamping
disc with square head screw and diaphragm support disc.
☞ Attention: Position diaphragm with pale side towards dia-
phragm clamping disc (to pump chamber).
☞ Make sure that the square head screw of the diaphragm
clamping disc is correctly seated in the guide hole of the
diaphragm support disc.
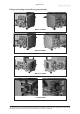
➨ Lift diaphragm at the side and position carefully together
with diaphragm clamping disc and diaphragm support disc
in the diaphragm key.
☞ Avoid damage of the diaphragm: Do not bend diaphragm
too much.
☞ Assemble the original number of washers between sup-
port disc and connecting rod.
➨ Screw diaphragm clamping disc, diaphragm, diaphragm
support disc and washers to connecting rod.
➨ Optimum torque for the diaphragm support disc: 6 Nm, it
is recommended to use a torque key. Attach hex key to
diaphragm key (hexagonal bolt 6 mm wide).
Attention: Never use the diaphragm key with any addi-
tional tools like tongs or hex keys without torque limita-
tion.
Replacing the valves
➨ Open the hinged cover of the connection fastener with a
at-bladed screw driver.
Loosen connection fastener slightly.
➨ Turn the llister head screw with a Torx screw driver TX20
one turn at most.
☞ Do not detach the llister head screw from the square
nut.