
Owner manual


Adjustable Extension Mounting Bracket for CONCEAL
Adjustable Extension Mounting Bracket for CONCEAL Installation and User Guide 342-0395 Rev. A Page 5 of 8
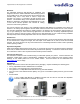
Step 3: Attach the CONCEAL Wall Mount Bracket to the Extension Bracket Arm:
A. Pull the three (3) Cat-5e cables from the Adjustable Extension Bracket Arm through the rectangular opening
in the rear of the CONCEAL Wall Mount Bracket.
B. Attach the CONCEAL Wall Mount Bracket to the Adjustable Extension Bracket Arm with the four (4) Machine
Screws (black), four (4) Lock Washers (black) and four (4) Nuts (black) and tighten securely. Note: The
CONCEAL Wall Mount Bracket mounting holes are slotted to allow leveling of the bracket.
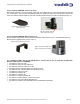
Step 4: Secure the Camera To the CONCEAL Wall Mount Bracket:
Please mark and test all Cat-5e cables prior to connection. Please do not connect to the camera
using the “guess/trial and error” method. Plugging the EZ POWER/VIDEO Cat. 5 Cable into the
wrong RJ-45 may cause damage to the camera and void the warranty!
A. Connect the (3) Cat-5e cables to the correct RJ-45 input connector on the WallVIEW Camera.
Note: Please! Before applying power to the camera, double-check each of the three RJ-45 connections to be sure
they are in the correct RJ-45 connector.
B. After all cables are attached to the camera, place the camera onto the camera mount and insert the two
provided 1/4”-20 x 3/8” screws into the camera through the two-screw holes in the bottom of the mount.
Note: Be sure to align each side of the camera evenly to all sides of the CONCEAL Wall Mount Bracket before
final tightening of the mounting screws (see Fig. 11).
Fig. 11: Vaddio HD-18 Camera aligned and
attached by two-(1/4-20) screws on the bottom
of the CONCEAL Wall Mount Bracket.
Fig.10: The CONCEAL Wall Mount
Bracket attached to the Adjustable
Extension Bracket Arm.