
Owner manual

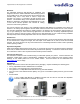


Adjustable Extension Mounting Bracket for CONCEAL
Adjustable Extension Mounting Bracket for CONCEAL Installation and User Guide 342-0395 Rev. A Page 6 of 8
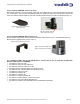
Step 5: Install the CONCEAL Lower Cover Plate:
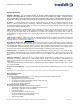
Attach lower CONCEAL Lower Cover Plate. Slide lower cover plate from front of the mounting bracket toward the
rear of the bracket. The two-rear locking tabs will need to be guided into position first and will lock in place as the
lower cover plate is pushed toward the rear of the mounting bracket and the front tabs are inserted (see Fig. 12).
Step 6: Install the CONCEAL Rear Camera Cover:
After successful testing of the camera, install the CONCEAL Rear Camera Cover on the CONCEAL Mounting
Bracket with the supplied screw (see Fig. 6 and 7).
List of additional Vaddio Thin Profile Wall Mounts for cameras that can also be used with the Adjustable
Extension Wall Bracket for CONCEAL:
535-2000-216: Sony EVI-HD1
535-2000-227: Sony EVI-HD1 PRO-CCU
535-2000-232: Sony EVI-HD7V, EVI-HD3
535-2000-205 and 535-2000-205B: Sony Model EVI-D70
535-2000-204 and 535-2000-204B: Sony Model EVI-D100
535-2000-207: Canon VC-C50i
535-2000-222: LifeSize HD
535-2000-234: LifeSize 10X
535-2000-217: CISCO Precision HD
535-2000-219: CISCO Wave II, Polycom PowerCam
535-2000-221: Polycom Eagle Eye/Eagle Eye II
535-2020-230: Vaddio Thin Profile Wall Mount for WallVIEW HD-USB PRO
Fig.6: CONCEAL Rear Camera Cover
Fig. 7: Completed CONCEAL Wall
Mount Camera Bracket Installation
Fig.12: CONCEAL Lower Cover Plate
with Locking Tabs
Fig. 13: CONCEAL Lower
Cover Plate locked in place