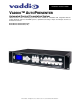
Installation and User Guide Camera and Electronic Products for Integrators VADDIO™ AUTOPRESENTER Automated Content Presentation System HD/SD Seamless Video Switching System with Video Transitions, Switchable PIP, Integration with the Vaddio AutoTrak and PresenterPOD Systems, Up/Down Converting of Inputs and Outputs and Preset PTZ Camera Control Model Number 999-5675-000 (NTSC) Model Number 999-5675-001 (PAL) ©2013 Vaddio - All Rights Reserved.
Auto Presenter Inside Front Cover - Blank AutoPresenter Manual 342-0029 Rev D Page 2 of 28
Auto Presenter AutoPresenter Overview The Vaddio AutoPresenter is a six (6) input Automated Content Presentation System (ACPS™) and PTZ camera control system designed for a variety of presenter controlled applications with Vaddio’s preset camera trigger devices such as the MicVIEW™, StepVIEW™ mats, AutoVIEW™ IR Sensors, PresenterPOD™ and TouchVIEW™.
Auto Presenter Key Technical Features (continued): Video Transitions - Video transitions are seamless with exceptional video quality. Transition time is adjustable from zero (0) to four (4) seconds and include: Mix Cut Wipe (11 different patterns) Intended Use: Before operating the Vaddio AutoPresenter, please read the entire manual thoroughly. The system was designed, built and tested for use indoors, and with the provided power supply and cabling.
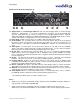
Auto Presenter UNPACKING: Carefully remove the device and all of the parts from the packaging. Unpack and identify the following parts: One (1) AutoPresenter Enclosure and Rack Mount Ears One (1) Vaddio PowerRite 12 VDC, 3A Power Supply One (1) AC Cord Set (US or UK & Europe) Documentation and Manuals AutoPresenter (Figure 2): ⑩ ① ② ③ ④ ⑤ ⑨ ⑧ ⑦ ⑥ 1.
Auto Presenter AutoPresenter Back Panel I/O (Figure 3): ⑪ ⑫ ⑬ ⑭ ⑳ ⑲ ⑮ ⑯ ⑰ ⑱ 11. Trigger Inputs 1 – 24 and Trigger Inputs 25 – 72: The first 24 trigger inputs are on Phoenix-type connectors. Trigger inputs 1 – 12 can be programmed in First Step, Last Step and Multi Step operation, which allows the live camera to zoom in or out to multiple trigger positions. Supports Vaddio AutoVIEW IR, StepVIEW, TouchVIEW, MicVIEW and PresenterPOD trigger inputs as well as 3rd party control devices.
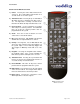
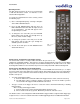
Auto Presenter AutoPresenter IR Remote Control 1) Power: Pressing the Power button will turn the system on. Press and hold the Power button for 3 seconds to turn on or off the system. ⑥ 2) Transition Select: Pressing the up or down button will switch the type of transition from wipe, fade or cut. The wipe that is currently selected via the internal menu will be the wipe transition that occurs. ① ⑦ ② ⑧ 3) Preset Control: Use the 0-9 buttons to program and recall preset camera positions.
Auto Presenter Operating the PIP: The PIP (picture-in-picture) can be accessed via RS-232 or with the IR Remote control. For RS-232, see the attached API in Appendix 1. Figure 5: IR Remote To operate the PIP with the IR remote control, perform the following steps: 1) Chose a background input by selecting 1 through 6 on the INPUT SELECT buttons. 2) Press the PIP ON/OFF Button and then press an INPUT SELECT button other than the input selected as the background.
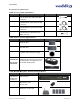
Auto Presenter Accessories for AutoPresenter Vaddio Accessory Cable Part Numbers Part Number Description 440-5600-000 DE-15 to Std.
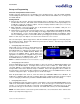
Auto Presenter Set-up and Programming First Time Set-up with the AutoPresenter: AutoPresenter was designed to be exceptionally easy to program and use. All of the Vaddio standards for transmitting RS-232 control over Cat. 5 cabling are in this manual and available free of charge from the Vaddio website. Getting Started: 1. Connect all of the cameras, monitors and peripheral devices to AutoPresenter.
Auto Presenter AutoPresenter Sample Configuration 1: Automated Classroom • Video Sources: Laptop PC Vaddio HD-18W HD PTZ Camera Vaddio Video White Board Vaddio CeilingVIEW HD Ceiling Document Camera • Video Preset Triggers: PresenterPODs (2) - 10 triggers total MicVIEW with six (6) Push to Talk Mics • Video Destinations: Vaddio PreVIEW HD Dual 7.
Auto Presenter AutoPresenter Sample Configuration 2: AutoPresenter connected to Vaddio’s Precision Camera Controller via the Vaddio Link control bus and used as a Professional operator controlled system. Vaddio WallVIEW CCU H700 Camera Systems x 4 Video, Power and Control on CAT 5e Up to 500’/154.
Auto Presenter Controlling the AutoPresenter Functions and controls on the front panel are easy and intuitive. Over the next few pages there are details on how the different functions operate, as well as how to program the inputs, outputs and trigger devices connected to AutoPresenter. PTZ Camera Controls: The controls that can be used to program presets, switch inputs, adjust a PTZ camera can be found on the Vaddio AutoPresenter IR remote control supplied with the product (see remote on p.6).
Auto Presenter Configuring Multi-Step Presets Notes Regarding Multistep: Multi-Step is available only on the first 12 preset trigger inputs on AutoPresenter and allows a camera preset to be programmed into the system to display two trigger devices.
Auto Presenter Power & Preset Disable If AutoPresenter is configured to be used as an automated, presenter controlled system, StepVIEW mats, AutoVIEW IR sensors and other devices, the mats, sensors and third-party trigger devices can be placed at locations, such as podiums, white boards, etc. Pressing the Preset Disable button on the front panel or via the IR remote control will disable all trigger devices (StepVIEW mats, AutoVIEW IR sensors, etc.).
Auto Presenter AutoPresenter Menu Structure: The AutoPresenter has an 8-line LCD that displays the system menus. The menus are navigated with the up/down arrows, select and cancel buttons. The menu structure is as follows: st 1 Screen Menu Section AutoPresenter V01.02.
Auto Presenter Menu Structure Continued SD Video Format >Select >Letter Box >Crop >Squeeze Enables the use of some SD signals to be mixed with HD video signals while avoiding aspect ratio problems Default Preset No Default Preset Number >Select > 01 – 72 Assigns camera preset 1 through 72 as Default Preset on the default camera (default is 01) Default Timer >Select >00 – 60 Default Camera Idle Return Timer - with no other trigger input, the system returns to the Default Camera and Default Preset after this
Auto Presenter System Menu (continued) >Clear Presets >Select >Start Clears only the camera presets >Transition Time >Select >0.1 to 4.0 Seconds Allows user to adjust transition time from menu or through RS-232 (i.e. control systems) Transition Time is also adjustable from front panel and can be stored in the presets if the Transition Mode (below) is set to “By Preset”. >Transition Mode >Select >Global (default) - Transitions and Times are the same for every video switch.
Auto Presenter Menu Structure Continued AutoTrak Input >Select >0 - No AutoTrak Support >1 through 6 Identifies which input on the AutoPresenter to establish presets for the AutoTrak. RS-232 commands Can be sent from AutoPresenter to AutoTrak when an external trigger (StepVIEW, AutoVIEW IR, PresenterPOD, etc…) is received that references that video input port. Essentially, this feature allows the AutoTrak system to have 6 presets when used with the AutoPresenter.
Auto Presenter Compliance and CE Declaration of Conformity AutoPresenter 6x1 Switcher/Mixer/Controller FCC Part 15 Compliance This equipment has been tested and found to comply with the limits for a Class B digital device, pursuant to Part 15, Subpart B of the FCC Rules. These limits are designed to provide reasonable protection against harmful interference when the equipment is operated in a commercial environment.
Auto Presenter Warranty Information: Hardware* Warranty - One year limited warranty on all parts. Vaddio warrants this product against defects in materials and workmanship for a period of one year from the day of purchase from Vaddio. If Vaddio receives notice of such defects during the warranty period, they will, at their option, repair or replace products that prove to be defective.
Auto Presenter Video Resolutions Supported* Input Signal Formats Supported Resolutions YPbPr 720p 59.94/50 1080i 59.94/50 1080p 59.94/50 RGBHV 640 x 480 @ 60Hz - VGA 800 x 600 @ 60Hz - SVGA 1024 x 768 @ 60Hz - XGA 1280 x 768 @ 60Hz - WXGA 1280 x 1024 @ 60Hz - SXGA 1366 x 768 @ 60Hz - WXGA 1400 x 1050 @ 60Hz - SXGA+ 1600 x 1200 @ 60Hz - UXGA Std Definition - w/Adapter 480i/29.97 Cable (Y/C or CVBS) 576i/25 Output Signal Formats Supported Resolutions YPbPr 720p 59.94/50 1080i 59.94/50 1080p 59.
Auto Presenter what you pay for”, when considering display devices can not be truer in this case. An inexpensive TV or miniature LCD panel will never look like a broadcast quality monitor.
Auto Presenter Appendix 1: Continued API and Programming Language +--------------------------------------------------------------------------+ | Vaddio AutoPresenter | +--------------------------------------------------------------------------+ | ? - This Menu | +------------------------ System Access -----------------------------------+ |Power x- Power(On/Off) |Mix - Mix/FTB Button | |Input x- Switch to Input(1-6) |Cut - Cut Button | |Store x- Store Preset(1-138) |Wipe - Wipe Button | |Preset x- Enable/Di
Auto Presenter Appendix 1: Continued Command Structure Definitions Command Parameters Description Camera Camera [9](cr) Select indicated camera (1-6) ClearAll ClearAll(cr) Clear all presets Config Config(cr) Display system configuration Cut Cut(cr) Select Cut Transition DspCams DspCams(cr) Display cameras connected(and Port) Home Home(cr) Home Camera IdleRtn IdleRtn [9](cr) Idle Return 0-60 seconds InitTrig InitTrig(cr) Initialize Idle Trigger State JSD70 JSD70 On/Off/[9] Speci
Auto Presenter Appendix 2: Pin-Outs Pin-outs for Connectors on AutoPresenter Video Pin-out (both input and output connectors) Pin RGBHV YPbPr 1 Red Pr 2 Green Y 3 Blue Pb 4 ID - 5 N/C - 6 Red GND Pr GND 7 Green GND Y GND 8 Blue GND Pb GND 9 No Pin - 10 GND GND Y/C & Composite Adapter Cable PN# 440-5600-000 GND 11 ID - Y - Luminance 12 ID - C - Chrominance 13 H-Sync - 14 V-Sync - 15 N/C - Composite Appendix 2 (continued): Camera Control Ports 1 through 6
Auto Presenter Inside Rear Cover - Blank AutoPresenter Manual 342-0029 Rev D Page 27 of 28
Auto Presenter Toll Free: 800-572-2011 ▪ Phone: 763-971-4400 ▪ FAX: 763-971-4464 www.vaddio.com ©2013 Vaddio - All Rights Reserved. Reproduction in whole or in part without written permission is prohibited. Specifications and pricing are subject to change without notice. Vaddio, ControlVIEW, TouchVIEW, Quick-Connect, StepVIEW, PreVIEW AutoVIEW, PresenterPOD, AutoPresenter, CeilingVIEW, WallVIEW, AutoPresenter EZCamera, Manual MicVIEW and PowerRite are registered trademarks of Vaddio.