
User Manual


Auto Presenter
AutoPresenter Manual 342-0029 Rev D Page 5 of 28
UNPACKING:
Carefully remove the device and all of the parts from the packaging.
Unpack and identify the following parts:
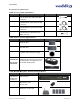
One (1) AutoPresenter Enclosure and Rack Mount Ears
One (1) Vaddio PowerRite 12 VDC, 3A Power Supply
One (1) AC Cord Set (US or UK & Europe)
Documentation and Manuals
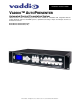
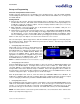
AutoPresenter (Figure 2):
1. 8-Line LCD Screen (for Menus and Status): The internal menu allows the user to configure the
resolution on the inputs/outputs, as well as other parameters built into the console. The LCD screen
will also provide status to current settings.
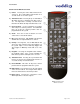
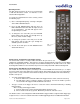
2. IR Window: Pointing the supplied IR remote control at the front of the AutoPresenter allows the user
to control the functions from a distance.
3. Menu Navigation Buttons: The Select, Cancel, , buttons allow the user to navigate through the
menus to modify input/output resolutions, wipe pattern, and other menu functions. See the
AutoPresenter Menu Structure at the back of the manual for the entire menu tree and additional
information on menu options.
4. Program: Pressing the Program button initiates the programming of the camera selection and preset
PTZ camera positions.
5. Preset Disable: Pressing the Preset Disable button disables all preset triggers and camera positions
programmed into AutoPresenter.
6. Inputs 1 - 6: Selecting an input will transition the output from the current input to the one selected.
All inputs can be configured as SD (CVBS or Y/C), HD (YPbPr) or a variety of analog RGBHV
resolutions. See the specifications at the end of the manual for all input and output resolutions
supported.
7. Power: Pressing the Power button turns AutoPresenter on or off. If the system is on, press and hold
the Power button for three seconds to power the unit off. All compatible PTZ cameras connected to
the system will go into stand by mode when AutoPresenter is powered off.
8. Transition Selection: Choose from Cut, Fade or Wipe transition when switching cameras. The
selected transition button will illuminate. 11 different wipe patterns can be selected from the internal
menu or by holding down the Wipe button and turning the Transition Time knob to scroll through the
wipe options (wipe pattern options will be displayed on the LCD screen). Transitions (Mix, Wipe or
Cut) can also be changed through either the IR remote, or through a third-party control system.
9. Transition Time: The rotary encoder will select the speed of the transition – from 0.1 to 4.0 seconds
for both the Fade and Wipe transitions. Transition speed can also be adjusted from either the IR
remote or through a third-party control system.
10. First, Last and Multi Step: When AutoPresenter is used with trigger devices (such as StepVIEW
Mats), First Step mode keeps a camera fixed on the “first” triggered preset camera position. In Last
Step mode, with multiple trigger devices, the “last” triggered preset camera position is recalled and
switched as the output from AutoPresenter. Multi Step allows any two of the first 12 triggers to be set
up for preset camera shots that will allow both trigger positions to be visible on-camera.
NOTE: Only one MicVIEW microphone can be triggered at one time, therefore two microphones connected to a
MicVIEW cannot trigger a Multi Step trigger.
①
② ③④⑤⑥
⑦⑧
⑨
⑩