
User Manual
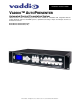


Auto Presenter
AutoPresenter Manual 342-0029 Rev D Page 7 of 28
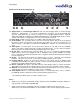
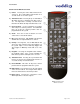
AutoPresenter IR Remote Control
1) Power: Pressing the Power button will turn the
system on. Press and hold the Power button for 3
seconds to turn on or off the system.
2) Transition Select: Pressing the up or down button
will switch the type of transition from wipe, fade or
cut. The wipe that is currently selected via the
internal menu will be the wipe transition that occurs.
3) Preset Control: Use the 0-9 buttons to program
and recall preset camera positions. Preset Disable
turns off all presets camera positions that are
programmed into the system.
4) Zoom: Press the in and out buttons for zoom
control of the selected PTZ camera.
5) PIP (picture-in-picture): PIP ON/OFF, PIP Position
and PIP Size are adjusted with these controls.
6) Priority: Pressing First, Last or Multi buttons will
choose the Step function for the input triggers on
the system. Inputs 1-12 are multi-step triggers. All
other triggers in Multi-Sep mode will act as Last
Step.
7) Program: Pressing the Program button initiates
the program feature of the system, allowing the
PTZ camera positions and inputs to be selected.
8) Transition Time: Pressing the up and down will
increase or decrease the transition time from 0.1 to
4 seconds for wipe or fade transitions.
9) Preset Disable: This turns off all presets camera
positions that are programmed into the system.
10) PTZ Camera: These buttons move the pan and tilt
of the selected camera. Pressing the Home button
moves the PTZ camera to the home position.
11) Input Select: Pressing the 1-6 buttons selects
which input will be sent to the outputs.
①
②
③
④
⑤
⑥
⑧
⑦
⑨
⑪
⑩
Figure 4: AutoPresenter
IR Remote Control