
Specifications


AutoTrak 2.0 Camera Tracking System
AutoTrak 2.0 Camera Tracking System - Document Number 342-0382 Rev. B Page 9 of 52
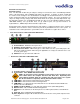
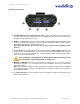
Belt Pack Views:
Belt Pack and Battery Compartment:
1) Removable Battery Compartment Cover: To open, carefully press down at the top of the
Removable Battery Cover near the center of the small opening and slide the cover downward. To
replace the Removable Battery Cover, start sliding the cover on at the bottom of the Battery Pack
Compartment and slide cover upward to the top to the small opening until the cover latches in place.
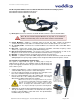
2) Micro-B USB Charging Port: The Belt Pack rechargeable battery can be charged by the micro-B
USB connector on the bottom side of the belt pack enclosure. A USB charger is included with the
Belt Pack. The Belt Pack can also be recharged by using a micro-B USB to USB adapter which can
be connected to a PC or Laptop USB port for recharging. Use only the charging power supply
provided.
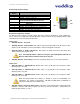
3) Dip Switches: There are two (2) 4-position dip switches located on the circuit board, SW4 and SW5.
They provide configuration settings for Microphone Gain Control, Filtering, Compression and
Microphone Filtering and Pairing of the Wireless Belt Pack to the AutoTrak 2.0 Wireless Audio
Interface.
4) Rechargeable Lithium Ion Battery: The battery is housed and attached inside the Battery
Compartment and under normal use should last up to ten (10) hours when fully charged.
5) Battery Indicator LED: The Battery Indicator LED is located on the bottom of the Belt Pack. When
the USB Charger is not connected to the Belt Pack: The Battery Indicator LED will be off when
battery power is adequate for the Belt Pack. The Battery Indicator LED will blink Red indicating that
the battery power is low and needs to be recharged soon. When the USB Charger is connected to
the Belt Pack: The Battery Indicator LED will be Yellow when the battery is charging. The Battery
Indicator LED will be Green when the battery is fully charged. Average charging time from dead
battery to full charge is 10 hours.
6) Radio Pairing Button SW3: push this button in conjunction with the Pairing button on the front panel
of the Optional Wireless Receiver to “pair” the transmitting Belt Pack with the Receiver.
①
③
④
②
⑤
⑥