
User guide


AutoTrak 2.0 Camera Tracking System
AutoTrak 2.0 Camera Tracking System - Document Number 342-0382 Rev. E Page 18 of 52
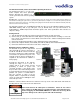
Note: If AutoTrak 2.0 CPU green light is blinking (which indicates standby mode), restart system by:
Turn the rear mounted Power Switch OFF for a few seconds and then back ON - or - remove
CPU power and then restore it - or - push the recessed Restart Button for a few seconds and
then release it.
3) Plug the IR Reference Camera into a monitor for set-up purposes. With the IR Reference plugged
into a monitor, the IR LEDs should be visible as white dots on a black background. These LEDs will
be tracked as the presenter moves around the room. To aid in set-up, a temporary RCA Y-cable may
be used to split the signal between the monitor and CPU.
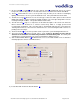
4) Select the Presets Tab①, then the Reference Camera Tab②. Use the Position③ buttons to Center
the IR lanyard in the monitor display horizontally and vertically.
5) Use the Zoom④ buttons (tele & wide) to increase the size of the lanyard in the display until it is
approximately 1/3 the size of the video image on the monitor. Use the Position③ up/down buttons to
locate the lanyard in the center of the screen so the presenter’s head is in the top ½ of the screen.
6) The Pan speed⑤ and the Tilt speed⑥ adjusts for the Reference camera’s speed to the Home
position.
7) The Custom Home position⑦ allows the user to define an alternate Default Home position for the
Reference and Tracking cameras (i.e. presenter’s lectern position, which is not always the dead
center of the room).
8) Click the Save⑧ button to save this default zoom and tilt position for the IR Reference Camera. The
Load⑨ button is for recalling a previously saved preset.
9) Plug the composite video from the IR Reference Camera back into the middle yellow RCA-F jack on
the back of the AutoTrak 2.0 CPU.
①
②
③
⑤
⑥
④
⑦
⑧
⑨