
Instruction Manual


Vaddio DomeVIEW Outdoor, Environment Pendant Mount Dome Installation and User Guide - Document 341-445 Rev C
Page 7 of 14
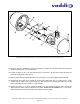
15) Once the camera is installed in the dome, terminate the camera pull the cable slack back through the
pendant extension pipe or curved wall mount.
16) Loosen the dome on the 1-1/2” NPT pipe mount (no more than 1 full turn) and position the dome for
preferred viewing angle of the camera.
17) Apply a generous bead of sealer around the top of the dome’s 1-1/2” pipe adapter and pipe threads.
18) Thread down the locking nut to engage the housing and tighten down the 1-1/2” NPT lock nut. Apply
another bead of sealer to the top of the lock nut; wipe off the excess working the sealer into the gap
between the top of the lock nut and 1-1/2” pipe threads.
19) Replace the dome on the dome housing assembly using the provided proprietary Allen wrench and
tighten the dome firmly to lock out moisture from below.
DO NOT LOSE THIS WRENCH (please). Use caution
when handing the dome to avoid scratching or scuffing the dome bubble.
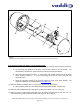
Figure 8:
Exploded view of DomeVIEW Outdoor, Environmental Pendant Dome for Sony EVI-D70 PTZ Camera
4
7
8
6
9
5
2
3
10
1