
User guide


ProductionVIEW HD
ProductionVIEW HD Manual 341-759 Rev. C Page 6 of 24
First Time Set-up with the ProductionVIEW HD:
ProductionVIEW HD was designed to be exceptionally easy to use and operate right out of the box. All of
the Vaddio standards for using video, power and control over Cat. 5 cabling are well documented and are
in the manual and available free of charge from the Vaddio website.
Getting Started:
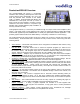
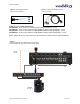
Connect all of the cameras, monitors and peripheral devices to ProductionVIEW HD. The back panel has
standard VGA connectors, and Vaddio offers three different break out cables – one for SD video inputs
(either Y-C or composite) and two cables (3 ft. or 6 ft.) for high resolution video (YPbPr or RGBHV). See
Figures 2 & 3 for additional information.
NOTE: If only one video monitor or projector will be connected to the Preview and/or Program outputs, use the top
connector labeled Primary. The secondary output will deliver 6 dB of gain, if nothing is connected to the primary
output.
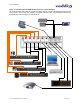
On the next page is a diagram showing how to connect a Vaddio WallVIEW H700 CCU to
ProductionVIEW HD.
Once you have connected all of your inputs, outputs and the PowerRite power supply, plug the AC cord
into an outlet. ProductionVIEW HD will boot up and scan for cameras. As ProductionVIEW HD boots up,
it will automatically scan each input to confirm which ports have compatible PTZ cameras or Add-A-Cam
systems connected. After boot up, a menu will appear on the blue LCD screen.
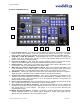
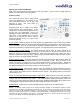
Configuring Output Resolutions
On the LCD screen, a chevron (>)
will be displayed next to the menu
item that is currently selected.
Press the Arrow Down Button (↓)
adjacent to the LCD screen, until the
chevron is next to “VIDEO OUTPUT
MENU” and then press the SELECT
button. Select PROGRAM
OUTPUT, which will display your
options for video output resolution for the PROGRAM OUTPUT. Arrow down to the appropriate resolution
that is compatible with your video monitor, then press the SELECT button. Then, press the CANCEL
button to exit out to the previous menu.
Repeat the process for your Preview Output. Once you have selected the Program and Preview output
resolutions, press the CANCEL button to get back to the Main Menu. For additional information on the
menu tree structure, see pages 13 to 16 for additional information.
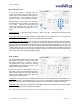
Configuring Input Resolutions
From the Main Menu, press the down arrow button, to move the chevron to VIDEO INPUT MENU, and
then press the SELECT button. If all input devices have the same resolution (i.e. 1080i / 59.94), then
select ALL PORTS. If not all inputs have the same resolution, then press the down arrow button to the
first input with a video device attached, and press SELECT. Choose the appropriate video resolution for
the video device connected to the input, and then press SELECT. Press the CANCEL button to exit the
resolution setting for the input. Repeat the process for all video inputs.
NOTE: Whether an input is a PTZ camera, or other peripheral device, the input signal will need to be configured to
the proper video resolution of the device connected.
Additional Programming
Review the ProductionVIEW HD Menu Structure on page 13 for additional information on programming
specific parameters. For API and Programming Language, see information beginning on page 21.