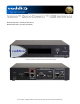
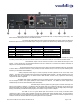
Installation and User Guide VADDIO™ QUICK-CONNECT™ USB INTERFACE Quick-Connect USB Interface for use with Vaddio Cameras with EZCamera™ Cat-5 interface, featuring Multi-format Outputs and IP or USB Streaming Model Number 999-1105-038 (North America) Model Number 999-1105-138 (International) Images: Quick-Connect USB Front Panel ISO (above) and Rear Panel ISO (below) © 2013 Vaddio - All Rights Reserved.
Quick-Connect USB Interface Inside Front Cover - Blank Quick-Connect USB, Document Number 342-0653 Rev.
Quick-Connect USB Interface TABLE OF CONTENTS Overview ................................................................................................................................................................................................................. 4 Unpacking: ..............................................................................................................................................................................................................
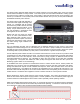
Quick-Connect USB Interface OVERVIEW: The Quick-Connect USB (QC-USB) Interface for Vaddio cameras is the most flexible video, power and control camera interface available on today’s market. This robust system uses the Vaddio EZCamera™ Cabling system and uses two Cat-5 cables to provide power, return HSDS™ video and extends RS-232 control signaling to the camera up to a distance of 100’ (30.48m) with PTZ motorized cameras and up to 150’ (45.72m) with ZoomSHOT & WideSHOT stationary POV cameras.
Quick-Connect USB Interface Save These Instructions: The information contained in this manual will help you install and operate your product. If these instructions are misplaced, Vaddio keeps copies of Specifications, Installation and User Guides and most pertinent product drawings for the Vaddio product line on the Vaddio website. These documents can be downloaded from www.vaddio.com free of charge. UNPACKING: Carefully remove the product and all of the included parts from the packaging.
Quick-Connect USB Interface QUICK-CONNECT USB INTERFACE Image: Front Panel with Feature Call-outs ③ ④ ① ② 1) LCD Blue Backlit Display: 20 x 2 Character, ODV (omni-directional view), ABN (advanced black nematic) display with a high contrast and wide viewing angle combined with high visibility. The MAC address (labeled as “HW” for hardware) is on the top line, and the IP address (static or DHCP) is listed on the bottom line.
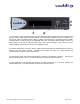
Quick-Connect USB Interface Quick-Connect USB Interface Image: Rear Panel with Feature Call-outs ① ② ③ ⑤ ⑦ ④ ⑥ ⑧ ⑨ 1) Power Input: 5.5mm OD x 2.5mm ID coaxial connector for the provided 24 VDC, 2.0 Amp switching power supply. The Quick-Connect USB Supplies Power to the attached camera.
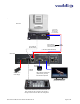
Quick-Connect USB Interface BASIC APPLICATION DIAGRAMS Diagram: Basic Wiring Configuration - Without Network or PC ` PowerVIEW HD-22 PTZ Camera Rear View Cat-5 Cable Distance up to 100’ (30.48m) for PTZ cameras Cat-5 Cable for Power and Video Cat-5 Cable for RS-232 Control (EZ-POWER VIDEO) ← HD Video (HSDS differential) Quick-Connect USB Interface Rear Panel Power HD Video YPbPr RS-232 Control 24VDC, 2.
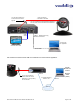
Quick-Connect USB Interface Diagram: Basic ZoomSHOT WallVIEW USB Configuration - USB 2.0 Streaming ZoomSHOT HD Video Camera Power to Camera > < HD Video to QC-USB Two (2) Cat-5 Cables carry Power, Video and Control Signals Two Cat-5 Cables up to 150’ (45.72m) for stationary POV cameras such as ZoomSHOT and WideSHOT Quick-Connect USB Interface HDMI Cable USB 2.0 - MJPEG Video using Standard UVC Drivers Host PC with UC Application HDMI Video Monitor Simulated Video Feed USB 2.
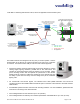
Quick-Connect USB Interface Diagram: Complex System with Audio Local USB 2.0 streaming with Ethernet control, active UC Application and local audio system. WallVIEW HD-30 USB System with Audio PowerVIEW HD-30 HD Camera PC “A” with Browser for Control and UC Application to connect to PC “B” on other side Video, Power and Control Two Cat-5 Cables Up to 100’ (30.48m) for PTZ cameras B PC “B” with Browser for Control and UC Application to connect to PC “A” on other side Quick-Connect USB Interface USB 2.
Quick-Connect USB Interface Step By Step Quick-Connect USB Installation Instructions: Step 1: After determining the optimum location of the camera; route, mark and test the two (2) Cat-5 cables from the camera to the Quick-Connect USB Interface located at the head-end. Follow the mounting instructions included with the camera package. Step 2: Set the desired HD Resolution with the rotary selection switch on the camera. NOTE: For best results with USB 2.
Quick-Connect USB Interface SOFTWARE AND OS COMPATIBILITY The Quick-Connect USB will work with the following web browsers, soft codecs, computer operating systems and media players: Compatibility - Web Browsers: 1) Internet Explorer (IE 8 and above) 2) Safari (Rev 4 and 5) 3) Safari/iOS (Rev 4 and 5) 4) Chrome (the latest and current release - auto updating) 5) Firefox (the latest and current release - auto updating) Soft Client Compatibility: The Quick-Connect USB is compatible with the following soft co
Quick-Connect USB Interface INTERNAL WEB PAGES AND CONTROL The internal web pages will allow control of the Quick-Connect USB and control of the attached camera via a network connection. These web pages will allow the user or administrator to set security passwords, change the IP address, view diagnostics, access the firmware upgrade page and more! DHCP IP Set-up (Dynamic Host Configuration Protocol) DHCP Set-up (skip this section if Static IP).
Quick-Connect USB Interface Screen Shot: Camera Control Page - No Camera Detected The No Camera Detected window will appear if the Quick-Connect USB has no communication with the camera. Check the camera power and serial connections if no camera is found within 30 seconds of initialization.
Quick-Connect USB Interface 3) Pan/Tilt and Zoom Speed Controls: The speed for both the Pan/Tilt and Zoom controls can be adjusted with the two (2) buttons in this section. For tighter shots, it is recommended that the slower speed is used. Note: Speed control does not apply for the WideSHOT and zoom speed only applies to the PowerVIEW, ClearVIEW and ZoomSHOT. 4) Store Preset Button: Clicking the Store button opens up a Store Preset pop-up dialog box.
Quick-Connect USB Interface Screen Shot: Admin Menu - Camera Settings Page The Camera settings page provides the parameters to allow the end user to match the camera to the environment, set the CCU presets and make startup assignments. ➊ ➋ ➌ ➍ ➎ 1) Load Preset at Startup: Check this box to move the camera to a predefined preset location when the camera powers up.
Quick-Connect USB Interface Iris: Move adjustment slider as required to adjust the iris opening. A numeric value will be displayed in the box to the right of the slider. Gain: Move adjustment slider as required for amount of iris gain desired. displayed in the box to the right of the slider. Auto White Balance check box: When checked, camera will operate in Auto White Balance mode, when unchecked camera will be in Manual White Balance Mode and allow for adjustment of Red and Blue Gain.
Quick-Connect USB Interface Screen Shot: Admin Menu - USB 2.0 or IP Streaming Mode Page ➊ ➋ ➌ ➍ ➎ 1) Streaming Mode: Streaming can be set for either USB 2.0 streaming (MJPEG) or IP streaming (H.264); but not both at the same time. The QC-USB can stream USB and accept IP control, or it can IP stream with IP control. Choose the streaming mode here. 2) USB Device Name: Allows the user to use a “friendly name” per system.
Quick-Connect USB Interface Screen Shot: Admin Menu - Room Labels The Room Labels menu allows the administrator to label the company name, room name, room phone and help phone on a per QC-USB basis. The labels appear on every page at the top/middle of the page. Simply enter the room information and click Save. Quick-Connect USB, Document Number 342-0653 Rev.
Quick-Connect USB Interface Screen Shot: Admin Menu - DHCP Network Configuration Under the Networking menu, The Network Configuration and Network Interfaces are displayed. This is where the Network administrator assigns either DHCP or a Static address and the associated parameters. MAC Address, IP Address, Subnet Mask and Gateway will Autofill when in DHCP Mode Screen Shot: Admin Menu - Static IP Configuration If Static IP is used, the IP Address, Subnet Mask and Gateway are manually entered.
Quick-Connect USB Interface Screen Shot: Admin Menu - Security The Security menu allows the Admin to UPDATE “user” PASSWORD and UPDATE “admin” PASSWORD. The default “user” password is: password. The default “admin” password is also: password. The Network administrator can reassign the user name and password as well as the Admin password. There is only one “user” password and one “admin” password at any given time. If changes are made, click on Save to store the change.
Quick-Connect USB Interface Screen Shot: Admin Menu - System Menu The System Menu is where the System Info is displayed and Firmware Updates are performed. There will be firmware updates and upgrades over the life of the Quick-Connect. The file for the firmware update is chosen in this menu and the update is started here too. A remote system Reboot and Restore to Factory Presets is also available.
Quick-Connect USB Interface Screen Shot: Admin Menu - Update in Progress After the firmware load has been started, a pop-up screen will advise patience and notify, in terms of a percentage completed, the progress of the firmware update load. Again, please don’t interrupt the firmware load (this example is from 1.0.0 to 1.1.0) . Screen Shot: Admin Menu - HELP Service/Help information can be found under the Help menu.
Quick-Connect USB Interface CONNECTING THE QUICK-CONNECT USB AND CAMERA TO THE PC AND PROGRAM OF CHOICE The Quick-Connect USB and attached camera are compatible with many programs and media players. The following is an attempt to generally describe the steps to plug in the QC-USB with a Vaddio camera and get an image in a couple of popular programs. Skype Example: 1) After connecting a camera to the Quick-Connect USB, with a quality USB 2.
Quick-Connect USB Interface GENERAL SPECIFICATIONS Quick-Connect USB Interface Cat-5 Cabling 999-1105-038 (North America) 999-1105-138 (International) USB 2.0 (MJPEG): Resolution up to 720p/30 (USB 2.0 MJPEG) H.264 (IP) of Ethernet: Resolution up to 1080p/30 (H.264 over IP Analog Component (YPbPr): Resolution up to 1080p/59.94 HDMI: Resolution up to 1080p/59.94 Connector: Type-B, USB 2.
Quick-Connect USB Interface COMPLIANCE AND CE DECLARATION OF CONFORMITY, QUICK-CONNECT USB INTERFACE Compliance testing was performed to the following regulations: FCC Part 15 (15.107, 15.
Quick-Connect USB Interface WARRANTY INFORMATION (See Vaddio Warranty, Service and Return Policies posted on vaddio.com for complete details): Hardware* Warranty: Two (2) year limited warranty on all parts and labor for Vaddio manufactured products. Vaddio warrants its manufactured products against defects in materials and workmanship for a period of two years from the day of purchase, to the original purchaser, if Vaddio receives notice of such defects during the warranty.
Quick-Connect USB Interface APPENDIX 1: PIN-OUTS FOR EZ-POWER VIDEO CAMERAS AND QUICK-CONNECT USB Table: EZ-POWER VIDEO RJ-45 Connector Pin-outs EZ-POWER VIDEO Port Pin Signal 1 Power+ 2 Power3 Y+ 4 PB+ 5 PB 6 Y7 PR+ 8 PR- EZ-POWER VIDEO Cat-5 Cable: Power to Camera, Differential Video from Camera 12345678 Important Note: The EZ-POWER VIDEO RJ-45 Connector on a Vaddio CAT-5 system camera is for use with the Quick-Connect SR, Quick-Connect DVI/HDMI SR, Quick-Connect USB and USB Mini Interfaces ONLY (568
Quick-Connect USB Interface APPENDIX 2 - TELNET SERIAL COMMAND API The Vaddio Serial Command protocol is a high level text based command line interface supported via telnet session on the Quick-Connect USB. Camera control commands supported on the Quick-Connect USB includes ClearVIEW HD-18, HD-19 and HD-20, PowerVIEW HD-22, HD-30, ZoomSHOT and WideSHOT. The command application protocol interface is intended to allow external device such as AMX or Crestron to control the camera.
ZOOMSHOT WallVIEW USB Camera System Camera Preset NAME camera preset - Recall and storing of camera presets SYNOPSIS camera preset {recall|store} [1-6] DESCRIPTION Method used to recall and store camera presets OPTIONS recall Recall preset store Store preset preset Required value from 1-6 used to indicate the preset number EXAMPLES camera recall 3 Move camera to preset position 3 camera store 1 Store current camera position as preset 1 Camera Tilt (not used with ZoomSHOT or WideSHOT cameras
Quick-Connect USB Interface Exit NAME exit - ends the current API command session SYNOPSIS exit DESCRIPTION Exit ends the current API command session. If the session is over telnet, the session is ended and the socket is closed. If the session is over serial, a new session is started.
Quick-Connect USB Interface Network Settings NAME network settings - get current network settings SYNOPSIS network settings {get} DESCRIPTION Method used to get the current network settings of the device OPTIONS get Get the current network settings for the machine EXAMPLES network settings get MAC Address: 00:04:a3:85:0a:ee IP Address: 10.10.8.116 Netmask: 255.255.255.0 Gateway: 10.10.8.
Quick-Connect USB Interface Streaming Quality NAME streaming quality - Gets or sets the current streaming quality SYNOPSIS streaming quality {get|low|standard|high} DESCRIPTION Method used to get or set the current streaming quality OPTIONS get Get the current streaming quality low Set video quality to low standard Set video quality to standard high Set video quality to high EXAMPLES streaming quality get quality:low Returns the current streaming quality ---streaming quality standard OK Sets th
Quick-Connect USB Interface System Factory‐Reset NAME system factory-reset - Gets or sets factory reset status SYNOPSIS system factory-reset {get|on|off} DESCRIPTION Method used to get or set the factory reset status OPTIONS get Get the current factory reset status on Enable factory reset on reboot off Disable factory reset on reboot EXAMPLES system factory-reset get factory-reset (software): off factory-reset (hardware): [Hardware reset is designated by rear panel dip switches in down position
Quick-Connect USB Interface Inside Back Cover - Blank Quick-Connect USB System Document Number 342-0653 Rev B Page 35 of 36
Quick-Connect USB Interface Toll Free: 800-572-2011 ▪ Phone: 763-971-4400 ▪ FAX: 763-971-4464 www.vaddio.com ©2013 Vaddio - All Rights Reserved. Reproduction in whole or in part without written permission is prohibited. Specifications and pricing are subject to change without notice or obligation. Vaddio, PowerVIEW, ClearVIEW, ZoomSHOT, WideSHOT, REVEAL, CeilingVIEW, ProductionVIEW, WallVIEW, EZCamera, Quick-Connect and HSDS are trademarks of USB Vaddio. All other trademarks are property of their owners.