
Specifications


55
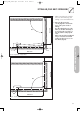
FITTING AIR/FLUE DUCT EXTENSIONS
How to add extensions
Use a saw, tin-snips, etc. to cut tubes
to size.
☞ No tools are required when
removing previously-fitted
extensions for cutting to size air
and flue tubes separately. When
doing so, the flue conduit should
be twisted into a position where
the shoulders on the plastic tube
can be pushed through the spacer-
piece. After cutting to size, refit
the flue conduit and secure it to
the air conduit.
Tip:
Start by measuring the required
length of air conduit* (L
air
), and then
calculate the corresponding length of
flue conduit (L
exhaust
) as follows:
L
exhaust
= L
air
+ 40 mm
L
exhaust
= length of flue conduit
L
air
= length of air conduit
* Minimum length of air-conduit
extension: 100 mm.
1
2
15
12
70
L
air
L
exhaust
1.
2.
+ 40 mm
25
Fig. 6.1: Cutting tubes to size
☞ The seals are sensitive to mineral
oil-based grease products. For this
reason, the seals must not be
greased. If the seals need wetting
to aid in installation, use water
only.
☞ De-burr and file down any rough
edges on the tubes before fitting in
order to prevent damage to the
seals. Remove all metal filings and
other debris.
☞ Do not use damaged or dented
tubes, as they will not form an
adequate seal.
☞ Ensure that the seals remain
correctly aligned when installing
the tubes. Do not fit damaged
seals.
☞ Secure the exhaust conduit with
the fixing device in order to ensure
that it is correctly centred relative
to the air conduit.
Fig. 6.2: Loosening the flue conduit
GU_LAZ 290/1
Important:
You must fasten extensions to the
ceiling or wall using pipe clamps.
Use one clamp for each extension.
Important:
Where extensions are used, these
must be installed with a slope of 3°
±1° to ensure that condensate does
not remain in the sleeve (equivalent
to 50 mm ± 20 mm rise per metre
length).
PART 2 CONCENTRIC 80/125
834449_09GB_082006.qxd 10.08.2006 12:20 Seite 55