
Instruction Manual


CO
2
transmitter GMD20 and GMD20D M210292en-A
INTRODUCTION
Vaisala’s GMD20 uses silicon based CARBOCAP
sensor technology providing
excellent stability and reliability. The GMD20 transmitters require almost no
maintenance: the recommended calibration interval is five years in HVAC and related
benign applications. Transmitters are available without a display (GMD20 version) and
with a display (GMD20D version).
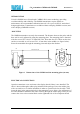
MOUNTING
The GMD20 transmitters are truly duct mounted. The distance between the probe and the
duct wall is easily adjusted by using the mounting plate. The mounting plate is fastened
with four screws ST.4.2x16-C-Z/A4m DIN 7981. Note that four ∅3.2 holes on the duct
surface are needed, as well as one ∅22...25 mm hole in the middle (see figure below).
Insert the transmitter through the mounting plate and adjust the distance.
Figure 1 Dimensions of the GMD20 and the mounting plate (in mm)
ELECTRICAL CONNECTIONS
Open the transmitter cover and remove the display board if there is one installed. The
cable is inserted through a rubber plug included in the package. Pierce the rubber plug
with a screwdriver or a similar instrument in order to open the hole for the cable. Then
insert the plug in the appropriate hole in the transmitter cover. Strip a few millimetres of
the cable insulation and insert the cable carefully through the rubber plug so that you can
connect the wires to the terminal block on the righthand side of the component board.
42
22
42
min 80 max 140
Ø15
64
1