
Manual

User's Guide _______________________________________________________________________
52 ___________________________________________________________________ M210474EN-C
When replacing the filter, wear clean gloves to avoid depositing dirt or
oil on the filter.
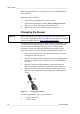
Replace the filter as follows:
1. Turn the filter counterclockwise until it is loose.
2. Pull the filter straight out carefully. Do not damage the sensor.
3. Take the new filter, and insert it to the filter thread.
4. Tighten the new filter to 5 Nm by turning it clockwise.
Changing the Sensor
NOTE
When replacing the sensor, the new sensor must be of the same type as
the old sensor (HUMICAP180
L2 for MMT310). Information on Vaisala
sensors is availab
le online at www.vaisala.com/sensorinfo.
Changing the sensor should be considered corrective maintenance, and it
is not necessary in normal operation. If the accuracy of the transmitter
does not seem to be within specification, it is more likely that the
transmitter is in need of calibration and adjustment, and not sensor
replacement. Refer to section Calibration and adjustment on page 55.
1. Remove the filter from the probe. See the instructions in section
Changing the Filter on page 51.
2. Remove the damaged sensor and insert a new one. Handle the new
sensor by the plastic socket. DO NOT TOUCH THE SENSOR
PLATE.
3. Perform a calibration and adjustment as instructed in section
Relative Humidity Calibration after Sensor Change on page 61.
4. Attach a new filter on the probe. When using the stainless steel
filter, take care to tighten the filter properly (recommended force
5 Nm).
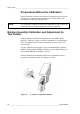
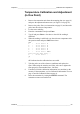
0508-079
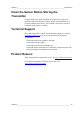
Figure 14 Changing the Sensor
The following numbers refer to Figure 14 above:
1
=
Pull out the sensor
2
=
Plastic socket