Real-time Display Software YourVIEW 2000 YVU2000 USER'S GUIDE M210681EN-B August 2008
PUBLISHED BY Vaisala Oyj P.O. Box 26 FIN-00421 Helsinki Finland Phone (int.): +358 9 8949 1 Fax: +358 9 8949 2227 Visit our Internet pages at http://www.vaisala.com/ © Vaisala 2008 No part of this manual may be reproduced in any form or by any means, electronic or mechanical (including photocopying), nor may its contents be communicated to a third party without prior written permission of the copyright holder. The contents are subject to change without prior notice.
________________________________________________________________________________ Table of Contents CHAPTER 1 GENERAL INFORMATION............................................................................ 3 About This Manual ................................................................... 3 Contents of This Manual ....................................................... 3 Version Information ............................................................... 4 Feedback.......................................
User's Guide ______________________________________________________________________ CHAPTER 6 WEATHER 2 REAL-TIME DISPLAY............................................................27 Configuration ..........................................................................29 CHAPTER 7 BROWSER....................................................................................................31 Opening a Log File .................................................................
Chapter 1 ________________________________________________________ General Information CHAPTER 1 GENERAL INFORMATION This chapter provides general notes for the manual and the product. About This Manual This manual covers the YourVIEW YVU2000 displays. This manual provides information for installing, operating, and maintaining YourVIEW YVU2000. Contents of This Manual This manual consists of the following chapters: - Chapter 1, General Information, provides general notes for the manual and the product.
User's Guide ______________________________________________________________________ - Chapter 7, Browser, provides information on the Browser module that shows the the stored files in graphical and table formats. - Chapter 8, YourVIEW WEB server, provides information on the YourVIEW WEB Server that makes the display image available over Internet. Version Information Table 1 Manual Revisions Manual Code M210681EN-A M210681EN-B Description This manual. First release. Information on Microsoft Vista added.
Chapter 1 ________________________________________________________ General Information Trademarks Microsoft®, Windows®, and Windows NT® are registered trademarks of Microsoft Corporation in the United States and/or other countries. License Agreement All rights to any software are held by Vaisala or third parties. The customer is allowed to use the software only to the extent that is provided by the applicable supply contract or Software License Agreement.
User's Guide ______________________________________________________________________ This page intentionally left blank.
Chapter 2 __________________________________________________________ Product Overview CHAPTER 2 PRODUCT OVERVIEW This chapter introduces YourVIEW YVU2000, the graphical user interface software for Vaisala automatic data collection systems. Overview of the System The software is to be installed on a PC with operating system Microsoft Windows 2000 , Windows XP, or Windows Vista.
User's Guide ______________________________________________________________________ The YourVIEW operation is password-protected, preventing unauthorized personnel from making changes to the settings or from closing down the program. The password is needed to stop the modules or to change the parameter settings.
Chapter 3 ______________________________________________________ Installation and Startup CHAPTER 3 INSTALLATION AND STARTUP This chapter provides instructions for installation and startup of YourVIEW YVU2000. System Requirements The YourVIEW software will run on any IBM compatible PC with Windows 2000, Windows XP, or Windows Vista operating system. YourVIEW typically requires approximately 20 MB of free hard disk space and additional space for data logging.
User's Guide ______________________________________________________________________ 0412-103 Figure 1 4. YourVIEW Installation When the Setup program asks for the installation directory, you can accept the default by clicking the Finish button. In case you want to change the default directory, click the Change button and type the new path. It is recommended to install the software in its own directory.
Chapter 3 ______________________________________________________ Installation and Startup NOTE By default, YourVIEW is installed in folder C:\Program Files\YourVIEW. When started after installation, YourVIEW will write to this path. With Windows XP and older Windows versions, this will not pose any problems, but Windows Vista, which is strict about file access, especially in C:\Program Files, and only gives ordinary users read access to files by default, will cause trouble.
User's Guide ______________________________________________________________________ Computer Settings To run the YourVIEW software properly, specify the general Windows settings by selecting Start - Settings - Control Panel Regional Settings and check that the items below are as follows: - Date format: yy-MM-dd - Time format: HH:mm:ss - Decimal delimiter (decimal symbol): . (a period) The Data Socket protocol uses the TCP/IP data transfer protocol, which must be installed as well.
Chapter 3 ______________________________________________________ Installation and Startup 0010-082 Figure 2 3. NOTE Registration Window at First Start-up Click on the Name field and fill in the user name. Then click on the Company field and give the company name. The serial number appears automatically in the Serial Number field (for example, Weather 1). Then click the OK button. If the serial number field is left blank or it is not correctly filled in, only the Receiver module will start.
User's Guide ______________________________________________________________________ 0010-083 Figure 3 NOTE Registration Window at Normal Operation Once the Change Password button has appeared, you can change the password within three seconds. After three seconds the button disappears and YourVIEW will start. The Data Socket window and 3 to 6 other windows will open on the screen of your PC. Normally, the Real-time Display window is on top.
Chapter 3 ______________________________________________________ Installation and Startup of the PC name. The problem can also be caused by limited communication rights in the PC network. If a sensor is not connected or if data is unavailable, the data collection device may send (depending on its configuration) any nonnumeric value between the delimiters, for example, ///// or nothing at all (which would be received as two consecutive delimiters).
User's Guide ______________________________________________________________________ The Receiver and Real-time Display modules start running automatically. In case this does not happen, start the modules by clicking the button at the top left corner of the display. NOTE Data will not be logged on your PC by default. For further details, see Chapter 4, Receiver, on page 17.
Chapter 4 _________________________________________________________________ Receiver CHAPTER 4 RECEIVER This chapter provides information about the Receiver module that receives data from the AWS and transmits data to the Data Socket database. This program module receives data from the AWS and transmits the data to the Data Socket database for the real-time Display modules and Data Logging module. YourVIEW Receiver starts automatically at each start-up.
User's Guide ______________________________________________________________________ The Receiver module must be running continuosly to enable updating of data from the data collection system to the Data Socket database. Changing the Configuration Changes in the configuration of YourVIEW Receiver must be made while the Receiver is running. However, the changes will not be effective until you restart the Receiver. To edit the Receiver settings, click on the field to be edited.
Chapter 4 _________________________________________________________________ Receiver Message Formats This section explains the message formats that YourVIEW uses. You can configure the messages to suit your application, sensor set and display/data logging requirements. Each real-time display must have specific message definitions but there can also be additional messages only for datalogging.
User's Guide ______________________________________________________________________ Table 2 Receiving Rules Field name Type Description Defines the message output format. This information will be used by other parts of the program to parse and display the data. If you are using a format that you cannot find in the list, type "Other". Length Timeout, sec The maximum length of a received data message. The maximum time Receiver waits for the end of a data message after receiving the start characters.
Chapter 4 _________________________________________________________________ Receiver Control Buttons The three main control buttons are Load, Save and Stop. Load Button When loading new receiving rules for Your VIEW or a new configuration to Receiver, click the Load button. The file type is cfg. Loading a new configuration is a password-protected operation. Type in the password and click OK. Then select the *.cfg file. Restart YourVIEW by clicking the button at the top left corner.
User's Guide ______________________________________________________________________ 0105-147 Figure 7 Enter Password Dialog If no password has been set, you just need to click OK in the Enter Password? dialog.
Chapter 5 _____________________________________________________________ Data Logging CHAPTER 5 DATA LOGGING This chapter provides information on the Data Logging module that reads data from the Data Socket database and stores it into a spreadsheet file. The Data Logging module module takes care of data logging. This module reads data from the Data Socket database and stores it into a spreadsheet file. File names are created according to the date and time, for example, 96110600.CSV.
User's Guide ______________________________________________________________________ The Data Logging module must be running continuosly to enable updating of data from the data collection system to the data storage on the hard disk. The Data Logging module stores data only if the data is changed. By default, there is no minimum limit for data change, but it is possible to define a minimum change with the Deadband parameter. All data in each log definition is stored if any of the items change.
Chapter 5 _____________________________________________________________ Data Logging Table 3 Field Name Log File Path Duration Autodel Min Intvl Log Items Data Logging Rules Description Defines the directory in which the logged data folders and/or files are located. The default logfile path is C:\YOURVIEW. If is empty, log files will be stored in the LabVIEW default directory. Defines when a new log file will be created, based on time.
User's Guide ______________________________________________________________________ This page intentionally left blank.
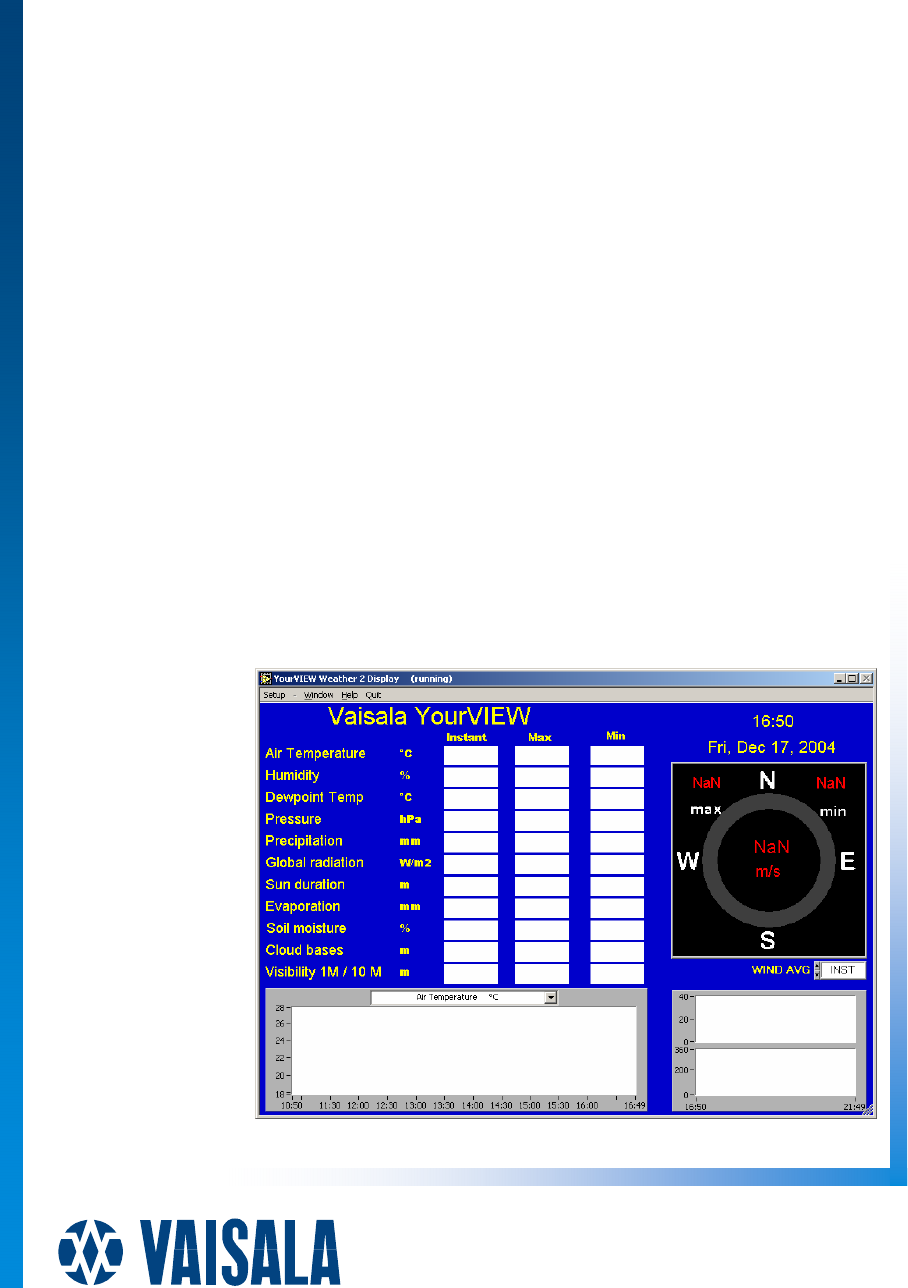
Chapter 6 _________________________________________________ Weather 2 Real-time Display CHAPTER 6 WEATHER 2 REAL-TIME DISPLAY This chapter describes the display objects and features of Weather 2 Real-time Display. 0412-102 Figure 9 Weather 2 Real-time Display Start the program module by clicking the corner of the display.
User's Guide ______________________________________________________________________ The date and time on the Weather Display are the same as on your computer. The Display includes fields for air temperature, humidity, dew point temperature, pressure, solar, precipitation sum, etc. The contents of the data field depend on the configuration of the reports sent by MAWS or MILOS520. The text field titles are editable. A history window plots the previously received values for the selected sensor.
Chapter 6 _________________________________________________ Weather 2 Real-time Display Configuration Changes to the configuration of YourVIEW Display must be made while the Display module is running. However, all changes will not be effective until you restart Display. The settings are saved in a file. The configuration controls become available after clicking Setup on the menu bar.
User's Guide ______________________________________________________________________ identification can be changed. By default, the identification is Localhost, which means the computer itself. Optionally, the identification can be the name or TCP/IP address of the computer that produces the data. Source, Topic and Name define the data item and must match with the receiver settings. In Weather 2 display the first three data items are for wind display and rest are for data table.
Chapter 7 _________________________________________________________________ Browser CHAPTER 7 BROWSER This chapter provides information on the Browser module that shows the the stored files in graphical and table formats. Browser is used for browsing the stored files in graphical and table formats. In Figure 12 below, the parameter TA1 has been selected from the parameter list and is displayed in the graph and table.
User's Guide ______________________________________________________________________ Start Browser by clicking the button at the top left corner. Clicking the New File button opens a new file for viewing in Browser. Clicking the Print Graph button prints the graph using the current Windows printing defaults. The printout is automatically designed to fill an entire A4-size page. Clicking the Print Table button prints the table using the current Windows printing defaults.
Chapter 7 _________________________________________________________________ Browser The graph controls are introduced in Table 4 below. Table 4 Button The Graph Controls Description The X-autoscale button is used for scaling the time of the graph. X-autoscale The Y-autoscale button is used for scaling the Y-data of the graph and for continuous autoscaling of either scale. Y-autoscale Right-clicking the X-scale format button will open the Format, Precision, and Mapping Mode buttons.
User's Guide ______________________________________________________________________ 0105-149 Figure 13 The Cursor The cursor appears on the display as shown in Figure 13 above and the graph controls appear on the display as shown in Figure 14 below. 0105-148 Figure 14 The Graph Controls The zooming tools are explained in Table 5 below.
Chapter 7 _________________________________________________________________ Browser The zooming tools appear on the display as shown in Figure 15 below.
User's Guide ______________________________________________________________________ This page intentionally left blank.
Chapter 8 ______________________________________________________YourVIEW WEB server CHAPTER 8 YOURVIEW WEB SERVER This chapter provides information on the YourVIEW WEB Server that makes the display image available over Internet. YourVIEW 2000 runs its own web server, which launches the display image available over Intranet. Displays are launched as .jpg images that are not updated automatically. The display can be updated by clicking the Refresh button of the web browser.
User's Guide ______________________________________________________________________ Web Server Settings NOTE Web Server is not be available by default. Web Server should be enabled after installation. By default, it is disabled. To enable the web server, follow the instructions below: 1. Select the YourVIEW Receiver window. 2. Select from the menu bar Tools - Options - Web Server: Configuration. 3. Select Enable Web Server. Use the default Root Directory and default HTTP Port, see Figure 17 below.
Chapter 8 ______________________________________________________YourVIEW WEB server Display Address The display address is, for example, the following: http://localhost/.snap?YourVIEW+Weather+2+Display.vi Where localhost means the computer itself and should be replaced by the TCP-IP address or name of the computer where the YourVIEW 2000 application is running.