
Skirted and Dropin Alcove Tubs Install Guide

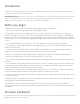


Finishing material
Adjustment material
5/8" Plywood
Finishing material
Adjustment material
5/8" Plywood
Silicone
Bathtub
Bathtub support (Island)
Note: the dimension
Note: Podium covering should be included in dimension C.
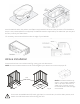
3/4"
(19mm)
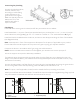
Drilling for plumbing
Mark the location of the faucets on the underside of your unit and
drill 3/16” (5 mm) pilot holes. Ensure that your holes are lined up
with the plumbing. Your chosen faucet will determine the number
and size of holes required for proper installation.
Drill directly on the finished side, following the faucet installation
instructions for your chosen faucet, or tub filler.
Position the faucets at the recommended marks. The bathtub must be tested prior to completing installation.
To properly test your tub, fill it to the overflow with water, and inspect it for leaks. Check the surface of the
tub as well as all pipes and joints for leakage.
Drilling for Valley jetted tubs
IMPORTANT SAFETY NOTE: Never run a whirlpool system dry. This can cause damage to your whirlpool jet
pump. Damages to whirlpool jet pumps caused by being run dry are not covered by warranty. Air systems,
however, are designed to be run dry for a short period of time; such as during a system’s purge cycle.
Fill tub to overflow before testing the jetting system or looking for leaks. Inspect closely for any damage or
leakage from under the bathtub.
After your preliminary inspection, run your tub’s jet system for 30 minutes, and again inspect for any leaks
that may have occurred to the tub or jetting system during transportation or installation. Your Valley Acrylic
bath has been shipped to you leak-free from the factory.
Allow the tub to stand, full of water, for 24 hours and monitor for leaks as some may not be apparent during
operation. When you are sure your bath is completely leak-free proceed with the installation steps provided
in this guide.
Bathtub without a drilling template
Lay the bathtub on a piece of plywood which will be used to cover the island.
Using a level or a plumb line, mark the contours of the bathtub onto the piece of plywood.
Cut 3/4” (19 mm) inside the traced line, and install the piece of plywood on top of the island. (See diagram
below)
Drop-In installation
Structure measurements from product specifications must be verified against your unit. Some units are
available with left-hand, right-hand, or centre drains; check the drain position, and double-check all
dimensions before drilling the floor.
IMPORTANT WARRANTY NOTE: Installation of a tub with a known, or visible defect will not be repaired by
Valley Acrylic once installed, and the warranty will be void. Please contact Valley immediately if you notice a
defect in your tub prior to install.