Installation Manual
Introduction Thank you for choosing a Valley product! This installation manual provides you with general information on the proper installation of our bath products. IMPORTANT NOTE: Never lift or carry your unit by the grab bar, or by any piping if equipped with a whirlpool system. These elements are not designed for carrying, and doing so may result in damage to the unit, or bodily injury. Carrying your unit in this manner will void your warranty.
Tools required • • • • • • • • Measuring tape Pencil 3/16” (5 mm) and 1/8” (3mm) drill bits Hole saw Electric drill Screwdriver Pliers Level • Safety glasses • Silicone sealant • Wood wedges • 2” x 2” x 3” wood blocks (51 mm x 51 mm x 76 mm) • No.8 x 1 1/4” screws (4.2 mm x 32 mm - Flat or Phillips head) • 3/4” x 1” wood studs (19 mm x 25 mm) for alcove installation. Plumbing Make sure you install all plumbing, and drainage before securing the unit.
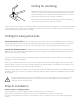
Drilling for plumbing Finishing material Silicone Bathtub Adjustment material Mark the location of the faucets on the underside of your unit and drill 3/16” (5 mm) pilot holes. Ensure that your holes are lined up 5/8" Plywood Your chosen faucet will determine the number with the plumbing. and size of holes required for proper installation. Bathtub support (Island) Drill directly on the finished side, following the faucet installation instructions for your chosen faucet, or tub filler.
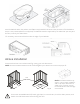
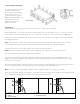
Level the bathtub within the podium, and fasten six (6) wood blocks around the perimeter of the bathtub to secure it into position (Blocks not supplied). The bathtub must be supported by the island 3/4” (19 mm), and the floor; never by the island alone. * If necessary, remove wood blocks under the edge of your bathtub. PODIUM COVERING FRAME SUPPORT od blocks Alcove installation Construct the alcove in accordance with Fig. A using your tub dimensions.
Connecting the plumbing Connect the plumbing (drain, overflow, faucets, etc.) according to local building codes, and keep to the general rules in this guide. Make sure that all joints are waterproof. Fill up the bathtub with water to inspect for leaks. Finishing up Install the finish covering over the island, and fill the joints with a silicone sealant. Install a standard 1” x 3” piece of wood (not provided with your product) [3/4” x 2 1/2” | 2 cm x 6.3 cm] all around the alcove, at height C (Fig A).
Maintenance General cleaning: Cleaning can be accomplished with hot, soapy water and a damp cloth. Whirlpool systems can be cleaned by running bleach, or a mixture of baking soda and vinegar through the system while in use; then cycling the cleaner. After cleaning is complete, refill with water, and allow the system to run through a thorough rinse; cycling the water through the whirlpool jets to clear them. Weekly cleaning is recommended for tubs and whirlpool jetting systems.
Valley Acrylic Product Guide 33778 North Railway Ave Mission BC, V2V1H6 Toll Free 1.877.398.8827(TUBS) Fax (604)820.0124 Email Sales@valleyacrylic.com Website www.ValleyAcrylic.