
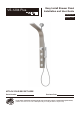
Installation Guide

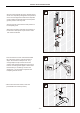

• Before and during installation, please read and familiarize yourself with all installation instructions for this product.
• Please keep all components, parts and accessories of this product away from small children and minors. During installation,
all screws,tools and small parts should be supervised so that they do not fall into the hands of children.
• Use caution at all times when installing this product. Please ensure that you are physically able to perform all parts of the
installation and that you have the correct tools and equipment needed.
• Before beginning,remove all wrappers and packinging materials including staples and packing straps.
• Please check to ensure that all components and parts are complete.
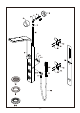
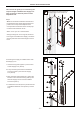
• The Filter Gasket (#11) must be installed to protect against incoming dirt by pipework. Incoming dirt can impair the function
and/or lead to damages on functional parts of the fixture. Manufacturer will not be held liable for resulting damages.
• The O Ring Gasket (# 6) must be installed to prevent water leakage. Manufacturer will not be responsible or liable from
any damage which results directly or indirectly from failure to installation of the O Ring Gasket.
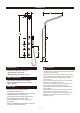
IMPORTANT NOTE
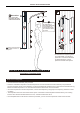
RECOMMENDED TOOLS FOR INSTALLATION
-
PH
+
2.5 mm
Drill Bit 6mm
Electric Drill
Wrenches
24 mm /30mm
Vice
Pencil / Shear
Screwdriver
Hexagon-wrench Level
Sealing Tape
Pliers
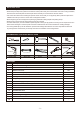
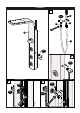
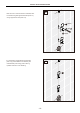
NO.
1
2
3
4
5
6
7
8
9
10
11
12
13
14
15
16
Description
Shower Panel Casing
Shower Head Outlet Connector Cover
Elbow Connector
Brass extender joint (1 5/8"& 2 5/8"x ½")
Base Plate Cover with Tape (for Shower Head Outlet Connector Cover)
O Ring Gasket
Ring Clamp
Main PVC Supply Line (43"/110cm)
Handshower Cradle Assembly
PVC Handshower
Filter Gasket
Handshower Hose
Screws
Positioning and Support Brackets
Screw Anchor
Installation Template Guide
Qty
1 Set
1 Pc
1 Pc
2 Pcs
1 Pc
2 Pcs
1 Pc
1 Pc
1 Set
1 Pc
2 Pcs
1 set
4 Pcs
2 Pcs
4 Pcs
1 pc
PARTS LIST
- 3 -
Hammer