AIR-POWERED 2 IN 1 COMBI NAILER/STAPLER MODEL SF5040E INSTRUCTION MANUAL IMPORTANT: Read all safety rules and operating Instructions carefully before starting the product. Keep this Manual for future reference. Residual Risks Even when the tool is used as prescribed it is not possible to eliminate all residual risk factors.
TABLE OF CONTENTS: TECHNICAL SPECIFIACTIONS SAFETY GUIDELINES UNPACKING KEY PARTS DIAGRAM IMPORTANT INFORMATION TYPES OF FASTENERS OPERATING INSTRUCTIONS MAINTENANCE TROUBLESHOOTING EXPLODED VIEW PARTS LIST TECHNICAL SPECIFIACTIONS: Magazine capacity(QTY.) 100pcs Nailer Drives18Ga Brad Nails 5/8”~2” and 18Ga Crown staples 5/8”~1-5/8” Operating pressure: 60 to100 PSI(4 to 7 bar) Maximum pressure: 120PSI (8.3bar) Air consumption: 0.
SAFETY GUIDELINES This manual contains information that relates to protecting personal safety and preventing equipment problems.it is very important to read this manual carefully and understand it thoroughly before using the product.the symbols listed below are used to indicate this information. DANGER! Potential hazard that will result in serious injury or loss of life. WARRNING! Potential hazard that could result in serious injury or loss of life.
-Locate the compressor in a well-ventilated area for cooling, and must be a minimum of 12”(31cm) away from the nearest wall. -Protect the air hose and the power cord from damage and puncture. Inspect them for weak or worn spots every week, and replace them if necessary . -Always wear hearing protection when using the air compressor. Failure to do so may result in hearing loss. -Do not carry the compressor while it is running. -Do not operate the compressor if it is not in a stable position.
UNPACKING -If you discover the nailer/stapler is damaged after you have signed for delivery, please immediately where you buy for advice. -Save the containers and all packing materials for possible inspection by the carrier or its agent. Otherwise, filing a freight claim can be difficult. When you are completely satisfied with the condition of the shipment, you should inventory the equipment. -After you open the nailer/stapler box, you should find the following. Model SF5040E Inventory (Figure 1) A.
Do not exceed the maximum or minimum pressures. Operating the tool at the wrong pressure(too low or too high) will cause excessive noise or rapid wear of tool. WARNING! Potential hazard that could result in serious injury or loss of life. Keep hands and other parts of the body away from the tools discharge and working areas when connecting the air supply. Failure to comply could lead to serious injury or loss of life.
OPERATING INSTRUCTIONS To load your nailer/stapler: 1. DISCONNECT NAILER /STAPLERFROM THE AIR SUPPLY! 2. Grip the nailer/stapler firmly, unlatch the catch lever (Figure 3), and pull the magazine pusher back completely. Figure 3. Catch lever engaged and magazine pusher retracted. 3. Insert a strip of brads or staples, pointed-end down, into the magazine as shown in Figure 4. Only those fasteners specified under TECHNICAL DATA may be used Pusher Magazine Figure 4. Loading nails into magazine. 4.
Operating If you have not read the safety instructions in this manual, do not operate the nailer/stapler. Before you operate your nailer/stapler, place two to three drops of the included oil into the quick connect fitting where the nailer/stapler connects to the air supply. To operate your nailer/stapler: 1. Connect the air supply to the quick connect fitting. 2.
Single Fire Operation SINGLE SEQUENTIAL MODE The tool is specially designed for single sequential mode. This mode requires the trigger to be pulled each time a fastener is driven. The tool can be actuated by depressing the work contact element against the work surface followed by pulling the trigger The trigger must be released to reset the tool before another fastener can be driven. Clearing Jammed Nails/Staples A jammed nail or staple must be cleared before using the nailer/stapler again.
Replacing Pistons/O-Rings If you use your nailer/stapler day in and day out, repair pistons are cheap insurance against wasted down time and lost profits, in the event that a piston or piston shaft becomes worn out. A replacement piston and O-ring kit, you can contact with where you buy! To replace a piston and O-ring: 1. DISCONNECT NAILER /STAPLER FROM THE AIR SUPPLY! 2. Remove all nails/staples from the magazine. 3. Remove the four cap screws on the head of the nailer/stapler, near the exhaust port.
Lubricating -Place 2 to 6 drops of pneumatic tool oil in the nailer air inlet (as shown in Figure 8) every 2 hours of continuous use. Wipe off any excess oil near the nailer exhaust to avoid dust build-up. -Another option to manual oiling would be to simply install a lubricator in your air compressor line. If your air compressor line already has a lubricator, then regular lubrication of your nailer will not be necessary. Just make sure there is always oil in the lubricator. Figure 8.
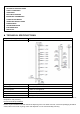
Explode Drawing &Spare parts list Issue Date:2018.05.24 Version No:C/0 No. 1 Description Bolt Qty 1 No. 24 Description O-ring 1.7×2 Qty 1 No. 47 Description spring washer 4 Qty 2 No.