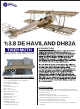
:3.8 DE HAVILAND DH82A TIGER MOTH INTRODUCTION BUILDING INSTRUCTION PRODUCT LIST& KIT FEATURES PRODUCT LIST: 1* Un-assembled Balsa Tiger Moth KIT: Plywood sheet pack*1 1:1 installation drawing*1 Batten sets Operation instruction*1 Fiber cowl*1 Fiber servo arms*3 Metal landing gear set*1 Tail wheel set*1 Main wheel* 1 pair 4mm steel tube set*1 Blister part*4 Metal parts plate*2 Metal fitting bag*1 φ0.8mm steel wire*20M φ1mm steel wire*10M KIT FEATURES ☆1:3.
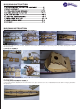
BUILDING INSTRUCTION BUILDING INSTRUCTION 1.SERVOS MOUNT IN FUSELAGE ASSEMBLY Accurately make two pairs of A28 , A32&a31 coincident with resin glue respectively.Then assemble all the parts same like the pictures. 2.NOSE ASSEMBLY Accurately make two pairs of A2 , two pcs A1 coincident with resin glue respectively.Then assemble all the parts same like the pictures. 3.FUSELAGE FRAME ASSEMBLY (1)Accurately make A25&A26 coincident with resin glue.
(2)Glue the fuselage lateral plate and the strengthening battens. (3) Assemble the engine mount to fuselage. (4)Joint and glue the pine sticks. (4)Glue the bottom board A37. (6)Glue the bulkhead A8,A12,A13 and strengthening plate A39. (7)Sanding the strengthening plates. (8)Glue the top cover board. Then glue A10*2,A11*2,A15*2,A16*2 according to the installation drawing.
(9)Joint the retral frame of fuselage with battens according to the installation drawing. Then connect it on the fuselage. (10) Joint and glue A17,A18,A19(cabin),Then glue the part on the fuselage like the pictures. (11)Joint and glue the bulkhead and battens according to the installation drawing. (12) Glue the cover board and fix it with wood sheet to make it more flat. (13) Make a small cut for bending the battens easily.
4.STABILIZER AND ELEVATOR (1)Joint the retral frame of fuselage with battens according to the installation drawing. Then connect it on the fuselage. (2)Glue the strengthening plate and ribs. Make sure the top of the ribs (8mm) on the middle of the 5*10mm batten, reserve 1mm both side for 1mm plywood sheets cover. (3)Cut 1mm deep grooves for glue 1mm plywood sheet on ribs. (4)Sand it to be cambered. (5)Bend the 4mm stainless steel tube like the installation drawing.
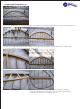
(6)Cover the 1mm plywood sheets on ribs and then joint and glue on the elevator. 5.FIN AND RUDDER (1) Trim the 8*14*300mm batten like the picture, make the diameter of the top semicircle be 4mm for connect the 4mm stainless steel tube. (2) Glue the ribs and 1mm plywood sheet. Each rib needs to be glued two pcs 1mm plywood sheet. (3)Bending the 4mm stainless steel tube. (4) Joint and glue the stainless steel tube and framework. And then glue the strengthening plate.
(5) Assemble the fin parts. (6) Cut 6 1mm deep grooves (both ends and middle, up and down side) on the vertical fin front batten like the picture, in order to glue 1mm plywood sheet in the grooves. (7) Sand the vertical fin front batten to be cambered. (8) Bore and install the needle hinges. The vertical fin is finished. 6.THE FUEL TANK ASSEMBLY (6) Joint and glue the parts like the picture and then glue the 1mm plywood sheets cover.
(2)Glue the wood bricks on the front(wider) and back (narrow),and then trim them to be cambered. (3) Finished 7.WING CONSTRUCTION upper wing (1)Joint the ribs. (2)Bend the 4mm stainless steel tube according to the installation drawing, then glue to the wing. Suggest using fiber cloth to strengthen the sticking-joint.
(3)Cut the redundant wood until the wing assembly is finished and the glue dries. (4) Notice: the right side of the metal parts is counter to the installation drawing. Sorry for that and we will correct the drawing in next batch production. (5)Make and install the metal parts like the pictures. (6)Mark the place of center line and then bore 3mm holes according to the holes of metal parts. And install the metal parts. (7)Make the metal parts and fix them with screws.
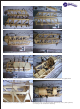
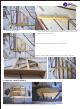
(8) Accurately make 2pcs D1 ribs coincident with resin glue ,Joint it on the wing. (9) Joint and glue the half ribs. (10) Fix the 8mm wood bars and metal parts with self-tapping screws. (11) Pull φ0.8mm steel wires. (12) Cover and glue 1mm plywood board.
(13) Install the appropriate wood block on the mount of wing strut, and smooth it ,then install the metal parts like the pictures. LOWER WING (1) Glue the servo mount “C” type strengthening plate. (2) Joint and glue the servo mount on E8 ribs .Insert the strengthening plates and glue them to ribs. (3) The girders in the kit come with bevel, please notice the installing direction for front and back girders. (Front girder with forward bevel and back girder with backwards bevel.
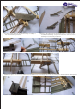
(5) Glue the ribs’ strengthening plates except rib E1. (6) Install the aileron girder, and insert&glue the strengthening plates. (7) Trim the wingtip with the knife and glue rib E9. (8) Overturn the wing and install the servo mount cover. (9) Mark the place of center line and then bore 3mm holes according to the holes of metal parts. And install the metal parts.
(10)Bend the 4mm stainless steel tube according to the installation drawing, then glue to the wing. Suggest using fiber cloth to strengthen the sticking-joint. (11) Joint rib E1.And fix the wing on the installation drawing again, then pull φ0.8mm steel wires. (12) Joint and glue the half ribs. (13) Glue 1mm plywood board (up and down). (14) Joint the strengthening plate for servo horn.
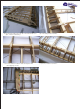
(15) Glue balsawood sheet on the aileron girder and smooth it. And then glue 1mm plywood sheet on it. (Same steps as the wing girder.) (16)Install the appropriate wood block on the mount of wing strut, and smooth it ,then install the metal parts like the pictures. (17) Install the wing mounting metal parts with self-tapping screws. (18)Make the wing bolts and install them like the pictures.
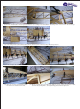
MAIN LANDING GEAR (1) Make the metal parts and install the tail wheel. (2) Main landing gear parts. (3) Joint the spring &sliding sleeve, and lock with each (4) Fix the damper on the wheel shaft with screw. end of nuts, then insert it to steel tube and the connection, keep the shaft movable. (5)Joint the supporting steel tubes and finished. (6) Fix it on the frame.
OTHERS Cabin door Make the fixture of cabin door, and fix 2pcs 1mm plywood with glue in it, then glue the battens. The process of wing strut. Assembly of tail servos. 1.0° 4.5° Supporting for the fuel tank.