HDMI® EXTENDER O V E R S I N G L E COAX I A L C A B L E PRODUCT MANUAL Vanco Part Number VPW-280577 www.vanco1.com • 888.769.
DEAR CUSTOMER Thank you for purchasing this product. For optimum performance and safety, please read these instructions carefully before connecting, operating or adjusting this product. Please keep this manual for future reference. This product is 100% inspected and tested in the United States to verify HDMI performance parameters. WARNING 1. Do not expose this unit to water, moisture, or excessive humidity. 2.
FEATURES The Vanco 280557 HDMI Coaxial Extender uses coaxial cable as the transmission media. Benefits of using the Vanco 280557 HDMI Coaxial Extender are: 1. The length of HDMI cable is normally offered in fixed length increments and cannot be changed after it is produced. This is because the HDMI connector can only be effectively soldered and terminated using tooling, fixtures and eye pattern testing equipment normally only available in a factory.
SPECIFICATIONS Operating Temperature Range...................................... -5 to +35°C (+23 to +95 °F) Operating Humidity Range........................................... 5 to 90 % RH (no condensation) Input Video Signal....................................................... 0.5-1.0 volts p-p Input DDC Signal......................................................... 5 volts p-p (TTL) Video Format Supported.............................................. DTV/HDTV; 1080p/1080i/720p/576i/480i Output Video..
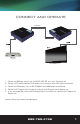
CONNECT AND OPERATE Coax Cable 1. Connect the HDMI input source ( such as HD-DVD, PS3, STB, etc.) to the Transmitter unit. 2. Connect a CATV coaxial cable from COAX output of the Transmitter to the COAX input of the Receiver. 3. Connect the HDTV display ( such as HD-LCD,HD-DLP) to the HDMI output of the Receiver. 4. Connect the IR TX pigtail into Transmitter unit; connect the IR RX pigtail into the Receiver unit. 5.
CONNECT AND OPERATE CONTINUED DIP switch setting instruction: Transmitter Position1 Function 0 Range scaling disable. 1 Range scaling enable. Position2 Position3 Function 0 0 1080P stereo (Using Embedded EDID) (note1) 0 1 1080P 5.1 (Using Embedded EDID) (note2) 1 0 1080P 7.1 (Using Embedded EDID) (note3) 1 1 EDID auto copy (note4) Note1: The OP5 will use the embedded 1080p stereo EDID when the DIP switch is in this mode. The EDID will be 1080p video and stereo audio.
PANEL DISCRIPTIONS TRANSMITTER 888.769.
PANEL DISCRIPTIONS RECEIVER 8 www.vanco1.
TROUBLE-SHOOTING 1. Best results are usually achieved when the source and display resolutions are the same. If resolutions differ, the extenders will try to adjust the signal to match the resolution of the HD TV with the lowest resolution. This will result in a picture with a lower resolution on the other HD TV sets. 2. If you do not get audio and video see if you can use the “set-up” menu on the TV to adjust the audio settings and the video settings.
LIABILITY STATEMENT Every effort has been made to ensure that this product is free of defects. The manufacturer of this product cannot be held liable for the use of this hardware or any direct or indirect consequential damages arising from its use. It is the responsibility of the user and installer of the hardware to check that it is suitable for their requirements and that it is installed correctly. All rights are reserved.
TECHNICAL SUPPORT In case of problems, please contact Vanco Technical Support by dialing 1-800-626-6445 or 1-888-769-4156. You can also email technical support issues to info@vanco1.com When calling, please have the Model Number, Serial Number (affixed to the bottom of the unit) and Invoice available for reference during the call. Please read this Instruction Manual prior to calling or installing this unit, since it will familiarize you with the capabilities of this product and its proper installation.
® Vanco International 506 Kingsland Drive Batavia, Illinois 60510 call: 888.769.4156 fax: 630.879.9189 visit: www.vanco1.