
Installation manual


21
Problems Possible causes You should try this
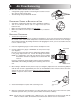
1. Unit doesn't work. • The circuit board may • Unplug the unit. Disconnect the main
be defective. control and the optional(s) control(s).
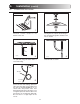
Jump B and G (BLACK and GREEN)
terminals. Plug the unit. If the motor
runs on high speed and the damper
opens, the circuit board is not defective.
2. The damper actuator • The 9-pin connector may • Unplug the unit and check to make sure all the crimp
does not work. have a loose connection. connections are secured. Check the damper actuator
connections as well.
• The damper actuator may be • Feed 120 V directly to the damper actuator. If the
defective. problem persists, replace the damper actuator.
• The circuit board may be • Replace the circuit board if the problem is not solved by
defective. the above.
3. The wall control does • Erratic operation of the • Unplug the unit. Wait 30 seconds. Plug it back in.
not work control every 8 seconds.
OR
the indicators flash. • The wires may be in reverse • Ensure that the color coded wires have been connected
position. to their appropriate places.
• The wires may be broken. • Inspect every wire and replace any that are damaged.
• There may be a short-circuit. • With the help of a multimeter, check for continuity.
• The wire in the wall OR the • Jump “B” and “G” (BLACK and GREEN). If unit switches
wall control may be defective. to high speed, remove the wall control and test it right
beside the unit using another shorter wire. If the wall
control works there, change the wire. If it doesn’t,
change the wall control.
• The circuit board may • If the unit does not switch to high speed, replace the
be defective. circuit board.
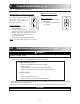
4. The 20/40/60-min. • The 20/40/60-min. push button • Jump the OL and OC terminals. If the
push-button timer may be defective. unit switches to high speed, remove
does not work OR its the push button and test it right beside
its indicator light the unit using another shorter wire. If it
does not stay on. works there, change the wire. If it
doesn’t, change the push button.
Start-up troubleshooting:
NOTE: Be sure to unplug and inspect the unit before proceeding with these steps.
11.
Troubleshooting
VE0082
B
G
VE0086
OL
OC