NATURAL GAS LOGS VENTED DECORATIVE APPLIANCE OWNER’S OPERATION AND INSTALLATION MANUAL ANSI Z21.84 O-TL REPORT # 114-L-31-4 Vanguard Burner Models VVMR18 and VVMR24 For Use with Vanguard Log Set Models VMLR18 and VMLR24 FMI Burner Models FVMR18 and FVMR24 For Use with FMI Log Set Models FMLR18 and FMLR24 These logs are approved by the manufacturer for installation in listed indoor and outdoor solid fuel burning fireplaces. See warranty for additional information.
TABLE OF CONTENTS Safety................................................................... 2 Local Codes......................................................... 4 Unpacking............................................................ 4 Product Identification............................................ 4 Optional Product Features................................... 4 Installation............................................................ 5 Operation...........................................................
safety Continued WARNING: Any change to this log set or its controls can be dangerous. 1. This appliance, as supplied, is only for use with the type of gas indicated on the rating plate. This appliance is convertible for use with propane/LP, using the GA9050A-1 or GA9150A pilot kit. 2. If you smell gas • shut off gas supply • do not try to light any appliance • do not touch any electrical switch; do not use any phone in your building • immediately call your gas supplier from a neighbor’s phone.
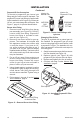
Local Codes Unpacking Install and use log set with care. Follow all local codes. In the absence of local codes, use the latest edition of The National Fuel Gas Code, ANSI Z223.1/NFPA 54*. *Available from: American National Standards Institute, Inc. 1430 Broadway New York, NY 10018 National Fire Protection Association, Inc. Batterymarch Park Quincy, MA 02269 CAUTION: Do not remove the data plates from the burner pan. The data plates contain important warranty and safety information. 1.
Installation CAUTION: Do not remove the data plates attached to the burner pan. The data plates contain important warranty information. WARNING: Before installing in a solid fuel burning fireplace, the chimney flue and firebox must be cleaned of soot, creosote, ashes and loose paint by a qualified chimney cleaner. Creosote will ignite if highly heated. A dirty chimney flue may create and distribute soot within the house. Inspect chimney flue and firebox for damage.
Installation Continued CHECK GAS TYPE Use only natural gas. If your gas supply is not natural gas, you must install ON/OFF Safety Valve/Pilot Kit (see Accessories, page 22). Call dealer where you bought log set. If the fireplace does not have a gas supply shutoff valve, one must be installed. VENTING SPECIFICATIONS FOR INSTALLATION The fireplace chimney flue and vent must be drafting properly.
Installation Continued IMPORTANT: Install equipment shutoff valve in an accessible location. The equipment shutoff valve is for turning on or shutting off the gas to the appliance. Apply pipe joint sealant lightly to male NPT threads. This will prevent excess sealant from going into pipe. Excess sealant in pipe could result in a clogged burner injector. WARNING: Use pipe joint sealant that is resistant to liquid petroleum (LP) gas.
Installation Continued 4. If using optional GA9050A-1 kit, go to Optional GA9050A-1 ON/OFF Safety Valve/Pilot Kit section for installation instructions. If using optional GA9150A kit, follow instructions included with kit for installation and operation. 5. Using thread sealant on male threads, install burner connection fittings into 1/8" NPT holes on each side of burner manifold. 6. Press right and left side burners onto burner connection fittings. Burner porting should face downward (see Figure 6).
Installation Continued 2. Attach pilot gas line to pilot outlet of gas control valve and tighten. Connect thermocouple to rear of gas control valve. See Figure 9. Do not overtighten. If using propane/LP gas, see Changing Pilot Orifice, page 10. 3. Install inlet fitting into inlet opening of gas control valve (see Figure 10). Use thread sealant on male pipe threads. 4. Place burner pan assembly in center of fireplace floor. Make sure front of pan faces the room from which you wish to control appliance. 5.
Installation Continued Propane/LP Gas Conversion To convert to propane/LP gas, burner inlet fitting and pilot orifice must be replaced. The propane/LP burner inlet fitting is supplied with orifice installed for a 24" log set. If you have an 18" set, you must change this orifice also. See Figure 1, page 4, for product identification. Burner Inlet Fitting 1. Remove burner inlet fitting from burner pan assembly (see Figure 12). DO NOT remove orifice from fitting.
Installation Continued Testing Burner for Leaks 1. Generously apply noncorrosive leak detection fluid to all connections. WARNING: Never check for gas leaks with open flame. 2. Light burner with shutoff valve no more than half open and holding a match slightly in front of pan (see Lighting Instructions, page 12). 3. Inspect all connections for bubbles, raw gas odor or flame from any area other than burner (leaks). If leaks are detected, shut off gas valve immediately.
Operation 1. STOP! Read the safety information, above. 2. Turn the gas shutoff valve to OFF. 3. Wait five (5) minutes to clear out any gas. If you then smell gas STOP! Follow the safety information above. If you don‘t smell gas, go on to the next step. 4. Lay a lit match on top of pan material about 2" from end of supply side of pan. 5. Slowly turn gas shutoff valve ON until burner ignites.
OPERATIon Continued 6. 7. 8. 9. Note: You may be running this log set for the first time after hooking up to gas supply. If so, the control knob may need to be pressed in for 30 seconds. This will allow air to bleed from the gas system. • If control knob does not pop up when released, contact a qualified service person or gas supplier for repairs. With control knob pressed in, push down and release ignitor button. This will light pilot. The pilot is attached to the rear of the front burner.
Troubleshooting WARNING: Turn off log set and let cool before servicing. Only a qualified service person should service and repair log set. Note: All troubleshooting items are listed in order of operation. OBSERVED PROBLEM POSSIBLE CAUSE REMEDY Log set is smoking/sooting excessively (Note: It is natural and unavoidable for vented gas log sets to produce moderate levels of carbon (soot) where flames contact the logs. This is especially true with propane/LP gas.) 1. Poor fuel quality 5.
troubleshooting Continued OBSERVED PROBLEM POSSIBLE CAUSE REMEDY When ignitor button is pressed, there is spark at pilot but no ignition (GA9050A-1 Only) 1. Gas supply turned off or equipment shutoff valve closed 2. Control knob not in PILOT position 3. Control knob not pressed in while in PILOT position 4. Air in gas lines when installed 1. Turn on gas supply or open equipment shutoff valve 5. Pilot adjustment screw closed 6. Pilot is clogged 7.
troubleshooting Continued WARNING: If you smell gas • Shut off gas supply. • Do not try to light any appliance. • Do not touch any electrical switch; do not use any phone in your building. • Immediately call your gas supplier from a neighbor’s phone. Follow the gas supplier’s instructions. • If you cannot reach your gas supplier, call the fire department. IMPORTANT: Operating log set where impurities in air exist may create odors.
Replacement Parts Note: Use only original replacement parts. This will protect your warranty coverage for parts replaced under warranty. Usually, we will ask you to return the part to the factory. Parts Under Warranty Contact authorized dealers of this product. If they can’t supply original replacement part(s), call DESA Heating, LLC at 1-866-672-6040 for referral information. A list of authorized dealers can be found by visiting www.desatech.com.
Parts Burner Models VVMR18, VVMR24, FVMR18 and FVMR24 9 7 10 11 10 5 12 6 1 8 4 3 2 18 www.desatech.
Parts burner Models 5 6 7 8 9 10 11 12 901267-01E PART NO. 14325 14528 901066-01 901064-10 901064-03 901763-02 901763-01 901767-02 901767-01 901242-01 901232-01 901800-01 901757-01 901060-01 901765-03 901765-01 901765-04 901765-02 DESCRIPTION Brass 3/8 FLR x 1/2 FPT Elbow Brass 3/8 FLR x 3/8 FPT Elbow Brass Air Mixer - Natural Gas Natural Gas Injector Natural Gas Injector Burner Manifold Burner Manifold Burner Pan Burner Pan Damper Clamp - Std.
PARTS kingSton split oak Log Set Models KEY NO. PART NO. 1 DESCRIPTION 901123-01 901123-02 901122-01 901122-02 901119-01 901121-01 901120-01 901101-01 901118-01 2 3 4 5 6 7 Bottom Log VCB-13 Bottom Log VCB-14 Bottom Log VCB-11 Bottom Log VCB-12 Top Log VS-12 Top Log VCR-12 Top Log VCR-11 Top Log CHR-13 Top Log VCR-9 VML R18 VML R24 This list contains replaceable parts used in your log set. When ordering parts, follow the instructions listed under Replacement Parts on page 17 of this manual.
PARTS manchester split oak Log Set Models KEY NO. PART NO. 1 2 3 4 5 6 7 901472-01 901472-02 901473-01 901473-02 901128-01 901127-01 901125-01 901129-01 901126-01 FML R18 FML R24 This list contains replaceable parts used in your log set. When ordering parts, follow the instructions listed under Replacement Parts on page 17 of this manual. DESCRIPTION QTY.
Accessories Purchase these accessories from your local dealer. If they can not supply these accessories call DESA Heating, LLC at 1-866-672-6040 for information. You can also write to the address listed on the back page of this manual. Pine Cones - GA9650A For all models. Use for additional decoration only. (3 pine cones per box). Ash Bed Material (Vermiculite) - GA9750A For all models. Use for firebox decoration only.
NOTES ______________________________________________________ ______________________________________________________ ______________________________________________________ ______________________________________________________ ______________________________________________________ ______________________________________________________ ______________________________________________________ ______________________________________________________ ______________________________________________________ __________
Warranty KEEP THIS WARRANTY Model (located on product or identification tag)______________________________ Serial No. (located on product or identification tag)___________________________ Date Purchased ___________________________ Keep receipt for warranty verification.