
Operation Manual


225
12
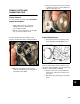
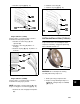
3. Install the top ring ([D] Fig. 14).
Fig. 14
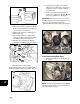
Ring Installation (161400)
Note the shape of each ring and be careful to
install them in their proper position.
1. Install the oil control rings (A) and
expander (B).
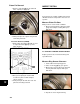
2. Install the center ring (C) with the “T”
facing up.
3. Install the top ring ([D] Fig. 15) with the “T”
facing up.
Fig. 15
Ring Installation (28Q700)
Note the shape of each ring and be careful to
install them in their proper position.
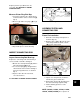
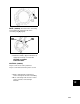
NOTE: Install gap of oil ring expander (B) 180
degrees from gap in oil control ring ([A] Fig. 16).
1. Install the oil contr ol ring (A) and expander
(B).
2. Install the center ring (C).
3. Install the top ring ([D] Fig. 16).
Fig. 16
PISTON INSTALLATION (TYPICAL)
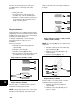
To prevent excessive oil consumption and/or
compression "blow-by," stagger the piston ring
gaps as illustrated in Fig. 17.
Fig. 17
CAUTION: Do not install piston and ring
assembly without ring compressor.
1. Oil the piston rings and piston skirt.
2. Compress rings with Ring Compressor
#19070 (A), or Ring Compressor #19230,
([B] Fig. 18).