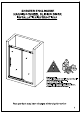
SHOWER ENCLOSURE HANGING WHEEL SLIDING DOOR INSTALLATION INSTRUCTIONS Maintenance tip: —| | The following substances or articles may cause physical harm and/er damage the shower door. Do not use them for cleaning: Acid and alkaline solvents,chemicals such as hydroelectric acid,acetone thinner,solvents,cleansers, or polishers,nylon brooms or sandpaper.
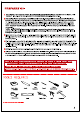
PREPARATION 4. WE STRONGLY RECOMMEND THAT A LICENSED AND INSURED PROFESSIONAL CONTRACTOR TO INSTALL THIS PRODUCT INCLUDING THE ASSISTANCE OF A SECOND PERSON DURING INSTALLATION. 2, After opening all boxes and packages, read this introduction carefully. Check that all of the needed parts are included in the package by marking all the components on the "Detailed Diagram of Shower Door Components”. Examine boxes and packages for shipping damage.
No.| Description QTY No.| Description QTY 1. | Bumper Strip 1pc 12. | Wall Mount Clamp 1pc 2. | Guide Rail Bracket 2 pes 13.| Wall Anchor 5 pes 3. | Glass Door Stopper 2 pes 14.| Allen Key 5 pos 4. | Upper Guide Rail 1pc 15. | Stationary Glass 1pe 5. | Roller PCs 16. | Screw M5XE0 apes 6. | Handel 1pc 17. | Glass Bracket 2 pes 7. | Glass Door 1pc 18. | Safety Pin 2 pes 8. | Side Anti-Water Strip 1pc 19. | Screw M4X30 1pc 9 Anti-splash Threshold 1pe 10.| Guide Block 1pe 11.
TIPS 01: Open the packaging carefully and inspect all the necessary parts using detailed diagram and component list in your manual as a reference. Before discarding the carton, check for small hardware bags that tend to fall to the bottom of the box. If any parts are damaged or missing, please contact us for replacement. 02: Retain these installation instructions for future use if in need. 1. Measure the distance between two finished walls. This distance is marked asW.
Note: The Glass Brackets(17) have been per-installed to the Upper Guide Rail(4). Your Upper Guide Rail (04) has been precept for your Shower model opening width, eg. 60" for shower width. If W-width of your wall-to-wall opening is equal to the size of your Shower model, it is unnecessary to cut the Upper Guide Rail and you can continue to Step 3.
3. Install Stationary Glass 3.1. Install Side Anti-Water Strip (8) on the side of Stationary Glass (15). 3.2. Disassemble the Wall Mount Clamp (12) and install the wall clamp on the Stationary Glass (15). 3.3. Place the stationary glass to the wall, level it and draw holes on the shower base/threshold through the holes on the Wall Mount Clamp (12).
4. Use 5/16" drill bit to drill holes on the shower base/threshold and knock in 5/16" Wall Anchors (13), then lock the stationary glass to the wall by Philip's Screw Please see Fig 4 for details Fig 4 5. Install guide rail 5.1. Loosen the screw on Guide Rail Bracket (02), pull out the wall bracket. Please see = (B.
Fig 6 6. Use the Allen key (14) to loose the screw on the Guide Rail Bracket (02) and Glass Door Stopper (03). Slide the stopper and then the bracket to the Guide Rail (04), use the Allen key to tighten the parts to the guide rail temporarily. Disassemble the Glass Bracket (17), insert the bracket core inside the guide rail tube, push it slowly to make the hole on the core match the hole on the tube, then lock the bracket back side with Allen Key(14) . See Figure 6 for details.
7. After finished installing the Upper Guide Rail(04), lock the glass bracket front side so as to lock the Stationary Glass(15) to the Upper Guide Rail(04). Please see Fig 7 for details. 8. Make sure the Stationary Glass (15) and the Upper Guide Rail (04) are leveled, if a horizontal adjustment is required, adjust it in the Glass Brackets (17). Slide the Guide Rail Bracket (02) against the wall, outline the guide rail brackets position.
9. Drill holes with 5/16" drill bit and knock in 5/16" anchor(13), then use Philip's screw to lock the wall bracket to the wall. Please see Fig 9 for details Tips: The other wall bracket is installed in the same way I = Fig 9 Aircrew M5X60 Slide the guide rail bracket (02) to the two end sides of the guide rail, fixed the guide rail bracket to the wall bracket with hexagon spanner(14). Please see Fig 10 for details Tips: 1.
. Rise the moving glass to make rollers hang to the top guide rail and place the glass bottom side to the Guide Block (10) slowly. Make sure that the Glass Door (07) will slide in the guide block, outline the drilling position, install the guide block to the shower base/threshold.
.Install strips Please see Fig 13 for details Bottom guide block ‘Sealing strip ’ Moving glass Stationary glass Waterproof strip. opus Jejune pis Jung Fig 13 14. Install the safety pin 14.1. Make sure that the Glass Door with Rollers hangs to the Upper Guide Rail (04), and the glass bottom is inside the Guide Block (10), now adjust glass to vertical and then lock the Safety Pin (18).
15. Adjust the roller and fix the Glass Door Stopper 15.1. Adjust the fasteners on both Rollers (05) to ensure that the bottom edge of the Glass Door (07) will not touch the bottom of the Guide Block (10). 8.2. Push the Door Stopper (03) close to the wall side, slide the moving door to make Roller contact to the stopper and get perfect space then lock the stopper bottom screw.
16.Install the anti-splash threshold Put the Anti-splash Threshold (09) in front of the Glass Door (07) on the shower base/threshold, seal it to the shower base/threshold with silicone. Please see Fig 16 for details Fig 16 17. Apply the sealant on the seams between the bottom sealing strip and the shower base/threshold; and between the stationary glass and wall.