4+1 SATA II 300 IDE/PATA PCI-E Combo Host Card w/ RAID & Port Multiplier User Manual Model: UGT-IS100R All brand names and trademarks are properties of their respective owners. www.vantecusa.
Table of Contents 1. Features and Benefits ......................... 3 2. Bus Interface ........................................ 3 3. Ports...................................................... 3 4. System Requirements ......................... 4 5. Package Contents................................ 4 6. Hardware Description.......................... 4 7. Jumper Settings................................... 5 8. Hardware Installation........................... 5 9. RAID Arrays...................................
Features and Benefits z Compliant with one-lane 2.5Gb/s PCI Express specification z Compliant with Serial ATA 1.0 specification z Supports Serial ATA Generation 2 transfer rate of 3.
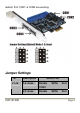
System Requirements z PCI Express-enabled system with one available PCI Express slot z Windows® 2000, XP/2003/Vista/2008/7 (32/64 bit) Package Contents z 1 x 4+1 SATA II 300 IDE/PATA PCI-E Combo Host Card w/ RAID & Port Multiplier z 1 x Driver CD z 1 x User’s Manual z 2 x SATA Data Cable z 1 x IDE/PATA Cable Hardware Description Note: There are four SATA ports in 4+1 SATA II 300 IDE/PATA PCI-E Combo Host Card w/ RAID & Port Multiplier . We name these ports CON1 to CON4.
default, Port CON1 & CON2 are working.
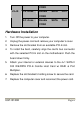
CON3 J5-J8 1-2 close Enable SATA Port SATA Port CON2 2-3 close Enable CON4 Hardware Installation 1. Turn Off the power to your computer. 2. Unplug the power cord and remove your computer’s cover. 3. Remove the slot bracket from an available PCI-E slot. 4. To install the bard, carefully align the card’s bus connector with the selected PCI-E slot on the motherboard. Push the board down firmly. 5.
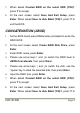
RAID Arrays RAID Arrays are setup in the 4+1 SATA II 300 IDE/PATA PCI-E Combo Host Card w/ RAID & Port Multiplier ’s BIOS. There are four configurations supported: RAID level/Type Configurations Number of disks needed RAID 0 Disk Striping 2 or 3 or 4 RAID 1 Disk Mirroring 2 RAID 0+1 Disk Striping 4 + Mirroring JBOD Disk Concatenation 2 or 3 or 4 RAID 0 (Striping) 1. As the BIOS boots press Ctrl+J when prompted to enter the RAID BIOS. 2.
“space” key to mark the selected disk, then press Enter. 6. Please use arrow keys ↑ and ↓ to select chunk size from 4K, 8K, 16K, 32K, 64K or 128K, then press Enter. 7. Input the RAID size, press Enter. 8. When asked Created RAID on the select HDD (Y/N)?, press Y to accept. 9. At the next screen select Save And Exit Setup, press Enter. When asked Save to disk &Exit (Y/N)?, press Y to exit the BIOS. RAID 1 (Mirroring) 1. As the BIOS boots press Ctrl+J when prompted to enter the RAID BIOS. 2.
7. When asked Created RAID on the select HDD (Y/N)?, press Y to accept. 8. At the next screen select Save And Exit Setup, press Enter. When asked Save to disk &Exit (Y/N)?, press Y to exit the BIOS. CONCATENATION (JBOD) 1. As the BIOS boots press Ctrl+J when prompted to enter the RAID BIOS. 2. At the next screen select Create RAID Disk Drive, press Enter. 3. Enter RAID name, press Enter. 4. Please use arrow keys ↑ and ↓to switch the RAID level to JBOD-Concatenate, then press Enter. 5.
exit the BIOS. RAID 0+1 (Striping + Mirroring) 1. As the BIOS boots press Ctrl+J when prompted to enter the RAID BIOS. 2. At the next screen select Create RAID Disk Drive, press Enter. 3. Enter RAID name, press Enter. 4. Please use arrow keys ↑ and ↓to switch the RAID level to 01-Stripe+Mirror, then press Enter. 5. Please use arrow keys ↑ and ↓ to select chunk size from 4K, 8K, 16K, 32K, 64K or 128K, then press Enter. 6. Input the RAID size, press Enter. 7.
Delete RAID Disk Drive 1. As the BIOS boots press Ctrl+J when prompted to enter the RAID BIOS. 2. At the next screen select Delete RAID Disk Drive, press Enter. 3. Please use arrow keys ↑ and ↓to select the array you want to delete, use the “space” key to mark the selected array, then press DEL. 4. When asked ALL DATA ON THE RAID WILL LOST!! ARE YOU SURE TO DELETE (Y/N), press Y to accept.
connection information, will be written to the replacement disk. Rebuild Mirror Drive When a failure to one member occurs, you will be notified by the RAID BIOS during boot. The steps below will guide you in rebuilding a failed mirror set. 1. Replace the failed drive(s) with one of equal or greater capacity, start the computer. 2. During boot press Ctrl+J to enter the RAID BIOS. 3. Select Rebuild Mirror Drive press Enter. 4.
up. During this (POST) process, the BIOS will show up and indicate the devices attached to it. Driver Installation For Windows® 2000, XP and Server 2003 For A New Installation A new installation requires a floppy disk for the driver installation. To make this floppy disk, copy the contents of the “UGT-IS100R\2000_XP_2003_Vista\Floppy32” folder, found on the driver CD, onto a blank floppy disk then follow the directions below. 1. Setup the RAID Array prior to Windows installation. 2.
on-screen instructions to complete the Windows installation. For An Existing Installation 1. Setup the RAID Array prior to driver installation and boot up to Windows. 2. Please insert the CD driver bound with 4+1 SATA II 300 IDE/PATA PCI-E Combo Host Card w/ RAID & Port Multiplier into your CD-ROM Drive. 3. At the Windows desktop, click Start, then Run. 4. Type D:\UGT-IS100R\2000_XP_2003_Vista\setup.exe, click OK. (Change D:\ to match your CD-ROM drive letter) 5.
directions below. 1. Setup the RAID Array prior to Windows installation. 2. Follow Microsoft’s Windows installation procedure. 3. At the Windows Setup screen, press F6 to install the driver. 4. When prompted, press S to specify the location of the driver. 5. Insert the floppy disk, then press Enter. 6. Select (Windows XP/2003 x64) RAID/AHCI Driver for 7. Press Enter to finish driver installation, then follow the JMicron JMB36X Controller, then press Enter.
installation. 6. Restart Windows to complete the installation. For Windows® Vista For A New Installation A new installation requires a floppy disk for the driver installation. To make this floppy disk, copy the contents of the “UGT-IS100R\2000_XP_2003_Vista\Floppy32” folder, found on the driver CD, onto a blank floppy disk then follow the directions below. 1. Setup the RAID Array prior to Windows installation. 2. Follow Microsoft’s Windows installation procedure. 3.
1. Setup the RAID Array prior to driver installation and boot up to Windows. 2. Please insert the CD driver bound with 4+1 SATA II 300 IDE/PATA PCI-E Combo Host Card w/ RAID & Port Multiplier into your CD-ROM Drive. 3. At the Windows desktop, click Start, then Run. 4. Type D:\UGT-IS100R\2000_XP_2003_Vista\setup.exe, click OK. (Change D:\ to match your CD-ROM drive letter) 5. Follow the on-screen instructions to complete the installation. 6. Restart Windows to complete the installation.
3. At the Windows Setup screen, press Load Driver to install the RAID driver. 4. Insert the floppy disk, please select JMicron JMB36X Controller (A:\jRAID_f.inf), then press Next. (Change A:\ to match your floppy drive letter) 5. Follow the on-screen instructions to complete the Windows installation. For An Existing Installation 1. Setup the RAID Array prior to driver installation and boot up to Windows. 2.
For Windows® Server 2008/7 (32-bit) For New Installation 1. Setup the RAID Array prior to Windows installation. 2. Follow Microsoft’s Windows installation procedure. 3. At the Windows Setup screen, press Load Driver to install the RAID driver. 4. Please insert the CD driver bound with 4+1 SATA II 300 IDE/PATA PCI-E Combo Host Card w/ RAID & Port Multiplier into your CD-ROM Drive, click Browse. 5.
into your CD-ROM Drive. 3. At the Windows desktop, click Start, then Run. 4. Type D:\UGT-IS100R\2000_XP_2003_Vista\setup.exe, click OK. (Change D:\ to match your CD-ROM drive letter) 5. Follow the on-screen instructions to complete the installation. 6. Restart Windows to complete the installation. For Windows® Server 2008/7 (64-bit) For New Installation 1. Setup the RAID Array prior to Windows installation. 2. Follow Microsoft’s Windows installation procedure. 3.
7. Follow the on-screen instructions to complete the installation. For An Existing Installation 1. Setup the RAID Array prior to driver installation and boot up to Windows. 2. Please insert the CD driver bound with 4+1 SATA II 300 IDE/PATA PCI-E Combo Host Card w/ RAID & Port Multiplier into your CD-ROM Drive. 3. At the Windows desktop, click Start, then Run. 4. Type D:\UGT-IS100R\XP_2003_Vista\setup.exe, click OK. (Change D:\ to match your CD-ROM drive letter) 5.
Controller: -JMicron JMB36X Controller should be displayed Windows® Vista: Double click Storage controllers: -JMicron JMB36X Controller should be displayed UGT-IS100R Page 22