Model: MRK-300FD-BK Aluminum Mobile Rack 3-1
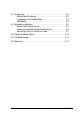
3-1 Introduction ........................................................................ 3-3 Mobile Rack Features ................................................... 3-3 Unpacking Your Mobile Rack ........................................ 3-4 IDE Basics .................................................................... 3-4 3-2 Hardware Installation.......................................................... 3-5 Mobile Rack Components .............................................
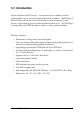
-1 Introduction Vantec introduces the EZ-Swap 2 – the convenience of a mobile rack with cooling abilities on par with most dedicated hard drive coolers. The EZ-Swap 2 features front and rear fans to cool the hard drive from all around. It also features a keyed lock to prevent accidental removal while in use. The EZ-Swap 2 is compatible with all IDE hard drives and has a sleek, professional look.
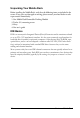
Unpacking Your Mobile Rack Before installing the Mobile Rack, verify that the following items are included in the carton. If any parts are damaged or missing, please contact your local dealer or sales representative immediately. 1.One Mobile Rack Removable Docking Module 2.Twelve (12) mounting screws 3.2 keys 4.One user’s guide IDE Basics IDE is an acronym for Integrated Device (Drive) Electronics and is sometimes referred to as an ATA (AT Attachment) interface.
3-2 Hardware Installation The Aluminum Mobile Rack Docking Module is designed to install in any PC/AT or Pentium-class computer that has an available 5.25-inch half-height drive bay. General instructions for installing the Mobile Rack are given since the design of computer cases varies. Refer to your computer’s manual whenever in doubt.
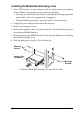
Installing the Mobile Rack Docking Case 1. Turn OFF the power to your computer and any other connected peripheral devices. Follow the precautions for static electricity discharge: • Discharge any static electricity build up in your body by touching a grounded metal surface such as the computer case, if plugged in. • During installation procedures, avoid any contact with internal parts. 2. Unplug the power cord from the back of the computer. 3. Remove your computer’s cover. 4.
. Position the docking case so its mounting holes align with the drive bay’s mounting holes. Secure with the supplied mounting screws (two/four on each side.) 8. Attach an existing IDE 40-pin data cable from the system motherboard (or IDE controller card) to the 40-pin connectors on the back of the docking case. Most connectors are keyed for proper insertion. If there is no key, orient the cable so the pin-1 colored stripe edge is closest to the power connector. 9.
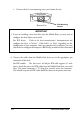
c. Unscrew the fan’s two mounting screws and remove the fan. Remove Fan Fan Mounting Screws IMPORTANT 3. If you are installing a new hard drive into the Mobile Rack, you may need to configure the drive before you install it. Refer to the drive manufacturer’s documentation and For IDE drives: configure the drive as ‘Master’, ‘Cable Select’, or ‘Slave’ depending on the configuration of your computer.
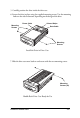
5. Carefully position the drive inside the drive case. 6. Secure the drive in place using the supplied mounting screws. Use the mounting holes on the sides or bottom, depending on the design of the drive. Power Cable Mounting Screws Colored Stripe Data Cable Mounting Screws Install the Drive in Drive Case 7. Slide the drive case cover back on and secure with the two mounting screws.
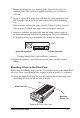
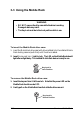
3-3 Using the Mobile Rack WARNING • DO NOT remove the drive case while the drive is working. Damage to data may result. • The Key-Lock must be in the Lock position while in use. To insert the Mobile Rack drive case: 1. Insert the Mobile Rack drive case (with drive installed) into the installed Mobile Rack docking case and push firmly until the drive is seated. 2. Insert the key and turn it right to lock. The LED on the Mobile Rack should light after a slight delay.
3-4 Troubleshooting Q. I installed the EZ-Swap 2 but my computer does not detect the hard drive in it. A. Be sure to turn on the EZ-Swap 2 by setting the Key-Lock in the Lock position. The EZ-Swap 2 will not turn on unless it is locked. If you are using a brand new drive, make sure you initialize, partition and format the drive before trying to use it. This can be done using the software that comes with the HARD DRIVE or by using Windows’ Disk Management utility. Q. The data on my hard drive is corrupt! A.