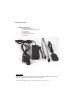
Package Contents: SATA/IDE-USB adapter: 1. SATA/IDE-USB Adapter 2. Power Adapter with On/Off Switch 3. Power Cable 4. SATA Data Cable 5. SATA Power Supply Cable 6. User Manual TRADEMARKS Apple, Macintosh and Mac are trademarks of Apple Computer. MS-DOS, Microsoft, Windows 95/98/NT/2000/ME/XP are trademarks of Microsoft Corporation. *All other third-party brands and names are the property of their respective owners.
Table of Contents: 1. Introduction ......................................................................................................pg. 2 2. Specifications/Features ....................................................................................pg. 2 3. System Requirements .......................................................................................pg. 3 4. Hardware Installation .......................................................................................pg. 3 5. Disconnecting .
1. Introduction The SATA/IDE-USB Adapter gives you the flexibility of connecting almost any type of drive to your computer via USB. SATA, 3.5” IDE, 5.25” IDE, and 2.5” IDE drives are all supported and can be easily hot-swapped to your system. The included external power adapter will allow you to power your drives outside your system giving you the ability to quickly add or swap between drives without opening your case. The SATA/IDE-USB adapter is like 3 drive to USB adapters built into one! 2.
3. System Requirements: Intel Pentium II 350MHz-compatible or Apple G3 processor and greater Microsoft Windows 98SE/ME/2000/XP or Mac OS 8.6 and greater USB-equipped system For USB 2.0 speeds, the system must support USB 2.0 specifications 4. Hardware Installation: Preparing the hard drive: For 3.5”/5.25” IDE drives: Set the hard drive jumpers to MASTER or SINGLE DRIVE ONLY. Please refer to the documentation included with your hard drive for information on jumper settings. For 2.
Installing the SATA/IDE-USB Adapter for internal use with 2.5” IDE Hard Drive: 1. 2. Open computer case. Connect the smaller 44-pin IDE connector of the SATA/IDE-USB Adapter to the hard drive. Connect 2.5” Power Cable Adapter to SATA/IDE Adapter. Connect a 4-pin power connector from power supply to 2.5” HDD Adapter. (Do not need to use supplied power adapter for internal use) Connect USB connector of SATA/IDE-USB Adapter to an available internal or external USB port. Close computer case. 3. 4. 5. 2.
Installing the SATA/IDE-USB Adapter for external use with 2.5” IDE Hard Drive: 1. Connect the smaller 44-pin IDE connector of the SATA/IDE-USB Adapter to the hard drive. 2. Connect 2.5” Power Cable Adapter to SATA/IDE Adapter. 3. Connect Power Cable to Power Adapter. Plug Power Cable into a live outlet. 4. Connect Power Adapter to 2.5” Power Cable Adapter. 5. Connect USB connector of IDE-USB Adapter to an available USB Port. 2.5” IDE HDD Installing the SATA/IDE-USB Adapter for external use with 3.
Installing the SATA/IDE-USB Adapter for internal use with 2.5”/3.5” SATA Hard Drive: 1. Open computer case. 2. Insert drive and mount with screws. 3. Using a SATA cable, connect the SATA port of the SATA/IDE-USB Adapter to the SATA connector on the hard drive hard drive. 4. Connect either a 4-pin power connector or SATA power connector from power supply to hard drive. Do not connect both. (Do not need to use supplied power adapter for internal use) 5.
Installing the SATA/IDE-USB Adapter for external use with 2.5” / 3.5” SATA Hard Drive: 1. Using a SATA cable, connect the SATA port of the SATA/IDE-USB Adapter to the SATA connector on the hard drive hard drive. 2. Connect Power Cable to Power Adapter. Plug Power Cable into a live outlet. 3. Connect Power Adapter to hard drive. If your drive does not have a 4-pin power connector, you will need to use a SATA power adapter. 4.
5. Disconnecting the SATA/IDE-USB Adapter: Warning: NEVER remove the SATA/IDE-USB while the hard drive is in use. Doing so may cause data corruption or damage the hard drive, SATA/IDE-USB adapter, or computer. Windows 98SE/ME/XP/2000: 1. Make sure all operations using the hard drive connected to the SATA/IDE-USB Adapter have ceased. 2. Close any windows and programs pertaining to the SATA/IDE-USB Adapter. 3.
6. Creating A New Partition: Note: Most hard drives should come with a CD that includes its installation program. If not, a download should be available on the manufacturer’s website. The best way to partition a new hard drive is by using the manufacturers program. However, if that is not possible, please try the following instead (if using Mac OS 9 or below, please refer to your hard drive documentation for information on formatting/partitioning the hard drive): Windows 98SE/ME: 1.
7. Creating A New Partition (continued): Mac OS X 10.x.x: Initializing a Hard Drive: 1. Open Disk Utility (under Applications\Utilities) 2. Select the attached drive in the list to the left. Click it and then click the partition tab to the right. 3. Select the desired partitioning scheme. 4. Open the Type pop-up menu in the Volume Info area and choose Mac OS Extended Format. 5. Resize the volumes if desired. 6. When ready, click OK. 7. Click Initialize. If initialization fails, do the following: 1.
7. Troubleshooting/FAQ: SATA/IDE-USB Adapter: Q. What should the jumper settings on my hard drive be set to? A. We recommend the hard drive be set to MASTER or SINGLE. Q. Can I connect the SATA/IDE-USB Adapter to more than one drive at the same time? A. No. The SATA/IDE-USB can not handle multiple drives at once. Connecting multiple drives will likely cause data corruption. Q. My computer recognizes the SATA/IDE-USB Adapter, but it does not assign a drive letter to it. A.
7. Troubleshooting/FAQ: Q. Why is the data on my hard drive corrupted? A. Connecting your hard drive to the SATA/IDE-USB Adapter is just like connecting a hard drive to the inside of your computer. The SATA/IDE-USB Adapter itself will not corrupt your data. If your data has become corrupt, it is likely caused by the removal of the SATA/IDE-USB Adapter while data was still being written to the hard drive.
8. Warranty: The SATA/IDE-USB comes with a 1 year limited warranty (90 day parts). If your unit should become defective within that time frame, please go to http://www.vantecusa.com for information on how to receive warranty exchange or repair. Cosmetic defects and missing parts are not covered under this warranty. Please check the contents of the unit to make sure you received all parts. Also, check for any cosmetic flaws.