
Manual


Step 1 – Setting up the Tripod
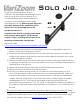
The Solo Jib can be mounted to nearly any type of industry-standard tripod, including
65mm & 75mm bowl-mount, flat base w/ 3/8”-16 stud, and 100mm bowl-mount (with
purchase of optional adapter). However, if you are using a tripod from another
manufacturer, please make sure it is capable of handling the load of the jib,
counterweights, and camera, and that it’s sufficiently stable to handle the operational
demands of the jib. It may be a good idea to sandbag or counterweight your tripod to
add stability and prevent tipping over, and always make sure the leg sections are
properly tightened to prevent sliding and toppling of the entire assembly.
When setting up the tripod, make sure you have an adequate radius of clearance to
operate the jib. You should have at least an arm-span of clearance all the way around
the tripod to be safe. Set the tripod height and level the legs as best possible. Lock the
legs and secure the tripod. Next you will mount the jib to the tripod.
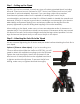
Step 2 – Attaching the Solo Jib to the Tripod
We recommend tightening the tilt brake and pan brake before attaching the Solo Jib to
your tripod.
Option A (75mm or 65mm tripod) - If you’re mounting to a
75mm or 65mm tripod (like the VariZoom VZTK75A), you will
need to attach the supplied mounting stud to the jib base.
Tighten the stud thoroughly, then fit the jib base into the
bowl mount of the tripod and use the supplied hand knob
to tighten and level the jib base. To prevent the jib from
shifting, make sure you tighten the knob thoroughly.