
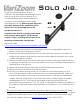
Manual


Option B (flat-base tripod with 3/8”-16 stud) - If
you’re mounting to a flat-base tripod with 3/8”-16
stud, the jib base will thread directly onto that stud.
Use the set screws on the flat base to prevent
loosening.
Option C (100mm tripod) – If you want to mount the
jib to a 100mm tripod, you will need the optional adapter plate (VZBR10075, not pictured).
Then the tightening will work
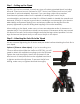
Once you have attached the jib to your tripod, level it and lock it in place. It is very
important that you secure the tripod and jib so nothing can slip, fall over, or collide with
people or surrounding objects.
Step 3 – Setting the Length of the Solo Jib
The Solo Jib has a 2-stage telescoping arm and single-
telescoping tail design that allows a balance of maximum
extension with good rigidity. The longer the arm (front of jib) is
extended, the more you will have to extend the tail (back of
jib). The jib will operate well at the shortest and longest
configurations as long as it’s properly set up and used within
the specifications.
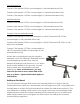
Start by adding the supplied counterweight to the tail of the
jib. Before you can add the counterweight, you must attach
the bar fitting to the tail, then add the weight itself. You can
use the second spacer/nut if you add more than one weight.
The jib will start a little tail-heavy, but as you extend the jib it
will balance out. Decide how long you want to extend the
jib, then start by extending the first stage.
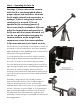
Loosen the first set of twist locks (the larger set closest to the
tripod), grab the camera platform (front end w/ “Solo Jib”
printed) and pull out the first stage to the desired length. Note
the bubble level on the camera platform (under the camera
plate). Use the bubble level to even the tube lengths until the
camera platform is level. You may also have to slightly twist
the camera platform side-to-side to get the bubble centered and the platform exactly
level. Tighten the twist locks.