Vax careline 0870 6061248 instruction manual Carpet washer Vax model number: V-027CC AAA SOLUTION www.vax.co.uk Please read carefully before using this cleaner. Always fully extend the mains cable before use. Retain for future reference.
www.vax.co.uk 1.
Vax Careline 0870 606 1248 2. Safety Information FOR HOUSEHOLD USE ONLY. When using the vacuum cleaner, basic safety precautions should always be observed, including the following: 21. Using improper voltage may result in damage to the motor and possible injury to the user. The correct voltage is listed on the rating label. 22. A hazard may occur if the carpet washer runs over the power supply cord. 1. Do not leave the carpet washer unattended when plugged in. Unplug it from socket when not in use. 23.
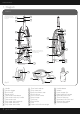
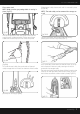
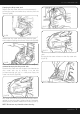
www.vax.co.uk 3. Assembly Feed the cord through the slots on the back of the handle and push into place (Fig.3/4). Putting your cleaner together Remove your Rapide XL from the carton with caution. The handle is connected to the body by a cord (Fig.3/1). NOTE: Do not tug or pull on the cord. Fig.3/4 Fig.3/1 Line up the handle to the upper body of the machine and slide into place (Fig.3/2). Place a nut into the recess in the back of the upper handle.
Vax Careline 0870 606 1248 Clean water tank NOTE: Make sure the grey wedge block is resting in place (fig.3/7). Slide the tool caddy downwards until it is secured in place (Fig.3/10). NOTE: The tool caddy can be removed for storage on a wall Fig.3/7 Line up the grooves of the clean water tank with the support posts inside the handle. Tilt the top of clean water tank inward and push until it locks into place Fig.3/8 (Fig.3/8).
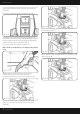
www.vax.co.uk 4. Operation Note: The float in your Rapide XL is the transparent, pivoting moulded part in the dirty water tank, it will shut off the suction when the dirty water tank is full. For best results use a smooth steady motion keeping the nozzle flat against the carpet. Tipping the cleaner and breaking the seal of the nozzle against the carpet will cause the float to rise cutting off suction. Once the float is activated, empty the dirty water tank.
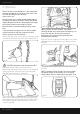
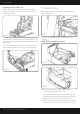
Vax Careline 0870 606 1248 To spray cleaning solution, depress the solution release trigger (Fig 4/6) and move the cleaner backward and forward. Release the trigger and push the unit back and forth in the same track to remove dirty water and solution from the carpet. For heavily soiled areas, repeat if necessary. Fig.4/9 Insert the end of the hose into the tool opening and twist clockwise until it locks into place (Fig.4/10). Fig.
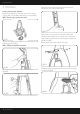
www.vax.co.uk To wash upholstery, be sure that the brush switch is OFF and that the power and soap switches are turned ON (Fig.4/13). Note: Do not allow upholstery to become too wet. Fig.4/16 Move the tool/floor selector to the floor position (downwards) (Fig.4/17). Fig.4/13 While depressing the blue solution spray trigger, push the attachment in a forward motion. Release the trigger and pull the attachment backward in the same path to remove dirty water and solution from upholstery (Fig.4/14).
Vax Careline 0870 606 1248 Emptying the dirty water tank Depress the dirty water tank latch and simultaneously pull the dirty water tank nozzle tab up and away from the cleaner (Fig.4/8). Fig.4/11 Return the dirty water tank cap (Fig.4/12). Fig.4/8 Remove the dirty water tank by lifting the dirty water tank handle and pulling the tank out of the base (Fig.4/9). Fig.4/12 Lift the dirty water tank handle and pull out the filter to clean. Rinse under hot water and return to the dirty water tank (Fig.4/13).
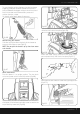
www.vax.co.uk Emptying the dirty water tank Return dirty water tank to the base of the cleaner by tipping the nozzle down into the basin and dropping it into place (Fig.4/14). Fig.4/14 Lift the front of the cleaner base off the carpeting with one hand. Line up the black tabs with the grooves of the front nozzle. 5. Maintenance Remove dirty water tank and front nozzle put them to one side (Fig.5/1). Fig.5/1 Use a Phillips screwdriver to remove two (2) screws (Fig.5/2).
Vax Careline 0870 606 1248 NOTE: Make sure the entire belt stays on top of the first large pulley by lightly placing a finder on top to guide it. Fig.5/7 Fig.5/4 Return the nozzle cover to the original position (Fig.5/5) Secure by replacing the two (2) screws. Fig.5/5 Remove the screw that holds the brushbar in place (Fig.5/6). To install a new brushbar. Feed the brushbar through the opening until the screw plate and screw hole are lined up (as above) (Fig.5/8).
- EEC STATEMENT OF COMPLIANCE Manufacturer/EEC importer: Vax Limited, hereby on our own responsibility, declare that the Vax V-027CC is manufactured in compliance with the following Directives: Safety: 2006/95/EC Low Voltage Directive EMC: 2004/108/EC Electromagnetic Compatibility Directive Waste electrical products should not be disposed of with household waste. Please recycle where facilities exist. Check with your Local Authority or retailer for recycling advice. Vax Ltd.