
User`s guide


CORDLESS SWEEPER
MODEL VS102 8.4V DC
IMPORTANT SAFEGUARDS
To reduce the risk of fire, electrical shock, or injury when using an
electrical appliance, basic safety precautions should always be
observed, including the following:
READ ALL INSTRUCTIONS BEFORE USING YOUR
CORDLESS SWEEPER.
•
Do not store or charge this unit outdoors.
•
Do not use outdoors or on wet surfaces.
•
This appliance is not intended for use by young or infirm persons without
supervision. Never allow children to tamper or play with your VAX.
NOTE: CORDLESS SWEEPER MODEL VS102 IS SUPPLIED WITH THE BATTERIES UNCHARGED.
CHARGING OF THE UNIT FOR 16-20 HOURS PRIOR TO FIRST USE IS REQUIRED.
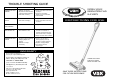
1.Main Unit (Sweeper
Power Head)
2.On/Off Switch
3.Charging Light Indicator
4.Dust Container
5.Rotating Brush
6.Transparent
Brush Cover
7.Edging Tool
8.Charging Jack
9.Lower Handle
10.Metal Extension Handles
11.Upper Handle
12.Charging Adapter
13.Gear Box
2
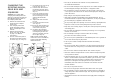
NOTE: If uncertain as to how to remove the
battery pack, we suggest you take your
sweeper to an authorised VAX Service Agent to
have this service performed.
Follow these steps when battery removal is
required.
1. Remove the extention handles and dust
container.
2. Turn unit over so that the base is facing
upwards. Be careful not to turn the unit
ON. (Fig.20).
3. Push in locking tab and lift off battery
assembly. (Fig.21).
4. Place battery assembly aside.
5. Insert the new battery assembly into unit.
Ensure that locking tab snaps in place.
BATTERY REMOVAL
CAUTION: This cordless sweeper contains
nickel-cadmium (Ni CAD) batteries and must be
recycled or disposed of properly. Call your
nearest recycling centre for information on the
recycling and disposal of nickel-cadmium (Ni-
CAD) batteries.
BATTERY DISPOSAL
7
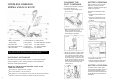
3. Replace dust container on cordless sweeper.
4. Periodically remove the transparent brush
cover on the front of the cordless sweeper
and remove any build up of lint, hair or fiber
on the rotating brush. To remove the cover -
grip the cover from the bottom, pull out and
upward until the cover unlocks from the side
slots and tabs located on the top of the
sweeper. (Fig. 19).
2. Empty dust container contents. (Fig. 18). If
desired - rinse with water to clean
the dust container - but
dry thoroughly
before replacing on the sweeper.
To achieve the best performance, empty the
Dust Container after each use.
1. Pull the dust container straight out from
the side. (Fig. 17).
CLEANING THE
DUST CONTAINER
Figure 17
Figure 18
Fig. 19
Figure 20
Figure 21