
Instruction manual


H
ow to Assemble / How to Operate
4
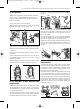
3. How to Assemble
IMPORTANT: Always unplug the vacuum cleaner
from the electrical outlet before assembling or
removing the accessories.
1. Place the base of the cleaner so it is facing away
from you. Position the body so that the lower hose is
on your right hand side. Push the body down into
place.
To secure the body in place insert one of the screws
supplied into the back of the cleaner, through the hole
located above the on/off pedal.
Pull back the flap on the clear window. Match the slots
on the hose to the tabs on the hose inlet. Push down
firmly on the cuff and turn anti-clockwise to lock in
place (fig. 3/1).
2. Align the holes in the tool holder, with the holes on
top of the body. Use two of the screws supplied to
secure the tool holder in place.Do not over
tighten.With the hose clip on the handle facing you
place it onto the top of the body of the cleaner (fig. 3/2).
3. Push down firmly and line up the screw hole on the
rear of the handle.
Use one of the screws supplied to secure the handle
on the body.
Insert the small end of the main hose into the tool
holder on the right hand side (fig. 3/3).
4. Using the handle attach the main hose into the left
hand side of the cleaner. Press down firmly to secure
in place. The main hose can then be secured in the
top and side of the tool holder.
Push the dirt container lid firmly on top of the dirt
container and place it onto the cleaner. The canister lid
will snap into place in the body of the cleaner.
Attach the tools to the tool holder. The 2 in 1 tool fits
over a post at the back of the vacuum cleaner.
The crevice tool fits into a round slot on the rear right
hand side of the tool holder. The extension wand hose
on the left hand side (fig. 3/4).
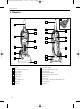
4. How to Operate
1. Plug the cord into an electrical outlet and turn on by
pressing the on/off pedal, located on the back left of
the cleaner.
To unlock the handle from the upright position press
the handle release pedal down.
Move the handle to the desired position (A) for storage
and position (B) for normal operation. To clean under
furniture, press the release pedal again and use
position (C) (fig. 4/1).
Fig.3/4
Fig.3/1
Phillips screwdriver required
Fig.3/3
A
B
C
Fig.3/2
Fig.4/1
VS_19TL_Artwork.qxd 3/5/06 17:26 Page 5