
Instruction manual


A
ccessories/Dirt Container & Filter: Removal & Replacement/Belt or Brush removal and replacement
5
5. Accessories
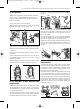
1. Make sure the vacuum cleaner has been switched
off and is in an upright position. Remove the lower
hose by twisting clockwise and pulling away from the
base of the cleaner.
Remove the hose from the tool holder.
Slide the hose into the lower hose with the tab facing
upwards twist together to secure (fig. 5/2).
2. For hard to reach areas when additional hose length
is required, use the extension wand. It fits over the end
of the hose.
Choose the accessory that suits your need or use the
hose alone.
To fit the attachments push them firmly on to the end of
the extension wand or hose. To remove the tool, twist
and pull apart gently.
When moving from one room to another use the carrying
handle at the rear of the vacuum cleaner (fig. 5/1).
6. Dirt Container & Filter: Removal and
Replacement
1. Make sure the vacuum cleaner has been switched off
and unplugged from the mains supply. To remove the
dirt container from the vacuum cleaner press the release
catch and pull it forward.
To remove the lid of the dirt container hold the top and
the side handles firmly and tur
n the lid anti-clockwise.
Pull the lid away from the body of the dirt container.
Empty all of the dust and dirt from the dirt container
(fig. 6/1).
2. The filter inside the dirt container should not need
replacing but it should be cleaned each time the dirt
container is emptied. Remove it by grasping the ring at
the top of the filter.
Twist and pull the filter out.To clean it, tap it gently against
the side of a dustbin. Do not use a brush to clean it as
this may damage the filter. Do not wash the filter.
Replace the filter into the dirt container. Push it firmly into
place to prevent dust and dirt leaking out. Replace the
canister lid turning clockwise and return the dust
(fig. 6/2).
7. Belt & Brush: Removal and
Replacement
1. Unplug the vacuum cleaner from the mains supply.
Press the handle release button and turn the vacuum
cleaner over so that the base lies flat and face up. Use a
screwdriver to remove the four retaining screws shown
above.Remove the nozzle guard.
Lift and remove the brush bar, then slide the belt off the
motor shaft and dispose of it. Place a new belt on the
motor shaft and then slip the brush bar through the belt.
The belt should sit on the end of the brush bar with no
bristles against the end cap. Re-fit the brush bar. Ensure
the end caps are in the correct position. Rotate the
brush bar to check the belt is not twisted. Replace the
nozzle guard (fig. 7/1).
.
Fig.5/1
nozzle guard
tabs
Fig.7/1
Fig.6/1
Fig.6/2
Fig.5/2
VS_19TL_Artwork.qxd 3/5/06 17:26 Page 6