Vax V-060 User Guide.qxd 5/4/07 16:46 Page 1 Vax careline 0870 6061248 Vax model number: V-060 V-060U V-060R V-060P V-060C V-060A V-060PP V-060xXTX V-060PA www.vax.co.uk instruction manual Bagless upright Please read carefully before using this cleaner. Always fully extend the mains cable before use. Retain for future reference.
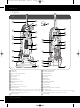
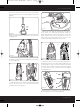
Vax V-060 User Guide.qxd 5/4/07 16:46 Page 2 www.vax.co.uk 1. Diagram V-060 1 9 6x 17 10 29 2 11 28 27 3 12 4 18 19 26 5 13 25 24 14 6 20 7 8 15 21 22 16 23 Fig.
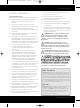
Vax V-060 User Guide.qxd 5/4/07 16:46 Page 3 Vax Careline 0870 606 1248 2. Safety Information 15. Do not vacuum up hard or sharp objects such as glass, nails, screws, coins, etc. For Household Use Only 16. Do not use without the filters in place. When using the vacuum cleaner, basic safety precautions should always be observed, including the following: 17. Take extra care when vacuuming on stairs. 1. Only use the vacuum cleaner indoors on dry surfaces. 19.
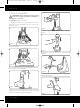
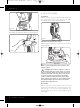
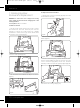
Vax V-060 User Guide.qxd 5/4/07 16:46 Page 4 www.vax.co.uk 3. How to Assemble IMPORTANT: Always unplug the vacuum cleaner from the electrical outlet before assembling or removing the accessories. ! Tool required: Phillips screwdriver 1. Slide the back panel onto the base (Fig.3/1). Connect lower hose to base by sliding it over the connector and twisting to secure. Fig.3/4 5. Place the upper handle onto the upright back panel (Fig.3/5). Fig.3/1 2.
Vax V-060 User Guide.qxd 5/4/07 16:46 Page 5 Vax Careline 0870 606 1248 8. Insert the two (2) screws into the back of the handle and screw them into the tool caddy. Tighten until secure (Fig.3/8). Fig.3/11 Fig.3/8 9. Clip the TurboTool® onto the front of the TurboTool® caddy (Fig.3/9). 12. Attach the tools. Slide the dusting brush onto the post in the upper tool caddy with the bristles facing out (Fig.3/12A).
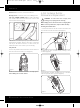
Vax V-060 User Guide.qxd 5/4/07 16:47 Page 6 www.vax.co.uk 4. How to Operate Cord Release Release the power cord by turning the quick cord release. The cord should be inserted into the cord guide while vacuuming to keep it out of the way (Fig.4/1) Fig.3/14 15. To secure the dirt container push the top in place, there will be an audible click when it is secure (Fig.3/15). Fig.4/1 Adjustment for Different Floor Types Slide the height adjust lever to match the surface being cleaned (Fig.4/2). Fig.
Vax V-060 User Guide.qxd 5/4/07 16:47 Page 7 Vax Careline 0870 606 1248 Handle Release Pedal To release the handle, push the handle release pedal located on the lower left side of the cleaner (Fig.4/3B). 5. Accessories IMPORTANT: The vacuum cleaner must be in the upright position to raise the brushbar. The brushbar height adjust must also be at its highest position. ! 1. Remove the hose from the tool caddy (Fig.5/1). A B Fig.
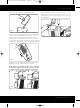
Vax V-060 User Guide.qxd 5/4/07 16:47 Page 8 www.vax.co.uk Crevice tool: for crevices, corners and cracks etc. Dusting brush: for delicate surfaces and skirting board. Stair tool (V-060R, V-060C only): for stairs, upholstery and curtains. Twist the head tool for best contact with stair treads and risers (Fig.5/4). 6. Dirt Container & Filter: Removal and Replacement ! WARNING: To reduce the risk of injury from moving parts, unplug before servicing.
Vax V-060 User Guide.qxd 5/4/07 16:47 Page 9 Vax Careline 0870 606 1248 4. Empty the dirt container completely (Fig.6/4). 7. Return the dirt container to the vacuum cleaner. Set the aligning tab on the bottom of the dirt container into the rectangular slot on the cleaner (inset). Push to click into place (Fig.6/7). Fig.6/4 5. Each time the dirt container is emptied, the filter should be cleaned. Tap the filter against the side of a rubbish bin until the dust stops falling from the filter.
Vax V-060 User Guide.qxd 5/4/07 16:47 Page 10 www.vax.co.uk 7. Rotating Brushbar: Removal and Replacement To Replace the Belt or Brushbar 1. Slide the belt onto the motorshaft (Fig.7/4). Then slide the brushbar into the belt. WARNING: To reduce the risk of injury from moving parts, unplug the cleaner before changing belt or the rotating brushbar. Tool required: Phillips screwdriver To Remove the belt 1. Lay the vacuum cleaner flat and turn it over to expose the nozzle base.
Vax V-060 User Guide.qxd 5/4/07 16:47 Page 11 Vax Careline 0870 606 1248 8. Clearing Blockages WARNING: To reduce the risk of injury from moving parts, unplug before servicing. 1. Check to see if dirt container is full. Empty and clean the dirt container filter. 2. Unwrap the hose from the caddy. Remove any obstruction if visible in the end of the hose (Fig.8/1). Fig.7/7 5. Replace all five (5) screws to secure the nozzle guard (Fig.7/8). Fig.8/1 2. Undo the hose from the back panel dirt tube.
Vax V-060 User Guide.qxd 5/4/07 16:47 Page 12 www.vax.co.uk TABS Fig.8/4 Clearing Blockages from the TurboTool 1. Rotate the locking ring 180º and then turn the TurboTool® over (Fig.8/5). LOCKING RING Fig.8/5 2. Pivot lowering housing and remove any blockage (Fig.8/6). Fig.8/6 3. To re-assemble, ensure that the tabs are engaged. Pivot the lower housing closed and rotate the locking ring 180º (Fig.8/7). 12 clearing blockages Fig.
Vax V-060 User Guide.qxd 5/4/07 16:47 Page 13 Vax Careline 0870 606 1248 9. Troubleshooting WARNING: To reduce the risk of personal injury, unplug the vacuum cleaner before performing maintenance or troubleshooting checks. PROBLEM: Vacuum cleaner won't run Cause: Not properly plugged into electrical outlet. Solution: Plug in securely. Cause: PROBLEM: Accessories won’t pick up. Cause: Accessories are not attached correctly. Solution: Refer to page 7 for fitting information.
Vax V-060 User Guide.qxd 5/4/07 16:47 Page 14 www.vax.co.uk 10. UK Service & Help 11. Technical Specification Vax Care 0870 6061248 Voltage: Wattage: Capacity: Filters: Monday-Friday 9.00am to 5.00pm. An answerphone is available outside of these hours. Any queries or concerns about using the Vax, call the Vax Careline. Calls are charged at the UK national rate. Please make a note of the serial number and model number of the carpet cleaner before calling.
Vax V-060 User Guide.qxd 5/4/07 16:47 Page 15 Registration Card please complete in BLOCK CAPITALS and return within 7 days Mr/Mrs/Ms/Miss Surname Telephone Initials (please include your STD code) House Number Address Postcode (it is important to fill in your postcode) Your details will be held and used by Domestic & General Services Limited and Domestic & General Insurance PLC and Vax to provide customer services, information about extended warranties and for other marketing purposes.
Total peace of mind for up to 5 years The complete Breakdown Insurance Plan to protect your new appliance for up to 5 years. • You will be protected against the full cost of repairs, including parts and labour in the event of a breakdown for an additional 2 or 4 years after expiry of the initial 12 month guarantee. • If you choose to pay by Direct Debit your fee will be spread over a ten month period, with the first payment debited about 30 days after the mandate is received.
Vax V-060 User Guide.qxd 5/4/07 16:47 Yes! Page 18 I wish to take out the optional BREAKDOWN INSURANCE What does it cost? Additional 2 years Additional 4 years Cheque/Credit/ Debit Card 10 Monthly Direct Debit Cheque/Credit/ Debit Card 10 Monthly Direct Debit Vax Appliances up to £100 £29.00 £2.90 £59.00 £5.90 Vax Appliances £101 - £200 £34.00 £3.40 £64.00 £6.40 Vax Appliances £201 and over £39.00 £3.90 £74.00 £7.
Vax V-060 User Guide.qxd 5/4/07 16:47 Page 19 2DPA To apply for the Extended Insurance Plan please read and complete Section A below and Section B overleaf. (Please complete in black ink using BLOCK CAPITALS) Section A - Your Details Title Initials Surname Telephone Email Address House Number Address Postcode Important Data Protection Information Domestic & General Services Limited and Domestic & General Insurance PLC are members of the Domestic & General Group.
Vax V-060 User Guide.qxd 5/4/07 16:47 Page 20 Read and complete Section A and Section B and return this form in an envelope to: Vax Guarantee Department, c/o Domestic & General Insurance PLC, Leicester House, 17 Leicester Street, Bedworth,Warwickshire, CV12 8JP.
Vax V-060 User Guide.qxd 5/4/07 16:47 Page 21 2 Summary of Protection of the Extended Insurance Plan This plan summary does not contain the full terms and conditions of the insurance contract, which can be found attached to this leaflet. Insurance Provider: The insurance plan is underwritten by Domestic & General Insurance PLC. Significant Features and Benefits: This is a general insurance contract that provides cover for your domestic appliance against the costs of: • Breakdown; No.
Vax V-060 User Guide.qxd 5/4/07 16:47 Page 22 Terms and Conditions of the Extended Insurance Plan Significant features and benefits explained The following are definitions of the different types of benefits available to you. Breakdown The cost of repair to the equipment following a mechanical or electrical fault which stops the equipment working properly. 1.
ther ctricity, . s we nt in nts or ended bulbs, nts, s place ent Vax V-060 User Guide.
Vax V-060 User Guide.qxd 5/4/07 16:47 Page 24 --- EEC STATEMENT OF COMPLIANCE Manufacturer/EEC importer: Vax Limited, hereby on our own responsibility, declare that the V-060 series bagless upright vacuum cleaners are manufactured in compliance with the following Directives: Safety: 2006/95/EC Low Voltage Directive EMC: 89/336/EEC Electromagnetic Compatibility Directive Waste electrical products should not be disposed of with household waste. Please recycle where facilities exist.