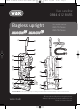
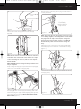
U90-M5 & U90-M6 Series User Guide.qxd:VZL-6015 & 6016 9/9/09 16:45 Page 1 Vax careline 0844 412 8455 Bagless upright 1 Vax model number: U90-M5 Series U90-M6 Series 2 26 27 3 4 5 17 18 6 25 16 7 19 15 24 23 8 14 20 9 13 10 ! 11 ! 22 12 21 21 PLEASE NOTE: some parts may vary according to model. Please check inside flap of box for more details. vax.co.uk Please read carefully before using this cleaner. Always fully extend the mains cable before use. Retain for future reference.
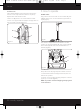
U90-M5 & U90-M6 Series User Guide.qxd:VZL-6015 & 6016 9/9/09 16:45 Page 2 vax.co.uk 1. Diagram 12 Furniture guard The guard helps prevent cleaner from marking furniture 1 On/Off switch Ensure that the plug is inserted securely into the electrical outlet before pressing the on/off switch.
U90-M5 & U90-M6 Series User Guide.qxd:VZL-6015 & 6016 9/9/09 16:45 Page 3 Vax Careline 0844 412 8455 2. Safety Information 14. Do not vacuum up hard or sharp objects such as glass, nails, screws, coins, etc. For Household Use Only 15. Do not use without the filters in place. When using the vacuum cleaner, basic safety precautions should always be observed, including the following: 16. Take extra care when vacuuming on stairs. 1. Only use the vacuum cleaner indoors on dry surfaces. 18.
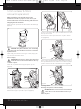
U90-M5 & U90-M6 Series User Guide.qxd:VZL-6015 & 6016 9/9/09 16:45 Page 4 vax.co.uk 3. How to assemble Attach Upper Housing Remove dirt cup (A) from upper housing (B) by pressing dirt cup release button (C) and pivoting cup out. Set dirt cup aside (Fig.3/1). B c A Fig.3/4 Place bottom of dirt container into cleaner body first. Pivot container into cleaner body (Fig.3/5). Fig.3/1 Using a Phillips screwdriver, remove (3) screws from cleaner base. DO NOT DISPOSE OF SCREWS.
U90-M5 & U90-M6 Series User Guide.qxd:VZL-6015 & 6016 9/9/09 16:45 Page 5 Vax Careline 0844 412 8455 After ends are connected, pull on plug to make sure it is securely attached. A Push firmly until you hear a snap or click Fig.3/7 B Position hose over rack (A) and into hose tube (B) (Fig.3/8). Fig.3/10 NOTE: The plug will only fit together one way. If plug is not fitting together, check alignment of ends. After the plug ends are fully connected, the orange tie wrap must be removed.
U90-M5 & U90-M6 Series User Guide.qxd:VZL-6015 & 6016 9/9/09 16:45 Page 6 vax.co.uk Position Tools Place smaller diameter end of extension tube (A) into bottom of rack. Snap extension tube into clip at top. Repeat with other extension tube. Crevice tool (B) fits into one of the extension tubes. Fit 2-in-1tool (C) and TurboTool (D) into storage areas on side of cleaner as shown (Fig.3/13). 4. How to operate On/Off Switch Plug cord into electrical outlet. To turn cleaner ON, push ON/OFF switch once.
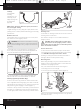
U90-M5 & U90-M6 Series User Guide.qxd:VZL-6015 & 6016 9/9/09 16:45 Page 7 Vax Careline 0844 412 8455 Carrying Cleaner The cleaner can also be moved by using the carrying handle (Fig.4/6). A Fig.4/3 Telescopic Handle The telescoping handle includes adjustable settings to various heights for user comfort. The handle is designed to retract into the body of the cleaner for convenience in storing or carrying the cleaner.
U90-M5 & U90-M6 Series User Guide.qxd:VZL-6015 & 6016 9/9/09 16:45 Page 8 vax.co.uk Settings For maximum cleaning performance, the following carpet height settings are recommended (Fig.4/9): Fig.4/9 NOTE: If the cleaner is difficult to push, turn knob to the next higher setting. • Higher settings: for very deep pile carpet, where easier pushing effort is desired, while maintaining good cleaning performance. Fig.
U90-M5 & U90-M6 Series User Guide.qxd:VZL-6015 & 6016 9/9/09 16:45 Page 9 Vax Careline 0844 412 8455 Select Proper Tool TurboTool: may be used for upholstered furniture, draperies, mattresses, clothing, automobile interiors, and carpeted stairs. B Crevice tool: may be used in tight spaces, corners and along edges in such places as dresser drawers, upholstered furniture, stairs and baseboards. Extension tubes: are used to give extra length to your hose. Use them with any of the above tools.
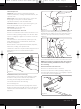
U90-M5 & U90-M6 Series User Guide.qxd:VZL-6015 & 6016 9/9/09 16:45 Page 10 vax.co.uk 5. Dirt container & filters: removal & replacement A NOTE: Familiarize yourself with these home maintenance tasks as proper use and care of your cleaner will ensure continued cleaning effectiveness. Emptying the Dirt Container Empty the dirt cup before the dirt reaches the fill line (A) (Fig.5/1). Fig.5/3 Close door and press dirt cup door release button to latch dirt cup door closed.
U90-M5 & U90-M6 Series User Guide.qxd:VZL-6015 & 6016 9/9/09 16:45 Page 11 Vax Careline 0844 412 8455 Remove dirt container as described above. Twist filter assembly counterclockwise. Remove assembly from dirt container (Fig.5/6). A B B A Fig.5/8 Cleaning the HEPA Final Filter/Anti-Bacterial Filter (only VZL-6015A, VZL-6015AA, VZL-6016AA) Fig.5/6 Dirt and debris can be cleaned from the filter assembly by brushing with the cleaner’s combination tool.
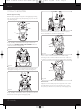
U90-M5 & U90-M6 Series User Guide.qxd:VZL-6015 & 6016 9/9/09 16:45 Page 12 vax.co.uk 6. Maintenance Replacing the Headlight Removing lens Disconnect cleaner from electrical outlet. Press handle release pedal and place handle in low position. Replacing Flat Belt Disconnect cleaner from electrical outlet. Place handle in low position and turn cleaner over so bottom side is facing up. Remove the 6 screws as shown with a Phillips screwdriver. Lift off bottom plate (A). (Fig.6/3).
U90-M5 & U90-M6 Series User Guide.qxd:VZL-6015 & 6016 9/9/09 16:45 Page 13 Vax Careline 0844 412 8455 Disconnect cleaner from electrical outlet. Turn carpet height adjustment knob to lowest setting. Turn cleaner over and remove bottom plate. Lift up brushbar and slide V-belt (A) off brushbar (Fig.6/9). A Fig.6/6 A Turn brushbar making sure belt turns freely and is not pinched between a brushbar and shield (Fig.6/7). Fig.
U90-M5 & U90-M6 Series User Guide.qxd:VZL-6015 & 6016 9/9/09 16:45 Page 14 vax.co.uk A Fig.6/11 Fig.6/14 Grasp brushbar firmly and fit it into position by first sliding end opposite the belt into the rectangular slot (A) on side of cleaner. Pull other side of brushbar (B) into place (Fig.6/12). Remove brushbar including end plates (A) and discard. Inspect belt to ensure that it is in good condition. If belt is cracked, gouged or broken, replace it (see following section).
U90-M5 & U90-M6 Series User Guide.qxd:VZL-6015 & 6016 9/9/09 16:45 Page 15 Vax Careline 0844 412 8455 Grasp turbine (A) and pull firmly to remove. Remove belt from turbine pulley (B). Replace with new belt (Fig.6/20). B A A Fig.6/17 Replace and tighten screws. To replace bottom plate, insert the four tabs on edge of bottom plate into slots on front of tool. Pivot bottom plate down and snap closed (Fig.6/18). Fig.
U90-M5 & U90-M6 Series User Guide.qxd:VZL-6015 & 6016 9/9/09 16:45 Page 16 vax.co.uk 7. Clearing blockages ! IMPORTANT: Disconnect cleaner from electrical outlet before attempting to clear blockages. Low suction or pick up may be due to a blockage in the system. Refer to the following steps to check for blockages continuing with each step until the blockage is found: Checking Under Hood Turn cleaner OFF and unplug. Remove hood, belt and brushbar as described in previous section.
U90-M5 & U90-M6 Series User Guide.qxd:VZL-6015 & 6016 9/9/09 16:45 Page 17 Vax Careline 0844 412 8455 8. Troubleshooting ! WARNING: To reduce the risk of personal injury, unplug vacuum cleaner before servicing. PROBLEM: Cleaner won’t run Cause: Solution: Not properly plugged into wall outlet. Plug in firmly. Cause: Solution: No electricity in wall outlet. Check fuse or breaker. Cause: Solution: Blown fuse/tripped breaker. Reset circuit breaker or replace fuse.
U90-M5 & U90-M6 Series User Guide.qxd:VZL-6015 & 6016 vax.co.uk 11. Technical Specification Voltage: 220 – 240V ~50Hz Wattage: 1500W Capacity: 2.6l Filters: Washable pre-motor filter assembly HEPA post-motor assembly Washable anti-bacterial post motor filter assembly (Some models only) Cord Length: 8.3m (approx) Weight: 10.68kg (approx) Subject to technical change without notice.
U90-M5 & U90-M6 Series User Guide.qxd:VZL-6015 & 6016 9/9/09 16:45 Page 19 Vax Careline 0844 412 8455 This page has been left intentionally blank.
U90-M5 & U90-M6 Series User Guide.qxd:VZL-6015 & 6016 9/9/09 16:45 Page 20 EEC STATEMENT OF COMPLIANCE Manufacturer/EEC importer: Vax Limited, hereby on our own responsibility, declare that the Mach 5 series and Mach 6 series upright vacuum cleaners are manufactured in compliance with the following Directives: Safety: 2006/95/EC Low Voltage Directive EMC: 2004/108/EC Electromagnetic Compatibility Directive Waste electrical products should not be disposed of with household waste.