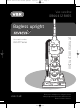
U90-M7 Series User Guide.qxd:UG 16/9/09 15:37 Page 1 Vax careline 0844 412 8455 Vax model number: U90-M7 Series vax.co.uk instruction manual Bagless upright Please read carefully before using this cleaner. Always fully extend the mains cable before use. Retain for future reference.
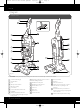
U90-M7 Series User Guide.qxd:UG 16/9/09 15:37 Page 2 vax.co.uk 1.Diagram U90-M7 Series 1 2 23 15 3 16 4 14 17 5 18 6 22 7 19 13 8 12 11 10 20 21 Fig.1/1 PLEASE NOTE: some parts may vary according to model. Please check inside flap of box for more details.
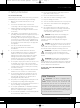
U90-M7 Series User Guide.qxd:UG 16/9/09 15:37 Page 3 Vax Careline 0844 412 8455 2. Safety Information 14. Do not vacuum up hard or sharp objects such as glass, nails, screws, coins, etc. For Household Use Only 15. Do not use without the filters in place. When using the vacuum cleaner, basic safety precautions should always be observed, including the following: 16. Take extra care when vacuuming on stairs. 1. Only use the vacuum cleaner indoors on dry surfaces. 18.
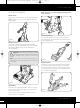
U90-M7 Series User Guide.qxd:UG 16/9/09 15:37 Page 4 vax.co.uk 3. How to assemble Attach Handle Using a Phillips screwdriver, remove (2) screws from the top of the upper housing assembly (Fig.3/1). Position Tools Place smaller diameter end of wand (A) into bottom of holder. Snap wand into clip at top. Repeat with other wand. Crevice tool (B) fits into one of the extension wands. Fit 2-in-1 tool (C) into storage area on side of cleaner as shown (Fig.3/4). B C A Fig.
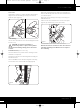
U90-M7 Series User Guide.qxd:UG 16/9/09 15:37 Page 5 Vax Careline 0844 412 8455 4. How to operate NOTE: To prevent cord from whipping, hold plug until cord is rewound. On/Off Switch Plug cord into electrical outlet. To turn cleaner ON, push ON/OFF switch once. To turn cleaner OFF, push switch again (Fig.4/1). A Fig.4/3 Transporting Cleaner To move your cleaner from room to room, put handle in upright position, tilt cleaner back on rear wheels and push forward (Fig.4/4). Fig.
U90-M7 Series User Guide.qxd:UG 16/9/09 15:37 Page 6 vax.co.uk Carpet Height Adjustment The cleaning of carpet and rugs takes place at the nozzle (A). When it is necessary to raise and lower the nozzle for various carpet pile heights, turn the nozzle control knob (B) to the desired setting (Fig.4/6). HIGH LOW 5. Accessories Select proper tool (Fig.5/1) A.
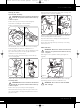
U90-M7 Series User Guide.qxd:UG 16/9/09 15:37 Page 7 Vax Careline 0844 412 8455 2-in-1 Tool Slide brush to remove. To replace brushes, align brushes, align bottom of brush with grooves (A) on tool. Slide brush into place (Fig.5/3). Align end of Extra Reach hose with projections (B) over slots on dirt duct (C). Slide hose into slots and twist hose to lock it into place. Align end of hose with projections (D) over slots (E) on Extra Reach hose.
U90-M7 Series User Guide.qxd:UG 16/9/09 15:37 Page 8 vax.co.uk 6. Maintenance Holding dirt cup over trash receptacle, press dirt cup door release button (A) to open dirt cup door (B) (Fig.6/3). Familiarise yourself with these home maintenance tasks as proper use and care of your cleaner will ensure continued cleaning effectiveness. ! Emptying the Dirt Cup Empty the dirt cup before the dirt reaches the fill line (A). Place the cleaner in the upright position before removing the dirt cup (Fig.6/1).
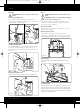
U90-M7 Series User Guide.qxd:UG 16/9/09 15:37 Page 9 Vax Careline 0844 412 8455 Remove black foam filter. Rinse filter frame cartridge and foam filter under cold water (Fig.6/8). Cleaning the Filters Cyclonic Filter Assembly IMPORTANT: Disconnect cleaner from electrical outlet. Do not operate cleaner without dirt cup or filters in place. ! A Remove dirt cup as previously described (Fig.6/2). Twist filter assembly (A) counterclockwise. Remove assembly from dirt cup (Fig.6/6). A Fig.
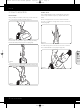
U90-M7 Series User Guide.qxd:UG 16/9/09 15:37 Page 10 vax.co.uk Headlight ! IMPORTANT: Disconnect cleaner from electrical outlet. Removing Headlight Lens Press handle release pedal and place handle in low position. Using a Phillips screwdriver, remove the screw as shown and lift off lens (Fig.6/10). Belts ! IMPORTANT: Disconnect cleaner from electrical outlet. ! WARNING: Brushbar can start suddenly. Unplug cleaner before turning it over.
U90-M7 Series User Guide.qxd:UG 16/9/09 15:37 Page 11 Vax Careline 0844 412 8455 Insert brushbar through belt an position belt in groove (A) on brushbar (Fig.6/18). A B Fig.6/15 A Reposition bottom plate and 6 Phillips head screws. Tighten screws securely (Fig.6/16). Fig.6/18 Brushbar ! IMPORTANT: Disconnect cleaner from electrical outlet. ! WARNING: Brushbar can start suddenly. Unplug cleaner before turning it over.
U90-M7 Series User Guide.qxd:UG 16/9/09 15:37 Page 12 vax.co.uk 7. Troubleshooting ! WARNING: To reduce the risk of personal injury, unplug vacuum cleaner before servicing. PROBLEM: Cleaner won’t run Cause: Solution: Not properly plugged into wall outlet. Plug in firmly. Cause: Solution: No electricity in wall outlet. Check fuse or breaker. Cause: Solution: Blown fuse/tripped breaker. Reset circuit breaker or replace fuse. Cause: Solution: Motor thermostat tripped.
U90-M7 Series User Guide.qxd:UG 16/9/09 15:37 Page 13 Vax Careline 0844 412 8455 10. Technical Specification Voltage: 230 – 240V ~50Hz Wattage: 1500W Capacity: 2.6L Filters: Pre-motor filter assembly HEPA post motor filter Cord Length: 8.3m Weight: 11.8kg Subject to technical change without notice.
U90-M7 Series User Guide.qxd:UG 16/9/09 15:37 Page 14 www.vax.co.uk This page has been left intentionally blank.
U90-M7 Series User Guide.qxd:UG 16/9/09 15:37 Page 15 Vax Careline 0844 412 8455 This page has been left intentionally blank.
U90-M7 Series User Guide.qxd:UG 16/9/09 15:37 Page 16 EEC STATEMENT OF COMPLIANCE Manufacturer/EEC importer: Vax Limited, hereby on our own responsibility, declare that the U90-M7 Mach 7 series upright vacuum cleaner is manufactured in compliance with the following Directives: Safety: 2006/95/EC Low Voltage Directive EMC: 2004/108/EC Electromagnetic Compatibility Directive Waste electrical products should not be disposed of with household waste. Please recycle where facilities exist.