U90-P5 & U90-P6 Series User Guide v1.2.qxd:UG 13/5/10 14:46 Page 1 Vax Careline: (UK) 0844 412 8455 (ROI) 1-800 928 308 Vax model number: U90-P5 Series U90-P6 Series WARNING: This cleaner has a constantly rotating brushbar which, when left in contact with lino, parquet and other hard flooring could potentially cause some damage to the floor surface. ! NOTE: Vax recommends that you raise the height of the brushbar when using this cleaner on lino and hard flooring.
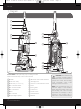
U90-P5 & U90-P6 Series User Guide v1.2.qxd:UG 13/5/10 14:46 Page 2 vax.co.uk 1. Diagram 1 2 3 11 4 12 5 6 13 14 7 8 15 14 9 10 16 17 18 Fig.1/1 PLEASE NOTE: some parts may vary according to model. Please check inside flap of box for more details.
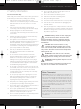
U90-P5 & U90-P6 Series User Guide v1.2.qxd:UG 13/5/10 14:46 Page 3 Vax Careline: (UK) 0844 412 8455 (ROI) 1-800 928 308 2. Safety Information 14. Do not vacuum up hard or sharp objects such as glass, nails, screws, coins, etc. For Household Use Only 15. Do not use without the filters in place. When using the vacuum cleaner, basic safety precautions should always be observed, including the following: 16. Take extra care when vacuuming stairs. 1.
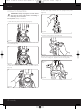
U90-P5 & U90-P6 Series User Guide v1.2.qxd:UG 13/5/10 14:46 Page 4 vax.co.uk 3. How to Assemble ! IMPORTANT: Always unplug the vacuum cleaner from the electrical outlet before assembling or removing the accessories. 4. Place the upper handle onto the upright back panel (Fig.3/4). Tool required: Phillips screwdriver 1. Slide the back panel onto the base (Fig.3/1). Fig.3/4 5. Insert locking part into slot (Fig.3/5). Fig.3/1 2.
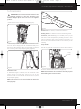
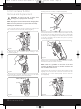
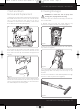
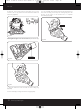
U90-P5 & U90-P6 Series User Guide v1.2.qxd:UG 13/5/10 14:46 Page 5 Vax Careline: (UK) 0844 412 8455 (ROI) 1-800 928 308 7. Clip the TurboTool™ onto the front of the TurboTool™ caddy (Fig.3/7). Fig.3/7 8. Wrap the hose around the back of the hose caddy. Push the hose tube down into the right side of the cleaner to secure (Fig.3/8). properly (Fig.3/10). Fig.3/10 11. Insert the tab on the bottom of the dirt container into the rectangular slot on the cleaner (Fig.3/11). Fig.3/11 Fig.3/8 9.
U90-P5 & U90-P6 Series User Guide v1.2.qxd:UG 13/5/10 14:46 Page 6 vax.co.uk 4. How to Operate Cord Release Handle Release Pedal To release the handle, push the handle release pedal located on the lower left side of the cleaner (Fig.4/2B). Release the power cord by turning the quick cord release. The cord should be inserted into the cord guide while vacuuming to keep it out of the way. Adjustment for Different Floor Types Rotate the height adjust lever to match the surface being cleaned (Fig.4/1).
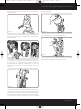
U90-P5 & U90-P6 Series User Guide v1.2.qxd:UG 13/5/10 14:46 Page 7 Vax Careline: (UK) 0844 412 8455 (ROI) 1-800 928 308 5. Accessories IMPORTANT: The vacuum cleaner must be in the upright position to raise the brushbar. The brushbar height adjust must also be at its highest position. ! 1. Remove the hose from the tool caddy (Fig.5/1). Fig.5/3 Crevice tool: for crevices, corners and cracks etc. Dusting brush: for delicate surfaces and skirting board. Fig.5/1 2.
U90-P5 & U90-P6 Series User Guide v1.2.qxd:UG 13/5/10 14:46 Page 8 vax.co.uk 6. Dirt Container & Filter: Removal and Replacement ! 4. Empty the dirt container completely (Fig.6/4). WARNING: To reduce the risk of injury from moving parts, unplug before servicing. NOTE: Unplug the vacuum cleaner before changing filter. NOTE: For best performance, replace filter annually. Cleaning the Central Filter 1. Press the latch above the dirt container and remove the dirt container from the vacuum cleaner (Fig.
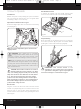
U90-P5 & U90-P6 Series User Guide v1.2.qxd:UG 13/5/10 14:46 Page 9 Vax Careline: (UK) 0844 412 8455 (ROI) 1-800 928 308 7. Belt and Brush: Removal and Replacement 1. Unplug the vacuum cleaner from the mains supply. Press the handle release button and turn the vacuum cleaner over so that the base lies flat and face up. Use a screwdriver to remove the four retaining screws shown above. Remove the nozzle guard (Fig.7/1). 8.
U90-P5 & U90-P6 Series User Guide v1.2.qxd:UG 13/5/10 14:46 Page 10 vax.co.uk 5. Remove the nozzle guard by removing the four (4) screws. Look for any obstructions and remove brushbar if necessary (Fig.8/5). 3. To re-assemble, be sure that the tabs are engaged. Pivot the lower housing closed. Slip the locking ring into the groove at the neck of the TurboTool™ to complete reassembly (Fig.8/8). TABS Fig.8/5 Clearing Blockages from the TurboTool (Some models only) LOCKING RING Fig.8/6 Fig.8/7 1.
U90-P5 & U90-P6 Series User Guide v1.2.qxd:UG 13/5/10 14:46 Page 11 Vax Careline: (UK) 0844 412 8455 (ROI) 1-800 928 308 9. Troubleshooting WARNING: To reduce the risk of personal injury, ! unplug the vacuum cleaner before performing maintenance or troubleshooting checks. PROBLEM: Accessories won’t pick up. Cause: Accessories are not attached correctly. Solution: Refer to page 7 for fitting information. PROBLEM: Vacuum cleaner won't run PROBLEM: Cleaner picks up moveable rugs or pushes too hard.
U90-P5 & U90-P6 Series User Guide v1.2.qxd:UG 13/5/10 14:46 Page 12 vax.co.uk 10. UK Service & Help (UK) 0844 412 8455 (ROI) 1-800 928 308 Monday-Friday 8.30am to 6.30pm Saturday-Sunday 9.00am to 5.00pm Any queries or concerns about using your Vax, call the Vax Careline. Please make a note of the model number and serial number of your Vax before calling. For the nearest Vax Service Agent, please call the Vax Careline or visit vax.co.uk vax.co.uk 11.
U90-P5 & U90-P6 Series User Guide v1.2.
U90-P5 & U90-P6 Series User Guide v1.2.qxd:UG 13/5/10 14:46 vax.co.
U90-P5 & U90-P6 Series User Guide v1.2.
U90-P5 & U90-P6 Series User Guide v1.2.qxd:UG 13/5/10 14:46 Page 16 --- EEC STATEMENT OF COMPLIANCE Manufacturer/EEC importer: Vax Limited, hereby on our own responsibility, declare that the Power 5 & Power 6 series bagless upright vacuum cleaners are manufactured in compliance with the following Directives: Safety: 2006/95/EC Low Voltage Directive EMC: 2004/108/EC Electromagnetic Compatibility Directive Waste electrical products should not be disposed of with household waste.