
Installation guide


Unpacking and Assembling Cabinets 2-29
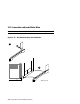
1. Locate a set of three end panel mounting brackets, and associated
Phillips head screws from the installation kit. Each bracket set con-
sists of one wide and two narrow brackets.
2. Attach the three brackets to a cabinet frame as shown in Figure 2-14.
Mount the wide bracket at the top, and the other two at the middle
and bottom of the frame. Each bracket has a "lower lip" which should
be facing upward to properly engage the end panel in the steps that
follow. Align the holes in each bracket with the corresponding
threaded inserts in the frame. Then attach each bracket to the frame
with two Phillips head screws as illustrated in Figure 2-14.
3. Locate an end panel and its two associated 40 mm (1.6 in) long bolts
and washers from the installation kit. For 3-cabinet systems, note
that the battery cabinet end panel is different from the system cabinet
end panel.
4. Position the end panel so that it is centered with respect to the front
and back of the cabinet assembly.
5. Lift the end panel, push in, and lower it while doing the following
three things simultaneously:
a. Engage the tabs of the top bracket with the corresponding holes in
the end panel;
b. Engage the lip of the middle bracket with the corresponding groove
in the end panel; and
c. Engage the lip of the lower bracket with the corresponding groove
in the end panel. When properly installed, the end panel should be
tight and flush against the cabinet frame.
6. Insert the two bolts with washers from the inside of the frame through
the holes in the cabinet frame and into the matching threaded inserts
in the end panel. You may need to tap on the ends of the panel to
align the holes.
7. Carefully tighten the bolts with a 10 mm hex wrench, preferably a
torque wrench. Recommended maximum torque is 20 in-lbs. Do not
overtighten the bolts or bumps on the end panel exterior will appear.
8. Repeat 1 through 7 for the other side of the cabinet assembly.