User Guide Vax Careline: AU: 1300 361 505 NZ: 0800 800 900 Hard floor cleaner Get Cleaning... What’s your Vax’s model number? W V H F M 7 0 0 What’s your serial number? (Located on the base of the machine) W – – – – – Note these down in case you need them in future. Please keep instructions for further use. www.vax.com.
Vax Service line AU: 1300 361 505 / NZ: 0800 800 900
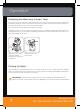
Machine Overview 1 2 3 20 H ARD FL OOR CL EAN ING SOL UTION 16 4 4 5 17 6 7 9 8 18 10 18 15 11 12 Fig.1/1 14 1 2 3 4 5 6 7 8 9 10 11 12 13 14 Soft hand grip On/off switch Solution trigger Mode selector Clean solution tank cap Clean solution tank Clean solution tank release www.vax.com.
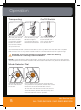
General Safety Information FOR HOUSE HOLD USE ONLY. 17. When using the hard floor cleaner, basic safety precautions should always be observed, including the following: o not attempt to remove blockages with sharp D objects as they may cause damage. 18. tore in doors put away after use to prevent S tripping accidents. 19. sing improper voltage may result in damage to the U motor and possible injury to the user. The correct voltage is listed on the rating label. 20.
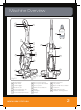
Operation Installing Brushes and Nozzle FIG. 3/1 To install brushes, place handle in upright position. Tilt cleaner back so that it rests on the floor. Align post (A) on brush block with hole (B) on bottom of cleaner. Turn brushes slightly until post fits easily into hole. FIG. 3/2 Unfold Handle FIG. 3/5 Raise upper handle to upright position until it locks in place. FIG. 3/3 Press brush assembly To install nozzle, make firmly to snap into place. sure latches (A) are out.
Operation Transporting FIG. 3/9 On/Off Switch FIG. 3/10 To move your cleaner from room to room, put handle in upright position, tilt cleaner back on rear wheels and push forward. FIG. 3/8 The cleaner may also be lifted using the carrying handle (A) on the front of the cleaner. Push switch (A) once to turn cleaner ON. Push switch again to turn cleaner OFF. Your FloorMate cleaner can be used to both vacuum dry debris and wet clean non-carpeted floor surfaces such as vinyl, tile and sealed wood.
Operation Filling the Solution (Upper) Tank The solution tank holds solution and clean water that is to be dispersed onto the surface being cleaned. NOTE: Disconnect cleaner from electrical outlet. FIG. 4/3 Place cleaner handle in upright, locked position. To remove tank, squeeze release button and pull tank straight out. FIG. 4/4 Carry tank to a sink. Rotate tank cap counter-clockwise and lift up to remove cap (A). FIG. 4/5 Turn cap (A) upside down to serve as a measuring cup.
Operation Emptying the Recovery (Lower) Tank An automatic suction shut-off is built into the recovery tank to prevent the tank from overflowing. When the shutoff activates, the cleaner will not pick up debris and the sound of the motor will change. The recovery tank is full and must be emptied. Turn cleaner off and disconnect from electrical outlet. Although not necessary for satisfactory performance, it is recommended that the recovery tank be emptied after dry vacuuming and before wet operation.
Operation Recommended Cleaning Sequence Use your Vax FloorMate to: Turn Mode selector dial to WASH position. • Dry vacuum to remove loose dirt, hair and debris. Dry hands and plug cleaner into a properly earthed outlet. • Wet clean the floor surface. The brushes will provide light agitation to help loosen dirt. Step on handle release pedal and lower handle to operating position. Turn cleaner ON. • Wet pickup reduces drying time of the floor surface.
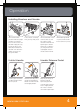
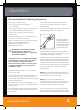
Maintenance (Keep your Vax as good as new) Cleaning the Filters The tank lid contains a washable, reusable filter. Clean this filter when suction is low or reduced. Turn cleaner off and disconnect from electrical outlet. FIG. 6/1 Remove recovery tank and lid as described in Section 4. Remove filter lid (A), then remove filter (B). FIG. 6/2 FIG. 6/3 Remove loose debris from filter by tapping the filter or gently brushing using your hand. The filter may also be rinsed for additional cleaning.
Maintenance (Keep your Vax as good as new) Cleaning the Nozzle Turn cleaner OFF and disconnect from electrical outlet. The cleaner’s nozzle can be removed for easy cleaning. FIG. 6/5 Slide the two nozzle release latches (A) outward. FIG. 6/6 Remove nozzle by pulling straight out. FIG. 6/7 Rinse nozzle under running water. Remove debris from squeegee (A) and wipe with a damp cloth. To replace nozzle, make sure latches are out.
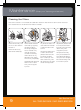
Maintenance (Keep your Vax as good as new) Cleaning the Brushes The brush assembly can be removed for easy cleaning. Turn cleaner OFF and disconnect from electrical outlet. Place handle in the upright position. Remove tanks to prevent leaking. Set aside. Pull the two nozzle release buttons out and remove nozzle as Fig.6/3. Tilt cleaner back so handle rests on floor. FIG. 6/8 Push two brush release buttons (A) and remove the brush assembly. The brushes can be washed with a mild detergent and rinsed.
FAQ’s WARNING: To reduce the risk of personal injury, unplug the hard floor cleaner before performing maintenance/troubleshooting checks. Problem Cause Solution Cleaner won’t run No electricity in the electrical outlet Check fuse or breaker Blown fuse/tripped breaker Reset circuit breaker or replace fuse Automatic shut-off activated Turn cleaner off and then on again or empty the dirty water tank (See page 7).
Other Information Vax Service & Help Vax Careline: Australia 1300 361 505 New Zealand 0800 800 900 Monday-Friday 8.30am to 5.00pm If you have queries or concerns about using your Vax, call the Vax Careline. Calls are charged at the standard local rate. Please make a note of the serial number and model number of the vacuum cleaner before calling. For the nearest Service Agent, please call the Vax Customer Careline or visit www.vax.com.
Notes www.vax.com.
Distributed by Techtronic Industries Pty. Ltd. Level 1, 660 Doncaster Road, Doncaster, Australia 3108. www.vax.com.