
Installation Guide

141108
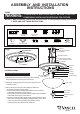
A: 13"
B: 6-1/4"
A
B
4. Attach the ceiling pan to the mounting strap by inserting two long screw heads into the key holes, and rotate the ceiling
pan until it locks in place. Then secure the screws tightly. (See Fig.1)
5. Screw the threaded pipe into the coupling, then secure it with a washer and a lock nut.
NOTE:Depth of threaded pipe may need to be adjusted to properly fit glass shade, decorative cup and finial.
6. Install bulbs (not included). See relamping label at socket area or packaging for maximum allowed wattage.
7. Attach the glass shade to the ceiling pan by inserting the threaded pipe, then secure it with a metal pad and a lock nut.
8. Slip the decorative cup up through the threaded pipe, secure it with the finial.
Turn on the power at fuse or circuit box.
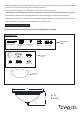
The following parts are available for re-order if damaged or missing.
Spare Parts List:
Mounting Hardware
5253MM
Assembly Kit
5254AA
Lock Nut (H)
Washer (I)
Threaded pipe (J)
Short Mounting
Screw (B)
Green Grounding
Screw (C)
Wire Nut (E)
Mounting Strap (A)
Long
Screw (D)
Metal Pad (K)
Decorative Cup (G)
Finial (F)
Glass Shade
9682FO