
Installation Sheet

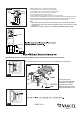

Tighten blades to blade brackets by
using blade screws and washers.
Remove the motor screws and washers
from the fan motor assembly.
Secure blade brackets to the motor with
washers and motor screws.
Note: Making sure the smooth side
of blade bracket is facing downward.
Canopy
Washer
Screw
Hang Bracket
Fig.14
Blade Screw
Blade Bracket
Blade
Washer
Fig.15
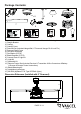
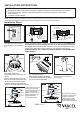
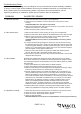
There are four hanger bracket screws and
lock washers. Remove two screws and lock
washers from the hanger bracket (one from
each side) and loosen the other two
remaining screws. Align the “L shaped” slots
of the canopy with the two remaining screws
on the hanger bracket and push the canopy
upwards to engage the slots and turn
clockwise to lock in place. Tighten the
screws and install the other two hanger
bracket screws and lock washers into the
remaining holes of the canopy and tighten.
Fig.12
Hanger
Bracket
Hanger
Ball
Receiver
1.
4.
5.
6.
2.3.
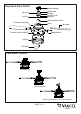
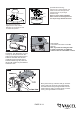
Antenna:
DO NOT CUT
OR SPLICE
Make wire connections:
1) The Motor white wire to the white "To Motor N" wire from
Receiver with a wire connector.
2) The Motor black wire to the black "To Motor L" wire from
Receiver with a wire connector.
3) The Motor blue wire to the blue "For Light" wire from
Receiver with a wire connector.
4) The white wire from Outlet Box to the white "AC in N" wire
from Receiver with a wire connector.
5) The black (hot) wire from Outlet Box to the black "AC in L"
wire from Receiver with a wire connector.
6) The ground wire from Outlet Box to the green ground wire
from the Hanger Ball and the green ground wire from the
Hanger Bracket with a wire connector.
Make sure all of wire connectors are connected firmly.
*** Tuck all wire connectors and wires carefully up into the
Outlet Box.
Fig.13
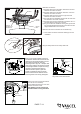
Safety Cable Hook
Safety
Cable
Hang the safety cable into the safety cable hook.
PAGE: 7 / 11
Motor Screws
Motor
Fig.16
Washer
Blade Bracket
210811